Overview
Typically, within a codespace you are able to forward ports privately (only to yourself), to members of your organization, or publicly (to anyone with the URL). For more information, see Forwarding ports in your codespace.
As an organization owner, you may want to configure constraints on the visibility options users can set when forwarding ports. For example, for security reasons, you may want to disallow public port forwarding. You do this by defining one or more policies in the GitHub Codespaces settings for your organization.
Behavior when you set a port visibility constraint
If there are existing codespaces that no longer conform to a policy you have defined, these codespaces will continue to operate until they are stopped or time out. When the user resumes the codespace, it will be subject to the policy constraints.
Note
You can't disable private port forwarding, as private port forwarding is required by GitHub Codespaces to continue working as designed, for example to forward SSH on port 22.
Setting organization-wide and repository-specific policies
When you create a policy you choose whether it applies to all repositories in your organization, or only to specified repositories. If you set an organization-wide policy then any policies you set for individual repositories must fall within the restriction set at the organization level. Adding policies makes the choice of visibility options more, not less, restrictive.
For example, you could create an organization-wide policy that restricts the visibility options to organization only. You can then set a policy for Repository A that disallows both public and organization visibility, which would result in only private port forwarding being available for this repository. Setting a policy for Repository A that allowed both public and organization would result in only organization visibility, because the organization-wide policy does not allow public visibility.
If you add an organization-wide policy, you should set it to the most lenient visibility option that will be available for any repository in your organization. You can then add repository-specific policies to further restrict the choice.
Note
Codespaces policies only apply to codespaces that your organizations pays for. If someone creates a codespace for a repository in your organization at their own expense, then the codespace will not be bound by these policies. For more information, see Choosing who owns and pays for codespaces in your organization.
Adding a policy to limit the port visibility options
-
In the upper-right corner of GitHub, select your profile photo, then click Your organizations.
-
Next to the organization, click Settings.
-
In the "Code, planning, and automation" section of the sidebar, select Codespaces then click Policies.
-
On the "Codespaces policies" page, click Create Policy.
-
Enter a name for your new policy.
-
Click Add constraint and choose Port visibility.
-
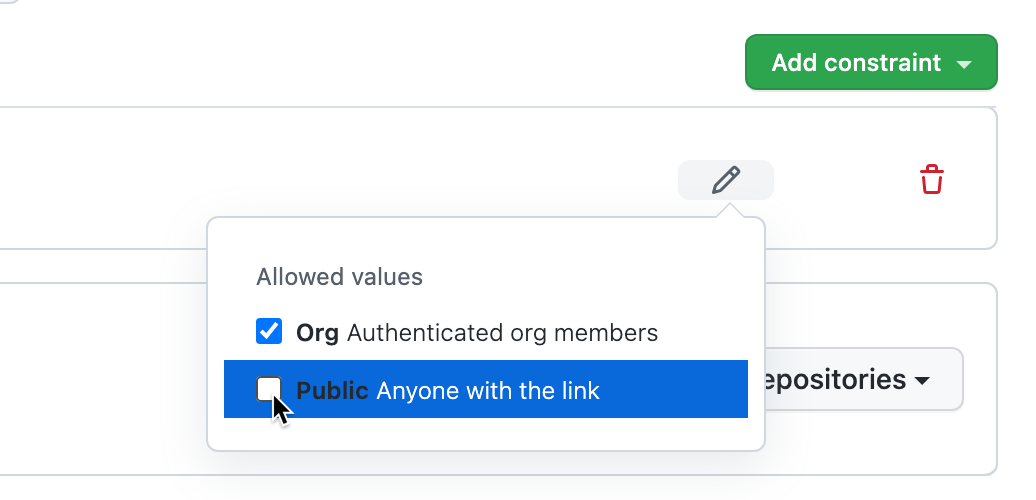
Click to edit the constraint.
-
Clear the selection of the port visibility options (Org or Public) that you don't want to be available.

-
Click outside of the dialog box to close it.
-
By default the policy is set to apply to all repositories, if you want it to apply only to some of the repositories in your organization, click All repositories and then click Selected repositories in the dropdown menu.

Note
If you're adding a constraint to an existing policy that already contains the "Maximum codespaces per user" constraint, you won't be able to apply the policy to selected repositories. This is because the "Maximum codespaces per user" constraint always applies to all repositories in the organization.
With Selected repositories selected:
-
Click .

-
Select the repositories you want this policy to apply to.
-
At the bottom of the repository list, click Select repositories.

-
-
If you want to add another constraint to the policy, click Add constraint and choose another constraint. For information about other constraints, see:
-
After you've finished adding constraints to your policy, click Save.
The policy will be applied to all new codespaces that are billable to your organization. The port visibility constraint is also applied to existing codespaces the next time they are started.
Editing a policy
You can edit an existing policy. For example, you may want to add or remove constraints to or from a policy.
- Display the "Codespaces policies" page. For more information, see Adding a policy to limit the port visibility options.
- Click the name of the policy you want to edit.
- Beside the "Port visibility" constraint, click .
- Make the required changes then click Save.
Deleting a policy
-
Display the "Codespaces policies" page. For more information, see Adding a policy to limit the port visibility options.
-
Click to the right of the policy you want to delete.
