Using the React Context API for Efficient State Management
Last Updated :
23 Jul, 2025
The React Context API is a robust feature announced in React 16.3. It offers a way to share data within components without passing props directly at all stages. This is specifically useful for global data that many components seek to access, like user authentication, theme, or language settings. Rather than prop drilling, Context enables you to create a shared data layer that can be accessed by any component to its extent.
 Using the React Context API for Efficient State Management
When to Use Context API
The Context API is optimal when:
- Global State Management: Use Context API for operating global state in small to medium-sized applications where using more complex state management libraries like Redux might be overwhelming.
- User Authentication: Context API is best for handling user authentication status (logged in/logged out) and user information over varied components without prop drilling.
- Current User Data: When you require providing user-specific data (e.g., user profile, preferences) to multiple components in your app, Context API can help ignore passing props down multiple levels.
- Notification System: Implementing a notification system where notifications need to be shown across varied parts of the application can be optimally controlled with the Context API.
Creating a Context
To create a context, you use the createContext() method. This method returns an object with Provider and Consumer components.
//Creating a context
import React from 'react';

const MyContext = React.createContext();

export default MyContext;
Providing the Context
To provide a value to the Context, wrap the components that need access to the value with the Provider component:
// Providing the context value

function App()
{

  return
  (
    <MyContext.Provider value={{ value, setValue }}>
      {/* Components that can access the context value */}
    </MyContext.Provider>
  );
}

export default App;
Consuming the Context
To consume the Context value in a component, use the useContext hook:
//Consuming the Context

function AnotherComponent()
{
  const contextValue = React.useContext(MyContext);

  //contextValue contains the shared value
}
Using Context with Class Components
To use context in class components, use the static contextType or Context.Consumer.
// Using Context with Class Components

class MyClassComponent extends Component
{
  static contextType = MyContext;

  render()
  {
    const { value } = this.context;
    return <div>{value}</div>;
  }
}

export default MyClassComponent;
Updating Context
To update context values, pass a function through the context and call it from the consuming components.
// Updating Context

function NewComponent()
{
  const { value, updateValue } = useContext(MyContext);

  return
  (
    <div>
      <div>{value}</div>
      <button onClick={updateValue}>Update Value</button>
    </div>
  );
}

export default NewComponent;
Best Practices
- Do not use context too much as it can slow down your app.
- Only use it for data that desires to be shared everywhere.
- In place of one big context, create multiple smaller ones for varied data.
- Set up default values for your context to verify it works although a Provider is hidden.
- Keep your context logic sorted by putting it into custom hooks or helper functions.
- Try not to update context values too often to escape slowing down your app.
Example Project: Counter Application
Let us create an easy counter application that shows the use of the React Context API.
Step 1: First, create a new React project using create-react-app .
npx create-react-app counter-application
Step 2: Navigate to the root directory of project using the following command.
cd counter-application
Project Structure:
 Project structure
package.json
"dependencies": {
    "@testing-library/jest-dom": "^5.17.0",
    "@testing-library/react": "^13.4.0",
    "@testing-library/user-event": "^13.5.0",
    "react": "^18.3.1",
    "react-dom": "^18.3.1",
    "react-scripts": "5.0.1",
    "web-vitals": "^2.1.4"
  }
Step 3: Understand the logic
- In src/contexts/CounterContext.js create the context utilizing React.createContext.
- In src/contexts/CounterProvider.js use useState to control the count state and pass both the count and setCount function to the context value.
- In the App component, we wrap our component tree with the CounterProvider to offer the context to all nested components.
Example: This example shows the use of React Context API.
JavaScript
// src/contexts/CounterContext.js
import React from 'react';

const CounterContext = React.createContext();

export default CounterContext;
// src/contexts/CounterProvider.js

import React, { useState } from 'react';
import CounterContext from './CounterContext';

const CounterProvider = ({ children }) => {
  const [count, setCount] = useState(0);

  return (
    <CounterContext.Provider value={{ count, setCount }}>
      {children}
    </CounterContext.Provider>
  );
};

export default CounterProvider;
// src/components/CounterDisplay.js

import React, { useContext } from 'react';
import CounterContext from '../contexts/CounterContext';

const CounterDisplay = () => {
  const { count } = useContext(CounterContext);

  return <div>Current Count: {count}</div>;
};

export default CounterDisplay;
// src/components/CounterButton.js

import React, { Component } from 'react';
import CounterContext from '../contexts/CounterContext';

class CounterButton extends Component {
  render() {
    return (
      <CounterContext.Consumer>
        {({ setCount }) => (
          <button onClick={() => setCount(prevCount => prevCount + 1)}>
            Increment
          </button>
        )}
      </CounterContext.Consumer>
    );
  }
}

export default CounterButton;
// src/components/CounterControls.js

import React, { useContext } from 'react';
import CounterContext from '../contexts/CounterContext';

const CounterControls = () => {
  const { setCount } = useContext(CounterContext);

  return (
    <div>
      <button onClick={() => setCount(prevCount => prevCount + 1)}>Increment</button>
      <button onClick={() => setCount(prevCount => prevCount - 1)}>Decrement</button>
    </div>
  );
};

export default CounterControls;
//src/App.js

import React from 'react';
import CounterProvider from './contexts/CounterProvider';
import CounterDisplay from './components/CounterDisplay';
import CounterControls from './components/CounterControls';

const App = () => {
  return (
    <CounterProvider>
      <CounterDisplay />
      <CounterControls />
    </CounterProvider>
  );
};

export default App;
// src/index.js

import React from 'react';
import ReactDOM from 'react-dom';
import App from './App';

ReactDOM.render(<App />, document.getElementById('root'));
Run your application using the following command.
npm start
Output:
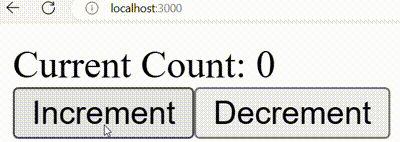 Output
Troubleshooting and Common Issues
- Context Not Updating: Verify you are using a state updater function like setState to update context values.
- Context Value Undefined: Confirm the component consuming the context is wrapped within the Provider.
- Re-Renders: Escape updating context values too often. Use memoization techniques if required.
- Default Values Not Working: Double-check that you have allocated default values when creating the context.
Conclusion
Using the React Context API in your projects enables for organized state management by giving a way to share data over the component tree without prop drilling. By creating a context, defining a provider, and consuming the context, you can organize state handling and intensify the scalability of your application.