If your Windows PC feels unusually slow and unresponsive, the culprit might be a system process called Antimalware Service Executable(MsMpEng.exe). This blog post explains why this process can spike CPU and disk usage and more importantly, how to fix it while keeping your device secure. and you don't know the reason for this sluggish performance.
What is Antimalware Service Executable
The Antimalware Service Executable, also known as "msmpeng.exe", is a background process run by Windows Defender, which is now known as Microsoft Defender Antivirus in newer versions of Windows. This service is responsible for scanning files for malware when accessed, performing background system scans to check for malicious software and malware threats, and implementing real-time protection. It ensures that threats are identified and dealt with swiftly.
However, this service can sometimes use a large amount of CPU and disk resources, which might affect the overall performance of your computer. This is typically noticed during full system scans or when updates are being installed.
Why Does Antimalware Service Executable Use So Much CPU and Disk?
There are many reasons that this process can cause high CPU & Disk Usage and for better understanding reasons are mentioned below:-
- Full System Scan: Occurs during scheduled or on-demand scans.
- Frequent Updates: Defender updates definitions regularly.
- Corrupted system Files: Can cause the scanning process to loop or get stuck.
- Conflict with other antivirus: May cause overlapping scans.
Should You Disable the Antimalware Service Executable?
Deciding whether to disable the Antimalware Service Executable (MsMpEng.exe) is an important consideration that depends largely on your specific circumstances and the security measures you have in place. Here are some points to consider:
- Security Risk: Disabling it reduces your system's defenses unless you have another robust antivirus.
- Alternative Antivirus: If another antivirus is installed, Windows Defender should turn off automatically.
- Performance Concerns: If the service is significantly slowing down your PC, consider disabling it temporarily during high-demand tasks.
- Caution: Generally, keep it enabled for continuous protection unless you're sure of your alternative security measures.
Recommendation: Generally, it's advisable not to disable core security features unless absolutely necessary, especially if no alternative security measures are in place. Regularly update your system and security software to minimize performance issues related to security scans and updates.
How to Stop Antimalware Service Executable - 3 Methods
In this section, you will explore three methods to stop or manage the Antimalware Service Executable process. Additionally, we’ll explain six more effective ways to fix this issue without compromising your device’s security. Whether you're looking to temporarily stop the process or adjust settings to optimize your computer's performance, we’ve got you covered.
Method 1. Disable Windows Defender Antivirus (Not Recommended for Users)
Disabling Windows Defender Antivirus will completely stop Antimalware Service Executable from running. However, doing so can make your computer more vulnerable to malware. It's generally not recommended unless you have a third-party antivirus solution in place.
Step 1: Open Windows Security
- Press Start and type Windows Security, then click on it.
 Windows Security
Step 2: Go to Virus & Threat Protection Settings > Manage Settings
- Click Virus & Threat Protection, then scroll down to Virus & Threat Protection Settings and click Manage Settings.
 Virus & Threat Protection Settings > Manage Settings
Step 3: Turn Off Real-Time Protection
- Windows will turn Real-Time Protection back on after a short period to keep your computer secure.
- Under Real-Time Protection, toggle the switch to Off. This will stop the Antimalware Service Executable process temporarily.
Note: When you'll turning off the Real-Time protection an administration dialogue box will appear saying would you like to make the changes in your settings, click yes on it to turn real time protection off.

Step 4: Disable Windows Defender Permanently (Advanced)
- If you want to stop Antimalware Service Executable permanently, you’ll need to disable Windows Defender via the Group Policy Editor or Registry Editor.
Option 1: For Group Policy Editor
Step 1: Press Windows + R, type gpedit.msc, and press Enter.
Step 2: Navigate to Computer Configuration > Administrative Templates > Windows Components > Microsoft Defender Antivirus.
Step 3: Double-click Turn off Microsoft Defender Antivirus, select Enabled, and click Apply.
Option 2: For Registry Editor
Step 1: Press Windows + R, type regedit, and press Enter.
Note: When you'll pressing Enter, an administration dialogue box will appear saying would you like to make the changes in your settings, click yes on it to turn real time protection off.
Step 2: Navigate to (HKEY_LOCAL_MACHINE\SOFTWARE\Policies\Microsoft\Windows Defender)
Step 3: Right-click on the Window Defender, select New > DWORD (32-bit) Value, and name it DisableAntiSpyware.
Step 4: Set the value to 1 to disable Windows Defender permanently.

Warning: Disabling Windows Defender entirely makes your system vulnerable, so it’s crucial to install and enable a third-party antivirus software before doing so.
Method 2. Disable Windows Defender Service (More Advanced)
If you want to stop Antimalware Service Executable but prefer not to disable Windows Defender entirely, you can stop the Windows Defender service via Services. This will prevent the service from running in the background, which in turn stops the process.
Step 1: Open Services
- Press Windows + R, type services.msc, and press Enter.
Step 2: Find Windows Defender Antivirus Service
- In the "Services" window, find and double-click on "Security Center" (or "Windows Defender Security Center" in newer versions).
Step 3: Stop the Service or Set the Service to Disabled
- In the "Properties" window, set the "Startup type" to "Disabled," then click "Apply" and "OK."
- Restart your computer to apply the changes.
Note: This method may be temporarily effective, but Windows Defender will often restart itself after a system reboot. You might need to repeat this process or combine it with other methods.
Method 3. Adjust Windows Defender's Scheduled Scan Time
If you don't want to completely disable Antimalware Service Executable, but you find its impact on your system during certain times annoying (such as during work or gaming hours), you can adjust the scheduled scan time. This prevents Antimalware Service Executable from running scans during specific periods, which can reduce its performance impact.
Step 1: Open Task Scheduler
- Press Windows + R, type taskschd.msc, and press Enter to open the Task Scheduler.
Step 2: Navigate to Windows Defender's Tasks
- In the left-hand panel, expand the Task Scheduler Library.
- Navigate to:
Microsoft > Windows > Windows Defender
Step 3: Modify the Task for Windows Defender
- You will see several tasks related to Windows Defender. Right-click on Windows Defender and select Properties.
Step 4: Change the Trigger
- Go to the Triggers tab and click Edit.
- You can change the scheduled time for the scan to a time when you're less likely to be using the computer, or disable the task entirely by unchecking the Enabled box.
 Adjust Windows Defender's Scheduled Scan Time
Step 5: Save Changes
- Click OK to save the changes. If you've disabled the task, Antimalware Service Executable will not perform scheduled scans.
How to Minimize the High CPU and Disk Usage from Antimalware Service Executable
Antimalware Service Executable is a key component of Windows Defender, the built-in antivirus tool designed to protect your system from malware and other security threats. However, under certain circumstances, it can consume a significant amount of system resources, leading to slower performance and longer load times. The good news is that you don't have to disable your antivirus protection to resolve this issue. This process is the same for both Windows 10 and Windows 11, and there are several steps you can take to reduce the CPU and disk usage without compromising your system's security.
1. Add Exclusions for High-Usage Files or Folders
One of the simplest ways to reduce high CPU and disk usage caused by the Antimalware Service Executable is to add exclusions. By excluding files or folders from being scanned, you can reduce the scanning load and minimize resource usage. To do this follow the given below steps:-
Step 1: Open Windows Security
- To begin, open the Start menu and typing Windows Security in the search box. Then, click on the Windows Security app from the search results.
 Windows Security
 Step 2: Navigate to Virus & Threat Protection Settings
- Once Windows Security is open, click on Virus & Threat Protection.
 Virus & Threat Protection
Step 3: Virus & Threat Protection > Manage Settings
- Then you'll see Virus & Threat Protection settings under that there will be Manage Settings click on it.
Manage Settings Step 4: Manage Settings > Add Exclusions
- Scroll down until you see the Exclusions section. Click on Add or Remove Exclusions. Now, you can add files, folders, or even file types that you want Windows Defender to skip while scanning. This helps reduce the workload on the CPU by not scanning certain files or folders repeatedly.
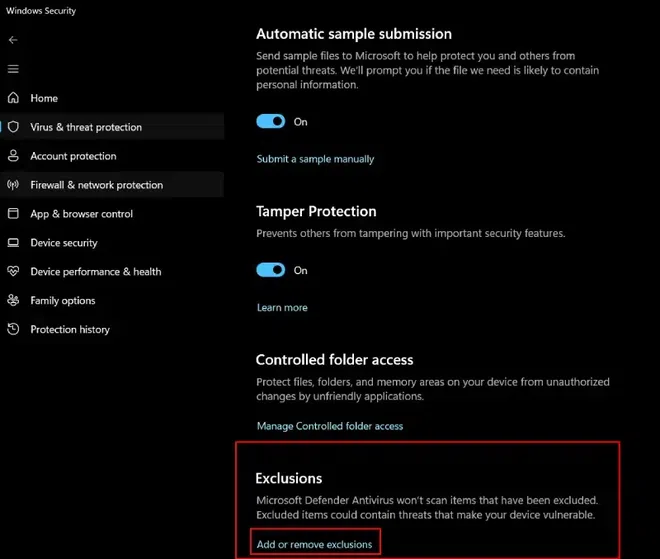 Add or Remove exclusion
 Note: When you'll clicking on Add or Remove Exclusion an administration dialogue box will appear saying would you like to make the changes in your settings, click yes on it to turn real time protection off.
Step 5: Select File or Folder to Add or Remove Exclusion
- Add this MsMpEng.exe file in the exclusion (or the relevant path to MsMpEng.exe on your system).
Important Note: Excluding MsMpEng.exe may expose your system to risks, so it's recommended to exclude it only for temporary troubleshooting purposes and to re-enable protection as soon as possible. Be cautious when excluding files. Only exclude those that you are sure are safe to prevent any security risks.
2. Adjust Windows Defender Scan Schedule
Scheduling Windows Defender to perform scans at times when you’re not using the computer can significantly reduce CPU usage. By adjusting the scan schedule, you can ensure the antivirus software doesn’t run during peak usage hours.
Step 1: Open Task Scheduler
- Press Windows Key + S, type Task Scheduler, and press Enter.
- This opens the Task Scheduler application.
 Task Scheduler
Step 2: Create a Basic Task
- In the Task Scheduler window, click on Action in the top menu, then choose Create Basic Task.
 Create Basic Task
Step 3: Enter a name for the task
- Enter a name for the task (e.g., "Windows Defender Scan") and an optional description, then click Next.

Step 4: Set the Trigger
- Choose Daily, Weekly, or Monthly based on when you want the scan to run. Click Next.
 Set the Trigger
Step 5: Set the start date and time for the scan
- Set the start date and time for the scan. Also, how many times you want this to recur every days.
 Date and time for the scan
Step 6: Choose the Action
- Select Start a Program and click Next.
 Start a Program
 Step 7: Set the Program to Run
- Click Browse and go to the following path
C:\ProgramData\Microsoft\Windows Defender\Platform\<version>\MpCmdRun.exe
Note: Replace <version> with the appropriate version number of the folder you have
- After selecting MpCmdRun.exe, click Open.
Step 8: Add Arguments for the Scan
- In the Add arguments (optional) field, enter the following arguments based on the type of scan you want:
- For a Quick Scan:
-scan -quick - For a Full Scan:
-scan -full - For a Custom Scan:
-scan -custom
- Finish the Setup:
- Click Next, review your task settings, and click Finish.
Task Scheduler Configuration Example:-
- The task will now run at the scheduled time (e.g., daily or weekly) with the specified scan type.
Additional Tips
- Windows Update Scans: Windows Defender usually updates automatically with Windows Update. You can manually check for updates under Settings > Privacy & Security > Windows Security > Virus & Threat Protection > Check for Updates.
- Using PowerShell: You can also run a scan using PowerShell, but scheduling it through Task Scheduler is the most straightforward method.
3. Update Windows and Windows Defender
An outdated version of Windows Defender or the Windows operating system can sometimes cause performance issues. Keeping both up-to-date ensures that you are using the latest versions, which often include bug fixes and optimizations that improve performance.
Step 1: Open Settings and Check for Updates
- Click on the Start menu and select Settings. Navigate to Update & Security and click on Check for Updates. If there are any available updates, make sure to install them.
Step 2: Update Windows Defender
- To update Windows Defender specifically, go to Virus & Threat Protection in Windows Security and click Check for Updates under the Virus & Threat Protection Updates section.
- By keeping both Windows and Windows Defender up-to-date, you’ll prevent potential bugs that might cause the service to consume unnecessary system resources.
4. End Task the Antimalware Service Executable Process Using Task Manager
If you’re looking for a quick fix, ending the Antimalware Service Executable process from the Task Manager can temporarily stop it from consuming too much CPU. Keep in mind that this is only a temporary solution and the process will restart the next time you boot your system.
Step 1: Open Task Manager
- Press Ctrl + Shift + Esc simultaneously to open the Task Manager. Alternatively, right-click the Taskbar and select Task Manager.
Step 2: Locate the Antimalware Service Executable Process
- Under the Processes tab, scroll down and look for Antimalware Service Executable under the Background Processes section.
 Antimalware Service Executable Process
Step 3: End Task
- Right-click the Antimalware Service Executable process and select End Task.
Note: This will immediately stop the process from running, temporarily freeing up your system resources. Remember that it will restart once the system reboots.
 End Task - Antimalware Service Executable Process
A clean boot starts Windows with only the essential system services and drivers, helping you troubleshoot the cause of the high CPU usage. By disabling non-essential services, you can identify if a third-party software or service is causing the issue.
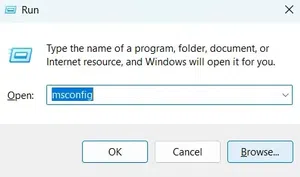
Step 1: Open System Configuration
- Press Windows + R, type
msconfig in the Run dialog, and press Enter. This will open the System Configuration window.
 Open System Configuration
Step 2: Disable Non-Microsoft Services
- Go to the Services tab and check Hide all Microsoft services. Then click Disable All. This ensures that only essential services are running, preventing other services from using up CPU resources.
 Disable Non-Microsoft Services
Step 3: Disable Startup Programs
- Next, click the Startup tab and select Open Task Manager. In the Task Manager, disable all unnecessary startup programs by right-clicking each one and selecting Disable.
 Disable Startup Programs
Step 4: Restart the Computer
- Once you've completed these steps, restart your computer. A clean boot will help identify if a third-party program is causing the high CPU usage.
6. Check for Malware
Sometimes, malware can disguise itself as Antimalware Service Executable, consuming excessive CPU and disk resources. Running a full malware scan with Windows Defender or a trusted third-party antivirus can help identify and remove the issue.
Step 1: Open Windows Security
Open Windows Security by typing it in the Start menu and selecting the app.
Step 2: Run a Full Scan
- Under Virus & Threat Protection. Click on Scan Options and select Full Scan. Then, click Scan Now. A full scan will take longer, but it will thoroughly check your system for malware or any other security threats.
 Run a Full Scan
Conclusion
To stop high CPU and disk usage by the Antimalware Service Executable, try updating Windows Defender and scheduling scans during off-peak hours. Adjust real-time protection settings or exclude specific folders to reduce strain. Perform a full system scan to check for malware, and consider adjusting power settings for better performance. If the issue persists, try resetting Windows Defender or using a third-party antivirus. These steps should help reduce resource usage while maintaining effective protection.
Similar Reads
How to Find the Wi-Fi Password Using CMD in Windows Forgotten your Wi-Fi password? Don't worry you're not alone! Whether you're trying to connect a new phone, set up a smart TV, or help a friend get online, remembering complex Wi-Fi passwords can be a headache. Luckily, you don't need to reset your router or dig through old notebooks. Windows has a h
7 min read
How to Download and Install the Google Play Store The Google Play Store is the heartbeat of your Android experience—home to millions of apps, games, and updates that keep your device functional, fun, and secure. But what if your phone or tablet doesn’t have it pre-installed?In this step-by-step guide, you’ll learn how to safely download and install
6 min read
How to Install YouTube App for Windows Installing the YouTube app on Windows 10 and 11 can enhance your experience with a wide range of contents. Besides, there is no as such official YouTube application available on the Microsoft Store, but you can still install YouTube apps in your Windows 10 or 11 system. This article will provide you
6 min read
How to Change Directories in Command Prompt (CMD) The Command Prompt (CMD) in Windows is a powerful tool for executing commands, managing files, and navigating your system. One of the most common tasks you’ll perform in CMD is changing directories, which allows you to move between folders to access and manage files. But have you know how to change
11 min read
How to List all Files in a Directory using CMD in Windows Are your files buried deep in folders and hard to find? While File Explorer is good for browsing visually, the Windows Command Prompt (CMD) offers a faster and more powerful way to manage and list files. Whether you're troubleshooting, creating backup lists, or writing scripts, the dir command gives
5 min read
How to Clear DNS Cache in Chrome using chrome://net-internals/#dns Command If you're experiencing website loading issues, seeing outdated pages, or encountering network errors in Google Chrome, clearing your DNS cache (also known as host cache) might be the solution. This method is useful if you are facing problems like slow browsing speeds, site access errors, or incorrec
5 min read
How to See deleted Messages on Whatsapp [5 Methods] Ever received a WhatsApp message only to see it disappear with a “This message was deleted†notification? Whether it’s curiosity or the need to retrieve important information, figuring out how to see deleted messages on WhatsApp can feel like solving a mystery. While WhatsApp doesn’t make it easy, t
6 min read
How to Create Any File Using CMD: Learn 5 Methods Creating a file using Windows GUI is quite simple but did you know you can do the same using the Command Prompt (CMD)? This guide will walk you through multiple methods to create files directly from CMD, giving you more control and efficiency in managing your system.How to Create a File in CMDMethod
4 min read
Fixing High CPU & Disk Usage by Antimalware Service Executable (MsMpEng.exe): 9 Proven Solutions" If your Windows PC feels unusually slow and unresponsive, the culprit might be a system process called Antimalware Service Executable(MsMpEng.exe). This blog post explains why this process can spike CPU and disk usage and more importantly, how to fix it while keeping your device secure. and you don'
14 min read
How to Set File Permissions in Linux Ever worried about who can access, modify, or execute your critical files on a Linux system? File permissions are the backbone of Linux security, ensuring that only authorized users and processes interact with your data.In this guide, you’ll learn how to master Linux file permissions using commands
10 min read