How to Cut, Copy and Paste on Windows
Last Updated :
20 Feb, 2025
If you use regularly use a Windows PC, laptop, or any other device, you probably know how essential it is to cut, copy, and paste content. These actions are some of the most basic and time-saving tools to handle text, files, and images on your computer.
In this guide, you will learn some of the quick methods to cut, copy, and paste, from keyboard shortcuts to Clipboard History and beyond. Whether you're on a desktop or laptop, these tricks will make your life much easier. Let’s walk through how to cut, copy, and paste in the easiest way possible.
 How to Cut, Copy and Paste on Windows
How to Cut, Copy, and Paste on Windows PC and Laptop: 8 Easy Methods
Performing the cut, copy, and paste on laptop is one of the most basic task that every user performs in their day-to-day task. Below are the best 8 methods to perform this action, let's find out:
1. Using Keyboard Shortcuts
Keyboard shortcuts are one of the fastest and most efficient ways to copy, cut, and paste on Windows, working across both Windows 10 and Windows 11. Here are the common shortcuts:
- Copy: Select items and press Ctrl + C to copy to the clipboard.
- Cut: Select items and press Ctrl + X to cut (removes from the original location).
- Paste: Go to your destination and press Ctrl + V to paste.
- Paste as plain text (no formatting): Ctrl + Shift + V.
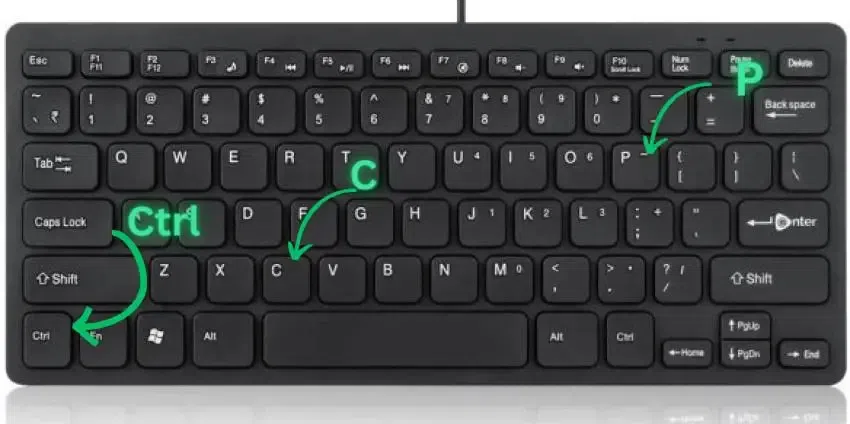 How to Cut, Copy and Paste on using Keyboard
Note: For laptops, these keyboard shortcuts work just the same, so whether you’re on a laptop or desktop, the process is the same!
2. Using Mouse (Right-Click)
This method is helpful for users who prefer working with the mouse rather than keyboard shortcuts. Both Windows 10 and Windows 11 support cut, copy, and paste through the right-click context menu:
- Select the content you wish to cut or copy.
- Right-click the selected item.
- Choose Copy or Cut from the context menu.
- Paste: Right-click in the destination and select Paste from the menu.
 How to Cut, Copy and Paste Using Right-Click (Mouse click)
Note: This method is especially helpful when you’re working with files and folders on your laptop or Windows desktop.
3. Using the Edit Menu (Windows 10/11 and Laptop Apps)
Most apps you use on Windows or laptop come with the traditional cut, copy, and paste options in the Edit menu. This is perfect if you’re working in apps like Microsoft Word, Excel, or Google Docs.
- Highlight the content you wish to copy or cut.
- Go to the Home tab or Edit menu at the top of the window.
- Choose Copy, Cut, or Paste from the options
 WORD
WORDNote: This method is especially useful if you don’t want to rely on shortcuts but still want an easy way to move content around.
4. Using the Clipboard History
Windows 10 and 11 offer a clipboard history feature that allows you to store and access multiple items you've copied. This can be particularly useful if you're working with multiple pieces of content.
- Go to Settings > System > Clipboard.
- Toggle on Clipboard History.
- After enabling it, press Windows + V to view your clipboard history and paste items you've previously copied, including both text and images.
Once Clipboard History is enabled, you can press Windows + V to see your clipboard history. You can then select from previous items that you've copied, making it easier to paste content multiple times without needing to recopy it.
 Clipboard
5. Using the Drag and Drop to Move Files (For Desktop & Laptop)
Another quick method for moving files and folders is dragging and dropping. This works on both Windows desktops and laptops.
- Open File Explorer and locate the file or folder you want to move.
- Click and hold the item, then drag it to the destination folder or location.
- Hold Ctrl while dragging to copy the item (without moving it).
- Release the item to drop it in the desired folder.
 Drag and Go to the Desired Location
Note: This method is especially useful when organizing documents or images on your laptop or desktop.
6. Using PowerShell (Advanced Users)
PowerShell can be a powerful alternative for users who need more control over file management, especially when automating tasks.
Note: You might need admin privileges for certain commands depending on the file's location.
To COPY a file: Use theCopy-Item cmdlet in PowerShell:
Copy-Item "C:\path\to\file.txt" -Destination "D:\path\to\destination\".
 copy-item
To MOVE a file: Use the Move-Item cmdlet to cut and move files:
Move-Item "C:\path\to\file.txt" -Destination "D:\path\to\destination\"
 move-item
Note: These commands allow for batch processing or automation, making it a great option for file management.
7. Using Command Prompt (For Power Users)
In Command Prompt, copying and moving files works similarly, but it requires specific commands and doesn't have a direct paste functionality like the graphical interface.
Note: To paste text into CMD, simply right-click and select Paste, or use the Ctrl + Shift + V shortcut (in newer versions of CMD).
Copy Files
Use the following command to copy any dedicated file:
For example:
copy C:\path\to\file.txt D:\path\to\destination\
 copy via cmd
Cut Files
Use the move command to cut and move files:
For example:
move C:\path\to\file.txt D:\path\to\destination\.
 cut and move via cmd
Paste Files
CMD doesn't have a direct paste command. However, you can drag and drop a file into the CMD window to get its path and then use copy or move commands to copy or cut.
Note: While the Command Prompt is less user-friendly for copy-paste tasks, it can be helpful for advanced users managing large numbers of files or automating tasks.
If you need to copy a screenshot, Snipping Tool (or Snip & Sketch on Windows 10/11) is your go-to tool.
- Open Snipping Tool or Snip & Sketch.
- Select the type of snip you want (free-form, rectangular, window, or full-screen).
- After taking the screenshot, click the Copy button or press Ctrl + C.
- Paste the screenshot into your document, email, or other application using Ctrl + V.
 Snipping Tool
Note: This tool is great for copying and pasting visual content like screen captures into documents, emails, or presentations.
Conclusion
Cutting, copying, and pasting are some of the most useful tasks on your Windows PC or laptop. With 2025 updates, including Clipboard History, drag-and-drop functionality, and keyboard shortcuts, these actions are now faster and more efficient than ever. Whether you’re working with files, text, or images, these methods will help you work smarter, not harder.
Similar Reads
How to Copy, Cut and Paste in Vi editor The Vi editor, a powerful text editor found in most Unix-based systems, is a favourite tool for developers, system administrators, and IT professionals. It’s highly efficient for editing text files in the command line interface (CLI). However, many new users often find it challenging to work with ba
11 min read
How to Fix Copy and Paste Not Working in Windows 10? Experiencing issues with copy and paste not working in Windows 10 can be frustrating, especially when you rely on these basic functions for daily tasks. This problem can arise due to various reasons, including Windows 10 clipboard problems or system bugs. In this guide, we’ll explore different ways
5 min read
How to Copy, Cut and Paste Files in Mac Copying and pasting is one of the most basic tasks on any operating system. For macOS, this function is performed using a combination of simple keyboard shortcuts or mouse actions. Whether you’re using a MacBook, Mac mini, or iMac, mastering these essential features can significantly boost your prod
7 min read
How to Copy & Paste in Android? Quick Solution!Here is a quick solution for our active and speedy learners. Follow these steps to Copy and Paste on Android devices. Hold down the text that you want to copy.You will get a few options. Click on the Copy option.On the page where you want to paste, hold it down.Click on the Paste opti
5 min read
How to Copy Paste in Vim Editor Copying and pasting in Vim Editor is an essential operation for efficient text editing. Vim offers several methods to copy and paste content, including visual mode selection, yanking, and putting. Understanding these techniques can significantly enhance your productivity when working with Vim. In th
3 min read
How to Enable Copy and Paste in Oracle VirtualBox? In this article, we will see how to enable copy and paste from a Windows host to a VirtualBox and vice-versa. We've taken the VirtualBox guest additions which gives us various additional tooling, specifically giving us the ability to copy and paste. It also enables bi-directional copy and pastes. St
1 min read