Steps to Create, Test and Deploy Ethereum Smart Contract
Last Updated :
20 May, 2024
Smart contracts are self-execution programs stored on a blockchain that are automatically executed when predefined conditions are met. They allow the participants on the blockchain to transact with each other without a trusted central authority. After creating a smart contract, the next step is to deploy the smart contract onto a blockchain for execution. For this purpose, developers often use development tools such as Remix IDE. This article focuses on discussing steps to create, test, and deploy the Ethereum Smart Contract on Remix Tool.
What is Remix IDE?
Remix IDE is a no-setup tool with a GUI that is used for smart contract development. It is famous for the visual debugger and allows for a simple deployment process.
- It is a browser-based editor.
- It is used for writing, testing, and debugging smart contracts written in Solidity programming language.
- It comes with syntax highlighting, auto-completion, and code analysis features.
- It provides a user-friendly interface making it accessible to developers of all skill levels.
Getting Started With Remix IDE
Step 1: Open the Remix IDE in your browser following the URL https://remix.ethereum.org/. You will be presented to the following screen:
 Remix IDE
Step 2: Click on the file explorer icon onto the left side bar.
 File Explorer
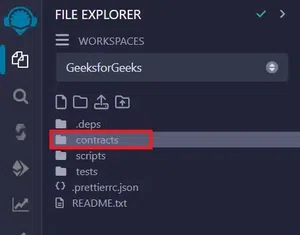
Step 3: Click on contracts as indicated in the below figure:
 contracts
Step 4: Click on HelloWorld.sol and you will be presented with the code editor with the default code on the editor.
 HelloWorld.sol
 Code Editor
What is Solidity Programming Language?
Solidity is a statically typed programming language that is designed for developing smart contracts that run on Ethereum.
- It is a contract-oriented and high-level programming language.
- It supports complex programming features like inheritance, libraries, and user-defined data types, among other features.
- It has syntax similar to that of JavaScript.
- The file extension of the Solidity file is .sol.
- It is used to create smart contracts for various purposes such as voting, muti-signature wallets, and many more.
Below is the Solidity program of the default code in the code editor:
Solidity
// SPDX-License-Identifier: MIT
pragma solidity >=0.6.12 <0.9.0;

contract HelloWorld {
  /**
   * @dev Prints Hello World string
   */
  function print() public pure returns (string memory) {
    return "Hello World!";
  }
}
Explanation:
1. SPDX License Identifier
// SPDX-License-Identifier: MIT
SPDX License Identifiers are standardized abbreviations for common open-source software licenses.
2. Version Pragma
pragma solidity >=0.6.12 <0.9.0;
Pragma are the instructions to the compiler on how to treat the code. This line states that the code is compatible with a version greater than or equal to 0.6.12 but less than 0.9.0.
3. The contract keyword
contract HelloWorld {
}
The contract keyword is used to declare a contract HelloWorld consisting of functions and data.
4. Function declaration
function print() public pure returns (string memory)
The print() function will print the string value on the console. The function has an access modifier public and is declared as pure as it does not read or modify the variables of the state.
5. Return statement
return "Hello World!";
The return statement prints the string Hello World! on the console.
Output:
 Default Code Output
How to Develop Smart Contract on Remix IDE?
Follow the steps below to develop a smart contract on Remix IDE:
Step 1: Open the Remix IDE and click on the File Explorer.
Step 2: Select create a new workspace option from the drop-down menu.
 create a new workspace
Step 3: Enter the name of the new workspace GeeksforGeeks.
 New workspace
Step 4: In the workspace GeeksforGeeks, right-click on the option contracts and select the option New File.
 Create New File
Step 5: Create a new file Bank.sol.
 Bank.sol
Step 6: Paste the below code in Bank.sol.
Solidity
// SPDX-License-Identifier: MIT
pragma solidity >=0.7.0 <0.9.0;

contract Bank
{
    address Owner;

    // Creating the Mapping for the Adding &
    // Transfer Amount in Account
    mapping(address=>uint)Balance;

    // Constructor for the address of the Owner
    constructor()
    {
        Owner = msg.sender;
    }


    // Function for adding the Ethereum in Account
    function depositBalance(uint amount) public returns(uint)
    {
        // First check whether it is Owner's Account or Not
        require(msg.sender == Owner, "This is Owner's Account !!");
        Balance[msg.sender] = Balance[msg.sender] + amount;

        return Balance[msg.sender];
    }

    // Function to Get the Balance from an Account
    function displayBalance() public view returns(uint)
    {
        return Balance[msg.sender];
    }

    // Function to transfer the Amount from Owner to Recipient
    function Transfer(address recipient, uint amount) public
    {
        // Function to check the Self account is or not
        require(msg.sender != recipient, "Can't Transfer !! Self Account.");

        // Function to check the owner has balance is available or not
        require(Balance[msg.sender] >= amount, "Insufficient Balance !!");

        _transfer(msg.sender, recipient, amount);
    }

    function _transfer(address From, address To, uint Amount) private
    {
        Balance[From] = Balance[From] - Amount;
        Balance[To] = Balance[To] + Amount;
    }
}
Explanation:
There are 4 functions in the smart contract Bank.sol:
- depositBalance()
- require(msg.sender == Owner, "This is Owner's Account !!") : Address is checked to determine if it is owner's address or not.
- Balance[msg.sender] = Balance[msg.sender] + amount : Amount is added to the available balance in the account.
- transfer()
- require(msg.sender != recipient, "Can't Transfer !! Self Account.") : This checks recipient address against sender's address, if the address is matching a message is displayed "Can't Transfer !! Self Account".
- require(Balance[msg.sender] >= amount, "Insufficient Balance !!") : This checks whether the requested amount is less than the available balance or not. If not, then a message is displayed "Insufficient Balance".
- _transfer(msg.sender, recipient, amount): If recipient address is correct and balance is available then _transfer() function is invoked.
- _transfer()
- Balance[From] = Balance[From] - Amount: Balance is deducted from sender's account.
- Balance[To] = Balance[To] + Amount: Balance is added to recipient's account.
- displayBalance()
- return Balance[msg.sender]: This will display sender's account balance.
Steps to Compile the Smart Contract
Smart Contact can be Compiled by two methods:
- Manual Compile
- Auto Compile
Manual Compile
In manual compilation, the developer has to manually compile the smart contract after every change before deploying it.
Step 1: Click on the Compile Bank.sol option as shown in the figure below:
 Compile Bank.sol
Step 2: This will show the compilation details.
 Compilation Details
Auto Compile
This option when enabled will automatically compile the code after every change and there is no need to manually perform the above steps for compiling the smart contract before deploying it.
Select the Auto Compile option as shown below:
 Auto Compile
By selecting this option, the smart contract will be compiled automatically.
Steps to Deploy the Smart Contract
Follow the step below to execute the code after successful compilation:
Step 1: To execute the code, click on Deploy button under the Deploy and Run transactions window.
 Deploy Bank.sol
Working of Deployed Smart Contract
After deploying the code, click on the method button under the drop-down of deployed contracts to invoke the method, and for the output scroll down to see the result.
 Execute Bank.sol
Function 1: Deposit Balance
Add amount and click on transact. Click on displayBalance and the total balance in the account will be displayed.
 Deposit Balance
Function 2: Transfer:
To transfer amount, add Recipient address, amount to transfer and click on transact button. Click on displayBalance button and the total balance in the account will be displayed.
 Transfer Balance
Conclusion
Writing and deploying smart contracts may seem challenging but with the right development tools and knowledge, it can be a simple process. In this article, we have walked through the process of using Remix IDE for developing and deploying the smart contract. By following the step-by-step guide, one can start building a smart contract and harness the power of Blockchain Technology.
Similar Reads
Non-linear Components In electrical circuits, Non-linear Components are electronic devices that need an external power source to operate actively. Non-Linear Components are those that are changed with respect to the voltage and current. Elements that do not follow ohm's law are called Non-linear Components. Non-linear Co
11 min read
Spring Boot Tutorial Spring Boot is a Java framework that makes it easier to create and run Java applications. It simplifies the configuration and setup process, allowing developers to focus more on writing code for their applications. This Spring Boot Tutorial is a comprehensive guide that covers both basic and advance
10 min read
Class Diagram | Unified Modeling Language (UML) A UML class diagram is a visual tool that represents the structure of a system by showing its classes, attributes, methods, and the relationships between them. It helps everyone involved in a project—like developers and designers—understand how the system is organized and how its components interact
12 min read
Backpropagation in Neural Network Back Propagation is also known as "Backward Propagation of Errors" is a method used to train neural network . Its goal is to reduce the difference between the model’s predicted output and the actual output by adjusting the weights and biases in the network.It works iteratively to adjust weights and
9 min read
3-Phase Inverter An inverter is a fundamental electrical device designed primarily for the conversion of direct current into alternating current . This versatile device , also known as a variable frequency drive , plays a vital role in a wide range of applications , including variable frequency drives and high power
13 min read
Polymorphism in Java Polymorphism in Java is one of the core concepts in object-oriented programming (OOP) that allows objects to behave differently based on their specific class type. The word polymorphism means having many forms, and it comes from the Greek words poly (many) and morph (forms), this means one entity ca
7 min read
CTE in SQL In SQL, a Common Table Expression (CTE) is an essential tool for simplifying complex queries and making them more readable. By defining temporary result sets that can be referenced multiple times, a CTE in SQL allows developers to break down complicated logic into manageable parts. CTEs help with hi
6 min read
What is Vacuum Circuit Breaker? A vacuum circuit breaker is a type of breaker that utilizes a vacuum as the medium to extinguish electrical arcs. Within this circuit breaker, there is a vacuum interrupter that houses the stationary and mobile contacts in a permanently sealed enclosure. When the contacts are separated in a high vac
13 min read
Python Variables In Python, variables are used to store data that can be referenced and manipulated during program execution. A variable is essentially a name that is assigned to a value. Unlike many other programming languages, Python variables do not require explicit declaration of type. The type of the variable i
6 min read
Spring Boot Interview Questions and Answers Spring Boot is a Java-based framework used to develop stand-alone, production-ready applications with minimal configuration. Introduced by Pivotal in 2014, it simplifies the development of Spring applications by offering embedded servers, auto-configuration, and fast startup. Many top companies, inc
15+ min read