How to Set Up and Use Email Client in Windows 11?
Last Updated :
16 Apr, 2025
Setting up an email client, on Windows 11 is a task that allows you to efficiently manage all your emails from a place. Whether you opt for the default Mail program or choose a third-party client such, as Outlook or Thunderbird! Using an email client can boost your productivity. Streamline communication efforts significantly. Throughout this article guide, we will assist you in configuring and utilizing an email client on Windows 11 to help you stay connected effortlessly.
How to Set Up Email in Windows 11 Mail App?
The first step to use the Mail app is to add your email account to it. You can do this by following these steps:
Step 1: Press Win + S then on the search bar type "Mail' then open it

After opening the Mail application you will see a list of ways to sign like google Gmail, outlook, yahoo, etc. Choose any method and enter the email and password

If you have already signed in with another account now you want to add one more account then follow these steps:
Step 1: Open the Mail App then click on the settings Icon on the the left side panel
Step 2: On the right side pane click on "Manage Account" then click on "Add Account"

Step 3: A window will pop up from the options list you can choose any like Gmail, Outlook, or Yahoo, and then click on sign in

You may need to enter a verification code or permit the Mail app to access your account.
After your account has been added you can see your inbox and other folders on the left pane. You can also change between accounts by clicking the the account name.
How to Add An Account Using An Advanced Setup?
Step 1: Press Win + S then on the search bar type "Mail' then open it
Step 2: On the right side pane click on "Manage Account" then click on "Add Account"
Step 3: A window will pop up from the options list Click on "Advanced setup"
Step 4: After clicking on "Advanced setup" you will see two options "Exchange ActiveSync", and "Internet email". You can choose any of them
- "Exchange ActiveSync" syncs data with Microsoft Exchange Server on mobile devices.
- "Internet email account" refers to standard email from ISPs or online services.
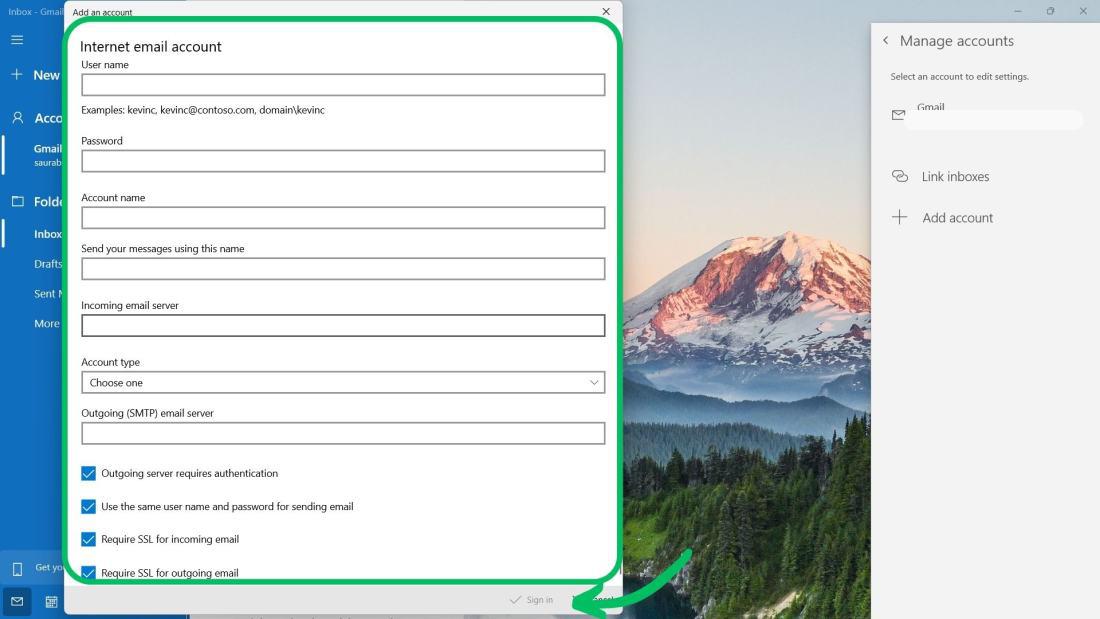
Step 5: Under the Advanced setup windows type the following information
- Email address: Enter your full email address, including the domain.
- Username: Enter your whole account name in [email protected] format.
- Password: Your Windows Mail app password. (What is an app password?)
- Account name: provide an account to refer to this account in the future.
- Send your messages using this name: This is shown in the From field of your emails.
- Incoming email server: Set to imap.fastmail.com
- Account type: Set to IMAP4
- Outgoing SMTP server: Set to smtp.fastmail.com
- The outgoing server requires authentication: Leave it as it is.
- Use the same username and password for sending email: Leave it as it is.
- Require SSL for incoming email: Leave it as it is.
- Require SSL for outgoing email: Leave it as it is.
Step 6: After entering all the information click on the "Sign In" button
How to Use Email Client in Windows 11?
Once you have added your email accounts to the Mail app, you can start to send and read emails, manage your contacts, and organize your emails. Here are some tips on how to use the Mail app in Windows 11:
Compose a new email:
- Click on the New mail icon or press Ctrl+N.
- Enter the recipient's email, subject, and message.
- Attach files/images, format text, add emojis, or insert tables.
- Click Send or press Ctrl+Enter when done.

Read an email
- Click on the email in the message list.
- Reply, forward, delete, or mark as unread.
- Move to a folder, flag, or mark as spam via right-click.
Search for an email
- Type the keyword in the Search box and press Enter.
- Filter results by date, sender, folder, or attachment.

Organize messages
- Create new folders by right-clicking and selecting New folder.
- Assign categories by right-clicking and choosing Categorize.
- Set rules to automate actions via Settings > Manage rules.
Conclusion
Installing an email app on Windows 11 not only makes handling your emails easier but also boosts your productivity. By stick to the instructions provided, you can effortlessly install your chosen email app, personalize its settings, and begin sending and receiving emails quickly. Dive into the different functionalities your email app provides to optimize your email communication experience.
Also Read
Similar Reads
How to Set Up and Use Remote Desktop in Windows 10?
The Remote Desktop feature in Windows 10 allows you to access and control another computer remotely from anywhere. Whether you need to manage files, troubleshoot issues, or connect to your work machine, knowing how to set up a Remote Desktop in Windows 10 is essential. This guide will walk you throu
4 min read
How to Create a New User in Windows 10
Setting up a new user account in Windows 10 is essential for enhancing user experience and ensuring that your Windows 10 is running safely and securely. You can create a new user account for any Guest, Family member, Children etc. in just a few steps using different methods. Create a New User Accoun
6 min read
How to Create a New User Account in Windows?
Learning how to create a new user account in Windows is essential for managing multiple users on your computer. Whether you're using Windows 10 or Windows 11, the process is straightforward and helps you set up personalized environments for different users. In this guide, we'll walk you through the
4 min read
How to Zip and Unzip Files in Windows 11?
Zipping and unzipping files is a common task that helps reduce file size or bundle multiple files together for easier sharing. In this guide, we'll cover 3 easy methods to zip and unzip files in Windows 11 for free. Whether you're using built-in features or looking for quick ways to compress files i
4 min read
How to Create a Microsoft Account in Windows 11?
Welcome, everyone! Today I will assist in demonstrating proving procedures of creating a new MS account or linking an existing one to Windows 11. Most of the time, Windows 11 OS can be run without creating this or that account, yet it is impossible to appreciate all the features of the new OS to the
4 min read
How to Set Up a VPN in Windows 11: A Beginner’s Guide [2025]
A Virtual Private Network (VPN) is a powerful tool that secures your internet connection by encrypting data and masking your IP address. It helps protect your privacy, secure sensitive information, and access geo-restricted content with ease. Whether you want to browse anonymously or ensure your onl
9 min read
How to Manage User Accounts in Windows 10?
Knowing how to manage user accounts in Windows 10 is essential for both personal and business use. Whether you're setting up multiple users on one device or managing Windows 10 user account settings for a family or team, this guide will walk you through the basics of creating, modifying, and removin
6 min read
How to Set Up Windows 11 Remote Desktop Access?
If you want to set up Windows 11 Remote Desktop, you're in the right place. The Remote Desktop feature on Windows 11 allows you to access and control your PC from another device, making it ideal for remote work or managing files from anywhere. This guide will walk you through enabling Remote Desktop
4 min read
How to Change Font Size on Windows 11?
Are you struggling to change the font size on Windows 11 system? Look no further! This guide is here to help you guide through the process with ease. Windows 11 offers a variety of options when it comes to customizing your display, including changing the size of text in windows 11 to better suit you
5 min read
How to Uninstall an Application on Windows 11?
Uninstalling applications on Windows 11 is a straightforward process that can help you free up space and keep your system running smoothly. Whether you're removing unused software, troubleshooting issues, or simply cleaning up your PC, knowing how to uninstall programs efficiently is essential. In t
6 min read