Popup Menu in Android With Example
Last Updated :
11 Feb, 2025
In Android development, Menus are an important part of the user interface, providing users with easy access to common functionalities and ensuring a smooth and consistent experience throughout the application. In Android, we have three types of Menus available to define a set of options and actions in our android applications. The Menus in android applications are the following:
- Android Options Menu: Android Options Menu is a primary collection of menu items in an android application and is useful for actions that have a global impact on the search application.
- Android Context Menu: Android Context Menu is a floating menu that only appears when the user clicks for a long time on an element and is useful for elements that affect the selected content or context frame.
- Android Popup Menu: Android Popup Menu displays a list of items in a vertical list which presents the view that invoked the menu and is useful to provide an overflow of actions related to specific content.
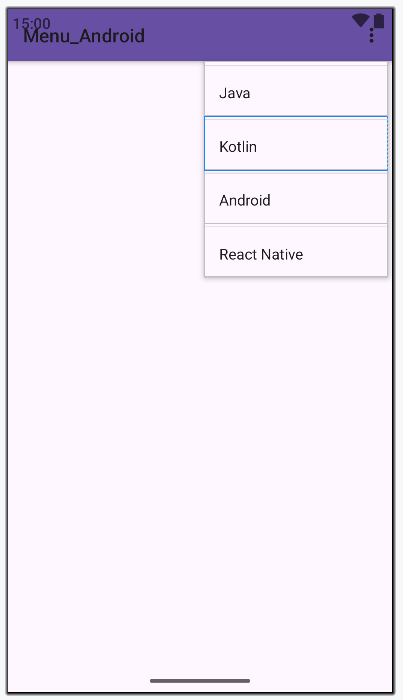
In this article, we are going to discuss the Popup Menu. A PopupMenu displays a Menu in a popup window anchored to a View. The popup will be shown below the anchored View if there is room(space) otherwise above the View. If any IME(Input Method Editor) is visible the popup will not overlap it until the View(to which the popup is anchored) is touched. Touching outside the popup window will dismiss it.
Example
In this example, we are going to make a popup menu anchored to a Button and on click, the popup menu will appear, and on a touch of the popup menu item, a Toast message will be shown. A sample video is given below to get an idea about what we are going to do in this article.
Note that we are going to implement this project using both Java and Koltin language.
Step By Step Implementation
Step 1: Create a New Project in Android Studio
To create a new project in Android Studio please refer to How to Create/Start a New Project in Android Studio.
The code for that has been given in both Java and Kotlin Programming Language for Android.
Step 2: Working with the XML Files
Next, go to the activity_main.xml file, which represents the UI of the project. Below is the code for the activity_main.xml file.
activity_main.xml:
XML
<androidx.constraintlayout.widget.ConstraintLayout
    xmlns:android="http://schemas.android.com/apk/res/android"
    xmlns:app="http://schemas.android.com/apk/res-auto"
    xmlns:tools="http://schemas.android.com/tools"
    android:layout_width="match_parent"
    android:layout_height="match_parent"
    android:background="@color/white"
    android:id="@+id/main"
    tools:context=".MainActivity">

    <Button
        android:id="@+id/clickBtn"
        android:layout_width="wrap_content"
        android:layout_height="wrap_content"
        android:backgroundTint="@android:color/holo_green_dark"
        android:text="Click Me"
        app:layout_constraintBottom_toBottomOf="parent"
        app:layout_constraintLeft_toLeftOf="parent"
        app:layout_constraintRight_toRightOf="parent"
        app:layout_constraintTop_toTopOf="parent" />

</androidx.constraintlayout.widget.ConstraintLayout>
Design UI:

Step 3: Create Menu Directory and Menu file
First, we will create a menu director which will contain the menu file. Go to app > res > right-click > New > Android Resource Directory and give the Directory name and Resource type as menu.

Now, we will create a popup_menu file inside that menu resource directory. Go to app > res > menu > right-click > New > Menu Resource File and create a menu resource file and name it popup_menu. In the popup_menu file, we will add menu items. Below is the code snippet for the popup_menu.xml file.
popup_menu.xml
XML
<?xml version="1.0" encoding="utf-8"?>
<menu xmlns:android="http://schemas.android.com/apk/res/android">
    <item
        android:id="@+id/java"
        android:title="Java" />

    <item
        android:id="@+id/kotlin"
        android:title="Kotlin" />

    <item
        android:id="@+id/android"
        android:title="Android" />

    <item
        android:id="@+id/react_native"
        android:title="React Native" />
</menu>
Design UI:
Step 4: Working with the MainActivity file
In the MainActivity file, we will get the reference of the Button and initialize it. Add onClick behavior to the button and inflate the popup menu to it. Below is the code snippet for the MainActivity file.
MainActivity File:
Java
package org.geeksforgeeks.demo;

import android.os.Bundle;
import android.view.MenuItem;
import android.widget.Button;
import android.widget.PopupMenu;
import android.widget.Toast;
import androidx.appcompat.app.AppCompatActivity;

public class MainActivity extends AppCompatActivity {

    private Button button;

    @Override
    protected void onCreate(Bundle savedInstanceState) {
        super.onCreate(savedInstanceState);
        setContentView(R.layout.activity_main);

        // Referencing and Initializing the button
        button = findViewById(R.id.clickBtn);

        // Setting onClick behavior for the button
        button.setOnClickListener(v -> {
            // Initializing the popup menu and giving the reference as current context
            PopupMenu popupMenu = new PopupMenu(MainActivity.this, button);

            // Inflating popup menu from popup_menu.xml file
            popupMenu.getMenuInflater().inflate(R.menu.popup_menu, popupMenu.getMenu());

            // Handling menu item click events
            popupMenu.setOnMenuItemClickListener(menuItem -> {
                Toast.makeText(MainActivity.this, "You Clicked " + menuItem.getTitle(), Toast.LENGTH_SHORT).show();
                return true;
            });

            // Showing the popup menu
            popupMenu.show();
        });
    }
}
package org.geeksforgeeks.demo

import android.os.Bundle
import android.widget.Button
import android.widget.PopupMenu
import android.widget.Toast
import androidx.appcompat.app.AppCompatActivity

class MainActivity : AppCompatActivity() {
    private lateinit var button: Button

    override fun onCreate(savedInstanceState: Bundle?) {
        super.onCreate(savedInstanceState)
        setContentView(R.layout.activity_main)

        // Referencing and Initializing the button
        button = findViewById(R.id.clickBtn)

        // Setting onClick behavior to the button
        button.setOnClickListener {
            // Initializing the popup menu and giving the reference as current context
            val popupMenu = PopupMenu(this@MainActivity, button)

            // Inflating popup menu from popup_menu.xml file
            popupMenu.menuInflater.inflate(R.menu.popup_menu, popupMenu.menu)
            popupMenu.setOnMenuItemClickListener { menuItem ->
                // Toast message on menu item clicked
                Toast.makeText(this@MainActivity, "You Clicked " + menuItem.title, Toast.LENGTH_SHORT).show()
                true
            }
            // Showing the popup menu
            popupMenu.show()
        }
    }
}
Output:
Similar Reads
Context Menu in Android with Example In Android, there are three types of menus available to define a set of options and actions in the Android apps. Here in this article let's discuss the detail of the Context Menu. In Android, the context menu is like a floating menu and arises when the user has long-pressed or clicked on an item and
4 min read
OpenIntents in Android with Example OI refers to the "OpenIntents" project in Android are a way for one app to request an action from another app. This can be done using either explicit or implicit intents, allowing them to share functionality. The OpenIntents project provides a set of commonly-used intents that can be used by develop
4 min read
Android ListView in Java with Example A ListView in Android is a type of AdapterView that displays a vertically scrollable list of items, with each item positioned one below the other. Using an adapter, items are inserted into the list from an array or database efficiently. For displaying the items in the list method setAdaptor() is use
3 min read
Sub-Menu in Android In android, Menu is an important part of the UI component which is used to provide some common functionality around the application. With the help of Menu, users can experience a smooth and consistent experience throughout the application. In order to use the Menu, we should define it in a separate
3 min read
Circle Menu in Android A circle menu (also known as a radial menu, round menu, circular menu) is a creative menu design concept that arranges the sub-menu items around a circle or arc style menu toggle button. Circle Menu in AndroidWhat we are going to build in this article? Here we will see how to implement a circular me
3 min read