How to Validate Nested Objects with Class-Validator in Nest.js?
Last Updated :
16 Oct, 2024
Validating nested objects in Nest.js using the class validator is crucial for ensuring the integrity and structure of incoming data, especially when dealing with complex data models. Class validator works seamlessly with Nest.js to validate incoming request data using Data Transfer Objects (DTOs). This process helps in enforcing rules, such as required fields, data types, and nested object validation.
These are the following topics that we are going to explore:
Key Concepts
- DTOs (Data Transfer Objects): Used to define the shape and structure of data being transferred, DTOs in Nest.js help in validating and transforming the data.
- Nested Objects: When DTOs contain properties that are objects themselves, those nested objects need their own validation rules.
- class-validator: A library that provides a set of decorators and utility functions to validate objects against specified rules.
- class-transformer: This library helps in transforming plain JavaScript objects into instances of classes, which is essential for nested validation.
How Does It Work?
- Define DTOs: Create classes that represent the structure of the data, using class-validator decorators to specify validation rules.
- Nested Validation: For nested objects within a DTO, use the @ValidateNested decorator to ensure that nested objects are validated according to their own rules.
- Apply in Controllers: Use these DTOs in controller methods to automatically validate incoming requests.
- Global Validation Pipe: Enable a global validation pipe in Nest.js to enforce validation across the entire application.
Why Validate Nested Objects?
- Data Integrity: Ensures that the nested objects conform to the expected structure and rules.
- Error Handling: Provides clear error messages if the data is invalid, helping with debugging and client-side validation feedback.
- Security: Prevents malformed or malicious data from reaching your business logic and database.
Steps to Validate nested objects with class-validator
Here's a complete setup to validate nested objects with class-validator in a Nest.js application. This example includes defining the DTOs, setting up the controller, and enabling validation globally.
Step 1: Create a project using the below command:
npm install -g @Nest.js/cli
nest new my-nest-app
Project Structure:
 Project Structure
 Step 2: Install Dependencies
First, install class-validator and class-transformer if you haven't already
cd my-nest-app
npm install class-validator class-transformer
Updated Dependencies:
"dependencies": {
    "@Nest.js/common": "^10.0.0",
    "@Nest.js/config": "^3.2.3",
    "@Nest.js/core": "^10.0.0",
    "@Nest.js/platform-express": "^10.0.0",
    "class-transformer": "^0.5.1",
    "class-validator": "^0.14.1",
    "reflect-metadata": "^0.2.0",
    "rxjs": "^7.8.1"
  }
Step 3: Create DTOs
- Create a DTO for the nested object, e.g., AddressDto.
JavaScript
// src/users/address.dto.ts
import { IsString, IsNotEmpty } from 'class-validator';

export class AddressDto {
  @IsString()
  @IsNotEmpty()
  street: string;

  @IsString()
  @IsNotEmpty()
  city: string;

  @IsString()
  @IsNotEmpty()
  country: string;
}
Step 4: CreateUserDto - Main Object with Nested DTO
Create the main DTO, e.g., CreateUserDto, which includes the nested AddressDto:
JavaScript
// src/users/create-user.dto.ts
import { IsString, IsNotEmpty, ValidateNested } from 'class-validator';
import { Type } from 'class-transformer';
import { AddressDto } from './address.dto';

export class CreateUserDto {
  @IsString()
  @IsNotEmpty()
  name: string;

  @IsString()
  @IsNotEmpty()
  email: string;

 // Validate the nested object
  @ValidateNested()

  // Transform to AddressDto class instance
  @Type(() => AddressDto)
  address: AddressDto;
}
Step 5: Create the Controller
Set up a controller that uses the CreateUserDto to validate incoming requests:
JavaScript
// src/users/users.controller.ts
import { Body, Controller, Post } from '@nestjs/common';
import { CreateUserDto } from './create-user.dto';

@Controller('users')
export class UsersController {
  @Post()
  async createUser(@Body() createUserDto: CreateUserDto) {
    // Logic to handle user creation (e.g., save to database)
    return createUserDto;
  }
}
Step 6: Create the Module
Create a module to register the controller:
JavaScript
// src/users/users.module.ts
import { Module } from '@nestjs/common';
import { UsersController } from './users.controller';

@Module({
  controllers: [UsersController],
})
export class UsersModule {}
Step 7: Include the Module in the Application
Include the UsersModule in your main application module:
JavaScript
// src/app.module.ts
import { Module } from '@nestjs/common';
import { UsersModule } from './users/users.module';

@Module({
  imports: [UsersModule],
})
export class AppModule {}
Step 8: Enable Global Validation Pipe
Enable global validation in the main.ts file to ensure that all incoming requests are validated according to the DTOs:
JavaScript
// src/main.ts
import { ValidationPipe } from '@nestjs/common';
import { NestFactory } from '@nestjs/core';
import { AppModule } from './app.module';

async function bootstrap() {
  const app = await NestFactory.create(AppModule);
  app.useGlobalPipes(new ValidationPipe()); // Enable global validation
  await app.listen(3000);
}
bootstrap();
Test the Endpoint
Example Request Payload:
- Open Postman or Insomnia.
- Set the request type to POST.
- Enter the URL: http://localhost:3000/users.
- In the "Body" tab, choose "raw" and set the format to "JSON".
- Enter the JSON payload:
{
  "name": "John Doe",
  "email": "[email protected]",
  "address": {
    "street": "123 Main St",
    "city": "Anytown",
    "country": "USA"
  }
}
Click "Send" to make the request.
Output:
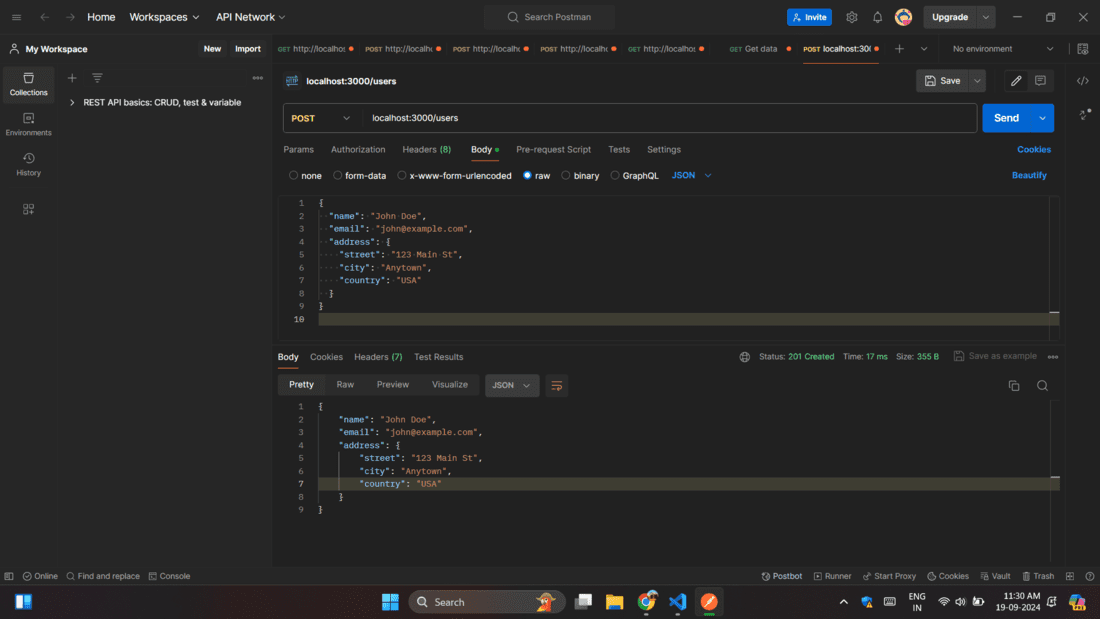 With Validation
Example Invalid Request Payload:
{
  "name": "John Doe",
  "email": "[email protected]",
  "address": {
    "street": "",
    "city": "Anytown"
  }
}
Output:
 Invalid Request