How to Install Jupyter Notebook on Windows
Last Updated :
19 Dec, 2024
Jupyter Notebook is one of the most powerful used among professionals for data science, and machine learning to perform data analysis and data visualization and much more.
If you're a Windows user and looking for different ways to install Jupyter Notebook, then this guide will help you out by using Anaconda, Miniconda, official website and pip. So let's get started:
System Requirement:
1. Python 3.7 or later
2. Windows 7 or later
3. RAM: 4GB (atleast), 8GB or more is recommended
4. Storage: 1GB or more
Method 1: Using Anaconda
If you're looking to get Jupyter Notebook in your Windows 7, 8, 10 or 11 with data science libraries (such as Matplotlib, Pandas, etc.) then this method is suitable for you. Here's how you can do it:
Note: You need to install Anaconda in your Windows OS to begin with this method.
Step 1: Go to Anaconda Navigator
Firstly, Launch anaconda and click on the Install Jupyter Notebook Button.
 Installer
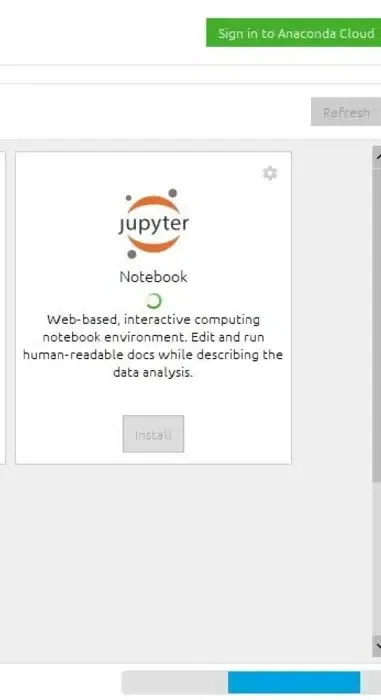
Step 2: Install Jupyter Notebook
Search for Jupyter Notebook, and click on the Install button to begin with the installation process.
 Installer
Step 3: Load Packages
Once the installation is complete, it will start loading the packages that comes along with it and click to finish the Installation.
 Setup complete.
Step 4: Launch Jupyter Notebook
Now, click on Launch button to start the Jupyter Notebook.
 Launch
Method 2: Using pip
Using PIP with Python is one of the best method to install Jupyter Notebook in your Windows Operating System. Here's how to perform this action in few steps:
Step 1: Check for any Exisiting Update
Use the following command to update pip (to verify if pip is updated):
python -m pip install --upgrade pip
 python pip upgrade
Step 2: Install Jupyter Notebook
After updating the pip version, type the following command to install Jupyter:
python -m pip install jupyter
 pip jupyter
Now, the supportive packages will start Installing along with it:
 Finish the Installation
Step 3: Launching Jupyter
Use the following command to launch Jupyter using:
jupyter notebook
 Launch Jupyter
Now, the Jupyter Notebook will launch automatically in your default web browser.
 Launcher
Method 3: Visit the Microsoft Store (Windows 10/11)
As of recent updates, Jupyter Notebook can also be installed directly from the Microsoft Store on Windows 10 and Windows 11 by using the following steps:
Step 1: Open Microsoft Store and Search for Jupyter
Select and click to initiate the installation.
 Jupyter Notebook
Step 2: Launch Jupyter Notebook
Once installed, search for Jupyter Notebook in the Start Menu and launch it.
 Start > Jupyter Notebook
This will open Jupyter in your Windows 10 or 11.
Method 4: Using Miniconda (Anaconda Alternative)
If your system is slow or looking out for a light-version alternative to Anaconda, you can use Miniconda. Miniconda is a minimal version of Anaconda and allows you to install only the packages you need.
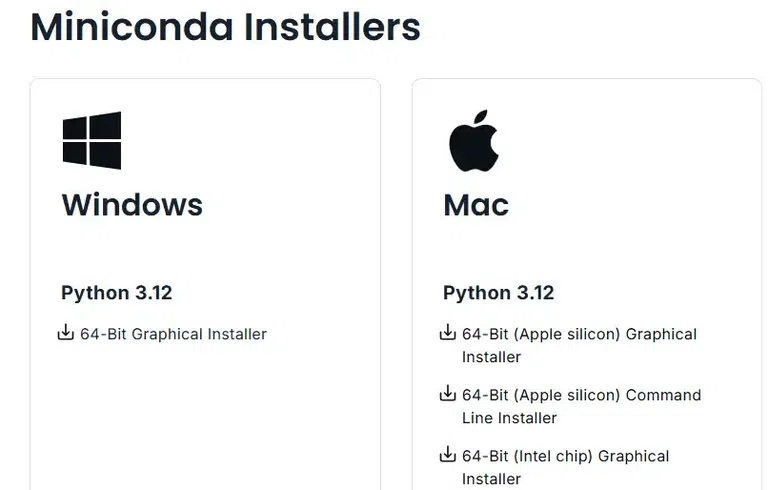
Step 1: Visit the Official Website to Download & Install Miniconda
Visit the Miniconda website and follow the installation instructions to get Miniconda for Windows.
 Miniconda
Step 2: Install & Run Jupyter Notebook
Open Anaconda Prompt (which is installed with Miniconda) and run the following command:
conda install jupyter
 conda prompt
Now type the following command in the Anaconda Prompt to launch Jupyter:
jupyter notebook
 Anaconda Prompt
Installing Jupyter Notebook on Windows can be done easily using the above-mentioned methods which includes Miniconda (Anaconda alternative), pip, Anaconda and Microsoft Store. Moreover, these all methods have their benefit depending on user's preference and requirements. Once you're done with the Jupyter installation, start exploring with for your projects, experiments, and learning.
Also Read
Similar Reads
How to Install Jupyter Notebook on MacOS Jupyter Notebook is a popular web-based interactive computing environment, widely used among data scientists and programmers. Working with Jupyter Notebook in MacOS helps perform various tasks including data cleaning and transformation, numerical simulation, statistical modelling, data visualization
5 min read
How to Install iPython on Windows? Ipython is a toolkit used for using Python interactively using a Python shell and also provides a Jupyter kernel to work with Python code in Jupyter notebooks. In this article, we will look into the process of installing ipython package on Windows. Pre-requisites: The only thing that you need for in
2 min read
Install OpenCV on Jupyter Notebook With Jupyter Notebook, users can create and share documents with live code, equations, visualizations, and narrative text in an interactive computing environment. An open-source software library for computer vision and machine learning is called OpenCV (Open Source Computer Vision Library). When com
4 min read
How to work with Julia on Jupyter Notebook? Julia is a programming language that uses multiple dispatches as a feature where a method or a function can be dynamically dispatched based on the requirement. It is a high performance and a dynamic language which makes it user-interactive. It has a high-level syntax which makes it easy to learn and
3 min read
How to Install Jekyll on Windows? Jekyll is a static site generator. It takes text written in your favourite markup language and uses layouts to create a static website. You can tweak the site's look and feel, URLs, the data displayed on the page, and more. Jekyll was first released by Tom Preston-Werner in 2008. Â Jekyll was later t
4 min read