Apache Hadoop is a strong framework based on open sources that is capable of implementation of distributed storage and processing of massive data volumes across a system made up of a network of computers. It is the favoured technology for the big data steel Industry, that is, its scalability, reliability, and fault-protecting characteristics are superior. Let's take you through the Hadoop installation process on a Mac OS computer using this guide.
Installation Prerequisites
Before we proceed, ensure that the necessary conditions below are met on your macOS system:
1. Java Development Kit (JDK): Hadoop is written in Java and therefore needs it to function. Ensure that you have the JDK 8 or higher packed and ready for installation on your computer. You can get JDK either using a website Oracle (as an option) or a HomeBrew project, as brew installs OpenJDK.
2. SSH: Hadoop SSH communication is tied to Hadoop's ability to transmit data between different nodes in the cluster. macOS usually comes with SSH installed by default, however, to enable the feature you will need to navigate to System Preferences -> Sharing -> Remote Login.
3. Homebrew: Homebrew, the package manager for macOS, lists software components in their preferred software location. With Homebrew not being installed, use the following command on your shell.
 Homebrew Package
4. the Environment Setup: Make sure that the environment variable is correctly set up. This responsibility can be taken up by editing the ~/.bash_profile or ~/.zshrc file and adding in the mentioned lines.
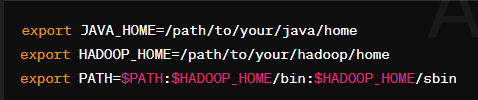 Setting Up The Environment
- Run the replace /path/to/your/java/home and replace /path/to/your/Hadoopwith/home with your full path to the installed Java and Hadoop.
How to Install Hadoop on Mac?
Apache Hadoop is a strong framework based on open sources and we need to follow the below-mentioned easy steps to download it properly on MacOS.
Step 1: Downloading Hadoop
You can download the latest stable version of Hadoop from the Apache Hadoop website. Select the one that fits your requirements and download the tarball (tar.gz) from the server to your machine.
Then, download the files, then extract the file into any of the directories that you wish.
For example
 Extracting Tarball files
Step 2: Configuration
Navigate to the Hadoop configuration directory (in $HADOOP_HOME/etc/Hadoop) and modify the given configuration as indicated below.
a. core-site.xml:
 Hadoop Configuration
 b. hdfs-site.xml:
 Hadoop Configuration
 c. mapred-site.xml (if it doesn't exist, create it):
 mapred-site.xml
d. yarn-site.xml:
 yarn-site.xml
The prerequisite for starting Hadoop services is formatting the disk HDFS (Hadoop Distributed File System) by the end of it.
Run the following command
 Formatting HDFS
Step 4: Start Hadoop Services.
Launch Hadoop services by executing the commands mentioned below.
a. Start HDFS:
 Starting HDFS
b. Start YARN:
 Start YARN
Step 5: Verify Installation
Hadoop is a program that you can check its correct running by viewing the Hadoop web interface. Open your web browser and go to http://localhost:9876 for the HDFS NameNode interface and http://localhost:6060 for the YARN ResourceManager Interface.
 Output of Hadoop running on MacOs
Conclusion
Congratulations! You have successfully installed Apache Hadoop on macOS. You can now move on to the full spectrum of possibilities afforded by Hadoop and start investigating its role in distributed data processing and analysis. Keep in mind that the official Hadoop documentation can be of help to those interested in more advanced configurations and more complex deployments.
Also Read
Similar Reads
How to Install PHP on MacOS?
PHP (Hypertext Preprocessor) is known as a general-purpose scripting language that can be used to develop dynamic and interactive websites. It was among the first server-side languages that could be embedded into HTML, making it easier to add functionality to web pages without needing to call extern
3 min read
How to Install Weka on MacOS?
Weka is computer software and its full form is Waikato Environment for Knowledge Analysis, it was built to fulfil the purpose of data mining and it is used in the field of data science. It is open-source software that is built using Java programming language. It is free and can be run on different p
2 min read
How to Install Java on macOS?
The Java Development Kit (JDK) is an essential tool for developers working with Java. It provides the necessary tools and libraries to build, compile, and run Java applications, making it a cornerstone for efficient and effective Java development. Without the JDK, writing and testing Java programs w
7 min read
How to Install NLTK on MacOS?
NLTK is Natural Language Tool Kit. It is used to build python programming. It helps to work with human languages data. It gives a very easy user interface. It supports classification, steaming, tagging, etc. In this article, we will look into the process of installing NLTK on MacOS. Installing NLTK
1 min read
How to Install LISP on MacOS?
Lisp is one of the oldest programming languages. It was invented back in the 1950s by John McCarthy. Lisp is a so-called meta-programming language or a symbolic programming language. It can be used for any sort of task. It's a general-purpose language. It is the second-oldest high-level programming
2 min read
How to Install Dart on MacOS?
The dart is an SDK (Software Development Kit) and SDK as you may observe from its name it is mainly a collection of software development tools that facilitate the creation of different applications, some of the tools include compilers debuggers libraries, and perhaps the software framework aiding to
2 min read
How to Install MySQL on macOS?
MySQL is an open-source relational database managing system. It is used for implementing databases. For any website or any other application, a database is required to store data of websites and applications. Using MySQL server of data can be created. The database created by MySQL is well-organized
5 min read
How to Install Anaconda on MacOS?
In this article, we will learn how to install Anaconda on MacOS. Anaconda is a distribution of the Python and R programming languages for scientific computing, that aims to simplify package management and deployment. Installation using Graphical Interface Step 1: Download the Graphical installer fro
1 min read
How to Install Scala on MacOS?
In this article, we are going to show you how you can download and install Scala on your Mac operating system. First of all, you need to download the Java JDK which you can download here Installing Scala on MacOS: Follow the below steps to install Scala on MacOS: Step 1: After installing JDK, run th
2 min read
How to Install Keras on MacOS?
In this article, we will learn how to install Keras in Python on macOS. Keras is an open-source software library that provides a Python interface for artificial neural networks. Using pip to install Keras Package on MacOS: Follow the below steps to install the Keras package on macOS using pip: Step
1 min read