How to Install Gnome on Arch Linux
Last Updated :
01 Aug, 2024
Arch Linux is known for its adaptability and moderation, allowing users to create their Linux operating system for specific needs. It is one of the most popular Linux system configurations, providing a clean and easy-to-use interface. assuming you're an arch Linux user hoping to install gnome, follow these moves toward setting up your framework with this adaptable work area climate.
Requirements
Before beginning the installation, make sure you have the following requirements fulfilled:
- Arch Linux was introduced and refreshed. You ought to have a functioning web association.
- Fundamental information on using the command line interface (CLI) in Linux.
- Sudo access.
Steps to Install Gnome on Arch Linux
Stage 1: Open boot menu:
To begin with, open the boot menu and select the following package to install:
Note: If you need to change the boot settings, check this article

Step 2: Check internet connection:
The next step is to check the internet connection, for this just type ping google.com and it will try to connect to Google, if packets are transmitted then the internet is connected, otherwise, make sure an active internet connection is present.

Step 3: Run the arch install command:
The next step is to run the following command which will install the arch and its dependencies on the system:
archinstall

Step 4: Set/modify the options:
There are various options available in the next window, from this window select the appropriate options and change them as per your preference (such as keyword layout, etc.)

Step 5: Select the filesystem partition:
The next step is to select the filesystem partition for the main partition, by default if you are not familiar with the filesystem you should select the BTRFS format.

Step 6: Open user account:
Open the user account section to create a new user and assign details to it:

Step 7: Add new user:
The next step for installing gnome on Arch Linux is to add a user to the system, for this select the first option labeled "add a user" option.

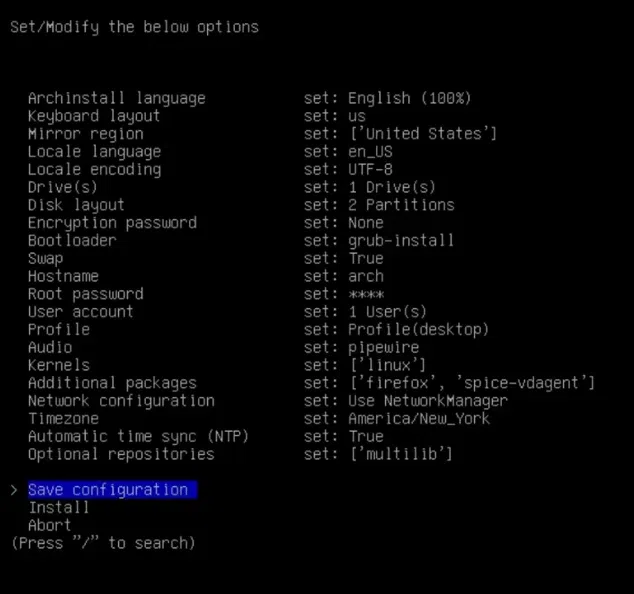
Step 8: Save the configuration:
After creating the new user simply click on the option at the bottom that says "save the configuration" and it will save the configuration.
Step 9: Wait for download:
After the configuration is saved wait for the download to be finished, the download will be finished within a couple of minutes relying on the speed of your connection speed.

Step 10: Select option post-installation configuration:
The next step is to select the option for the post-installation configuration, it is important because without this option the system can't configure the post-installation configurations so click on "Yes":

Step 11: Reboot command:
After finishing the post-installation configuration by the framework, the framework is presently ready to be used yet before it can be used it is expected to reboot the framework with the intention that gnome can be used, for this type the reboot command and it will reboot the framework.

Step 12: Select arch linux:
After reboot, if the arch Linux is installed successfully in the system, it will ask for which operating system you have to use (arch Linux) should be visible on the screen, and select it.

Step 13: Open terminal:
Open the terminal window and make sure the arch Linux version is shown in the terminal, similar to the image below.

Step 14: Install pacman:
The next step is to install the Pacman for this run the following command:
sudo pacman -Syu

Step 15: Install sudo pacman gnome-extra:
In the next step, install the gnome using the Pacman, for this run the following command in the terminal:
sudo pacman -S gnome gnome-extra

Step 16: Select all options:
Next, select all the options by pressing the enter button repeatedly until the installation begins:

Step 17: Wait for the download:
Once gnome is installed on Arch Linux, you will have to start Gnome session.

Step 18: Select gnome:
In the login window, select the option that says "GNOME on Xorg" as seen in the image:

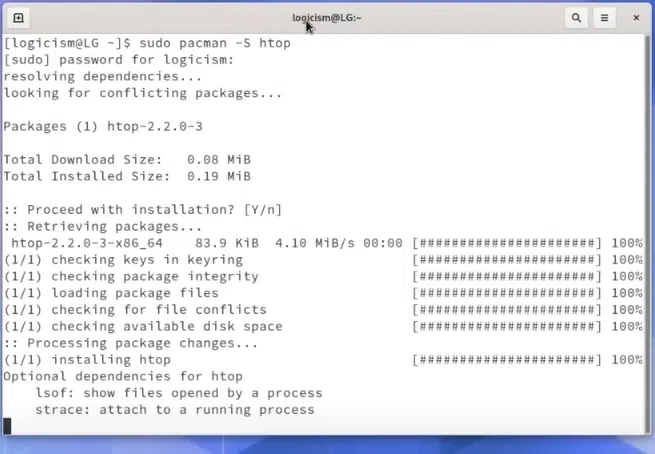
Step 19: Install htop:
The next and final step is to install the top to view the processes visually, which can be used if the gnome is installed, for this run the following command:
sudo pacman -S htop
Step 20: Check for installation:
At the top, we can see that the gnome-shell is running as a process which means that the gnome is successfully installed in the arch Linux.

Conclusion
Installing GNOME on Arch Linux gives an easy-to-use and adaptable desktop system that upgrades efficiency. By following these steps, users can easily install GNOME in the arch Linux system, enabling the users a flexible computing system customized to individual requirements.
Similar Reads
How to Install GNOME Desktop On Arch Linux? GNOME is one of the most popular desktop environments available for Linux users, offering a sleek, user-friendly interface. Installing the GNOME desktop on Arch Linux allows you to combine the customization and power of Arch with the elegance of GNOME. In this guide, we’ll walk you through the proce
5 min read
How to Install GNOME 3.16 On Linux Mint? For many top-tier Linux desktop distributions, such as Ubuntu and Fedora, GNOME is a common desktop environment that is the default desktop option. Nearly all flavors have a desktop GNOME alternative. The GNOME desktop is one of the most stable and user-friendly desktops, so many normal, advanced us
2 min read
How to Install GCC Compiler on Linux? In this article, we will discuss how to install a GCC compiler on Linux. GCC stands for GNU Compiler Collections which is used to compile mainly C and C++ language. It can also be used to compile Objective C and Objective C++. The GCC is an open-source collection of compilers and libraries. Let's st
2 min read
How To Install "git-gui" on Linux? Git is a FOSS (Free and Open Source Software) that is used for version control of any set of files, typically, the source code of software projects. Git is a version control system for recording changes in any group of files. During software development, it's generally used to coordinate work among
2 min read
How to Install Deepin on Linux? Deepin is the top Linux distribution from China, it provides a beautiful, easy-to-use, safe, and reliable operating system for global users. Deepin is based on Debian's stable branch. The feature that sets Deepin aside from the rest of Linux distributions is its desktop environment known as DDE Deep
3 min read