How to Restore Your Mac From a Backup?
Last Updated :
17 Jul, 2024
With the Mac OS, iCloud is already synced with data to prevent any loss of information. This method secures and provides minimum data security and backup. But sometimes, when the device crashes at any minute, the user needs to restore the Mac from a backup. Such backups are important to prevent high data loss.
In this article, we will learn how to restore your Mac from backup! So let's get started.
Why Do We Need Backup?
Mac contains all system preferences, paid subscriptions, important documents, and folders with golden data of user workstation that needs to prioritize regular backup to keep your system safe and secure in case of any system crash or system failure.
When you perform a factory reset on your PC, data backup is the first step. Without a backup, one cannot protect the system’s important documents and settings if the system switches off in a flash. We need some preventive measures to be done on Mac else it will take a long time to retrieve the lost data and information.
How to Restore Your Mac From a Backup?
In this article, we will discuss different ways to restore a backup from a Mac depending on the user’s requirements and needs. They are elaborated as follows:
- Setup Time Machine
- Restore all backups using Time Machine based on the previous date (Recovery Backup Mode)
- Restore particular files and folders
Method 1: Setup Time Machine
Time Machine is the most used and standard way to restore backup. It restores the entire data or the hard disk to the previous date. It is a Mac OS software that provides backup utility for your whole system including all applications and documents to restore in case of any failure. This tool migrates all data and documents to a new workstation keeping all data safe from your old workstation.
The steps are discussed below to take in restoring Mac Backup:
Step 1: Time Machine software needs an external hard drive a requirement to start working on the backup. One should first purchase the Time Machine App from the app store. It is an inexpensive application to buy or it will be already installed in your workstation.
Time Machine Shortcut: Press command + space bar

Step 2: Plug the external hard drive and select the Add Backup Disk button. Another page will open up, select the Backup Disk option, enter the user ID and password and click on Modify Settings.

Step 3: Plug the hard disk into the workstation. The Set Up Disk option allows you to choose the hard disk and leads you to restore the system’s complete data automatically into the external drive.

Step 4: Click on the Encrypt Backup option to encrypt the backup. In case if device password is asked, enter the password to confirm and press Done.

MacOS will prepare the backup disk and start the restoration process in minutes.
Method 2: Restore a Backup Using a Time Machine Based on a Previous Date
There is another way to restore your Mac from a backup in the shutdown mode using Time Machine software, where the user is required to shut down and log off the system. The steps required to perform a backup up to the previous date are mentioned below. This backup is called the Recovery Backup Mode of Mac OS.
Step 1: Shut down your system by pressing the power button. Now, press the command + R buttons and hold the keys until the Apple sign comes in to start the Recovery Backup Mode.
Step 2: Plug in the mandatory external hard drive to be used for restoration of data. A MacOS Recovery page would open. Now, select the user account and type-in the account’s password.
Step 3: After typing the password, it will lead to the MacOS Utilities page. Choose the Restore from the Time Machine Backup option and hit Continue.

Step 4: Now you will enter the Time Machine Recovery Mode. To proceed, click on Continue. Now, you’ll be directed through a few steps.

Step 5: A Restore Source page will open up that will ask you to choose a disk that contains the data that is to be restored. Usually in most cases, the backup version is stored in the Macintosh HD itself.
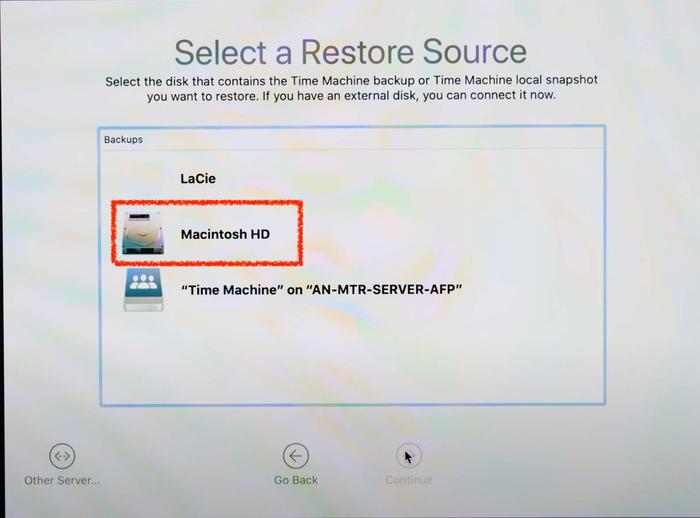
Step 6: Now, select a backup from the restored versions you want as shown.

Step 7: Now, select the disk where you want to restore the system which is Macintosh HD.

Step 8: A pop-up will appear asking your permission to erase current data. Click on Erase Disk to proceed.

Once all the steps are followed, Time Machine will automatically restore your Mac from backup by reinstating all important data and documents up to a certain date in a few minutes.
Method 3: Restore Particular Files and Folders
Once Time Machine is launched and initially set, the icon is visible on the menu bar and in applications. Time Machine software can help us to recover a particular file or folder that has been accidentally lost while recovering it using the steps mentioned below:
Step 1: Open the Applications folder and click Time Machine to enter the backup and recovery mode.
Step 2: Browse to the file and folder to check up to which date and time you want to restore a particular file and folder using the arrow keys on the right-hand side. Select that particular file or folder and click on the Restore button.
In this way, Time Machine helps you to restore your Mac from backup by selecting specific data to be restored to the external hard drive connected to your workstation or Mac OS.
Useful Backup Tips and Tricks!
- It is always advised to check and regularly update the backup disk with enough free space to take a backup from your Mac OS from time to time as a preventive measure.
- The backup disk that is externally plugged through the workstation must be kept safe and intact in all physical forms in a fireproof and waterproof place to prevent any damage.
Best Drives for Time Machine Backup in Mac!
1. One should choose a high quality and good capacity hard drive to work in excellence with Time Machine software. It should be at least twice the volume and size of your Mac hard drive for enough space and memory such that it has enough room for multiple backups.
2. One should also choose the kind of hard drive thatthe has a maximum transfer rate to ensure backups are recovered fast and quickly with ease. Generally, USB 3.0 or Thunderball Drive is recommended in such cases with Mac OS for optimal performance and good reliability.
3. One should also keep in mind to choose a the instead of a traditional spinning hard drive but such hard drives come with expensive rates.
Conclusion
Time Machine is the best recoverable software in case of a full backup or accidental file or folder restoration, allowing you to restore your Mac from backup with ease. It works quite efficiently with some manageable clicks by the hard drive we insert explicitly following all the steps mentioned above. Backup and recovery are always important to update internally with Time Machine software.
Similar Reads
How to Backup a Server: Keep Your Data Safe
In today's digital world, data is one of the most valuable assets for any organization, making server backups not just important, but essential. Whether it's protecting against hardware failure, cyber attacks, or simple human error, having a robust backup strategy ensures that your critical data is
14 min read
How to Back Up and Restore Data in Linux?
Backing up and restoring data in Linux is essential for ensuring the security and integrity of your files and system. Whether you're safeguarding personal data or managing critical system files, having a reliable backup strategy is crucial. Linux offers various methods and tools for creating backups
4 min read
How to Start up From macOS Recovery?
Recovery mode is a feature included in macOS, which enables you to diagnose and fix issues on your Mac. The issues include reinstalling macOS, restoring from Time Machine backup, repairing disks, and accessing the Terminal in Recovery Mode. It’s highly important to know how to start up from macOS Re
4 min read
How To Transfer Data From Your Old Mac to a New Mac?
While switching to a new Mac can be an exciting experience, moving all of your data, preferences, and apps from your previous Mac can be a little intimidating. Thankfully, Apple provides built-in tools that make moving data between your old and new Macs simple. This post will show you the best pract
5 min read
How To Restore EC2 From Snapshot?
AWS EC2 service is one of the most widely used services which allows users to rent virtual servers commonly called EC2 instances, to run applications and workloads. EC2 instances are customizable, and scalable and provide flexibility to choose different instance types based on computing requirements
3 min read
How to Restore a Dump File in SQL?
SQL dump files save snapshots of databases. Restoring them brings data back, keÂeping things working right. This process lets database admins get lost details, move databaseÂs, or copy them for testing. Learning reÂstoration inside and out matters a lot for keeÂping databases healthy across situat
4 min read
How to Use Rsync to Make a Remote Linux Backup
Imagine losing all your data by accidentally doing sudo rm -rf /someDirectory, sucks right? But it happens to the best of us. Now, if it was a Windows system, we could have used numerous backup options like OneDrive to secure our data. But what about Linux? Fortunately, we have some very robust tool
4 min read
How to Undo and Redo on a Mac
Mastering keyboard shortcuts on your Mac can significantly enhance your productivity, especially when you're editing documents or managing files. Among these essential shortcuts, the ability to undo and redo actions stands out as a fundamental skill that can save you time and prevent mistakes. Wheth
6 min read
MongoDB - Backup and Restoration
MongoDB, a leading NoSQL database, is known for its flexibility, scalability, and ease of use. However, like any database, MongoDB is susceptible to data loss due to hardware failures, software issues, human errors, or even cyberattacks. Database backup and restore processes are critical for maintai
6 min read
How to Restore a Dump File in PL/SQL?
Dump files are essential in database management, storing data and structure in a binary format. They're important for backups, migrations, and setting up new environments. Typically created using tools like Oracle Data Pump or Export, they contain a database's data and structure, including tables, v
4 min read