How to Rename Images and Media Files in WordPress?
Last Updated :
10 Sep, 2024
Renaming images and media files in WordPress can be used for SEO and organization purposes. When you rename an image file, you can improve its relevance to your content and make it easier for search engines to understand the context of the image. Additionally, renaming media files can help you better organize your media library. In this article, we will describe the process of renaming images and media files in WordPress.
Why Rename Images and Media Files in WordPress?
Before diving into the steps, let’s briefly discuss why renaming images and media files is beneficial:
- SEO Optimization: Descriptive file names with relevant keywords improve your content’s relevance to search engines, helping your images appear in image searches and contributing to your overall SEO strategy.
- Better Organization: Renaming files with clear, descriptive names makes it easier to manage and search your media library, especially when you have a large number of files.
- Enhanced Accessibility: Properly named images can also improve accessibility for users who rely on screen readers, as these tools often use file names and alt text to describe images.
Steps to Rename Images and Media Files in WordPress
Step 1: Access Your WordPress Dashboard
Log in to your WordPress dashboard.
 Login page of WordPress
Step 2: Navigate to Your Media Library
From the dashboard, go to Media > Library. This section displays all the images, videos, and other media files uploaded to your WordPress site.
 Media page of WordPress
Step 3: Select the Image or Media File and Click on Edit Button
- Browse through your media library to find the image or media file you wish to rename.
- Click on the media file to open its details page. Once the file is selected, click on the Edit button located below the file.
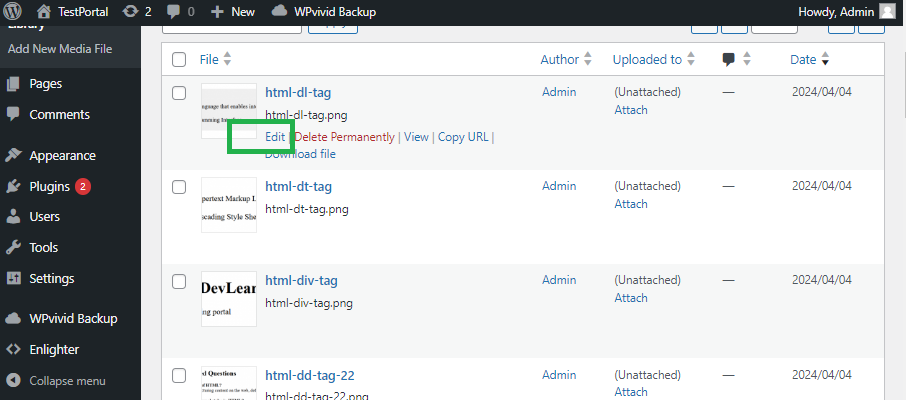 Edit button
 Step 4: Edit the File Name
In the Edit Media screen, you will see the current file name. Click on the file name to edit it. Enter the new file name and click on the "Save" button to apply the changes.
 Edit the name of Image
Step 5: Update the Post or Page
- If the renamed image or media file is already inserted into a post or page, you may need to update the post or page to reflect the new file name or title changes.
- Go to the post or page where the image or media file is used.
- Click on the Update button to save the changes. This ensures that any changes to the image details are correctly applied across your site.
Additional Tips for Renaming Images and Media Files
- Use Keywords Strategically: Incorporate relevant keywords into your image file names to help improve search engine visibility.
- Avoid Special Characters: When renaming files, avoid using spaces and special characters. Use hyphens (-) to separate words for better readability and SEO.
- Use Descriptive Alt Text: Always add descriptive alt text to your images. This further enhances SEO and improves accessibility for visually impaired users.
Recommended Plugins for Renaming Media Files
If you need to change the actual file name rather than just the title, consider using one of the following plugins:
- Media File Renamer: Automatically renames media file names based on the title you set. It also updates all the references to the file throughout your site.
- Phoenix Media Rename: Allows you to rename media files directly from the WordPress Media Library without affecting the media’s link in posts and pages.
Renaming images and media files in WordPress is an effective way to optimize your website for SEO and improve organization within your media library. By following the steps outlined in this article, you can easily rename your media files, making them more relevant to your content and easier for search engines to index.
Similar Reads
How to insert audio files in WordPress ? WordPress is an open-source Content Management System and an interface that is totally based on PHP and MySql which is used to create a dynamic website. Matt Mullenweg developed WordPress and Written in PHP language. WordPress is one of the most popular interfaces that allow users to customize and m
3 min read
How to Add Image Credits in WordPress? In today's digital world Images play an important role in creating content. Images have become an essential part of blogs, websites, and social media. However, using images without giving proper credit to the original creator can pose both ethical and legal issues. Crediting images not only recogniz
4 min read
How to Optimize Images for WordPress? A WordPress site is a website formed using the WordPress content management system (CMS). For WordPress users, optimizing images is not only essential for bettering site execution but also for enhancing SEO rankings and tempting more users. In this article, we will study a few simple tips to help yo
6 min read
How to Change File Permissions in WordPress? WordPress is a CMS or content management system that is very popular and used because of its features to create and manage websites such as blogs, e-commerce platforms, etc without having to code the website, it is important to understand the file permissions and how we can control it for making sur
5 min read
How to Rename Files in MacOS? Renaming files in MacOS is a simple yet essential task that can help you stay organized and improve your workflow. Whether you need to rename a single file or multiple files at once, MacOS offers several easy methods to get the job done. In this guide, we will provide step-by-step instructions on ho
4 min read