Dealing with messy data in Excel often requires removing text either before or after a specific character. Whether you need to clean up email addresses, extract parts of a URL, or streamline text-based data, Excel offers multiple tools to get the job done efficiently. This guide will explore how to remove text before or after a specific character in Excel using methods like Find & Replace, Flash Fill, and formulas such as the SUBSTITUTE function. With these steps, you can clean data in Excel with precision and ease.
How to Remove Text Before or After a Specific Character in Excel (3 Different Methods)
For example, if you have the name and age of people in the data field separated by a comma(,), you may want to remove the age after the comma and only keep the name.

After removing texts present after the comma(,),

Method 1: How to Remove Text Before or After a Character Using Find & Replace
The Find and Replace tool in Excel is a quick and easy way to remove text before or after a specific character in excel using the wildcard character * (which represents any number of characters). Here’s how you can use it:

Step 1: Select the Data
- Highlight the data range where you want to remove text.
- Go to the Home tab on the ribbon.

Step 2: Open Find and Replace
- Click on the Find & Select option in the Home tab.
- Alternatively, press the shortcut Ctrl + H to open the Find and Replace dialog box directly.
Step 3: Choose the Replace Option
- In the dropdown, select the Replace option.
- The Find and Replace dialog box will appear on your screen.
Step 4: Enter the Search and Replace Criteria
- In the Find what field, enter the following conditions based on your requirement:
*,: To remove all text before a specific character (e.g., a comma), type *, in the Find what field and leave the Replace with field blank. This removes all text before the comma, including the comma itself.,*: To remove all text after a specific character (e.g., a comma), type ,* in the Find what field and leave the Replace with field blank.char*char: To remove text between two specific characters, type the starting and ending characters with * in between (e.g., A*C).

Step 5: Replace All
Click the Replace All button to apply the changes to all the selected cells.
Step 6: Preview the Results
- Once the operation is complete, a dialog box will display the number of replacements made.
- Check the updated data in the worksheet to confirm the changes.

Method 2: How to Remove Part of Text Using Flash Fill in Excel
The Flash Fill feature in Excel is a quick and easy way to remove part of the text that precedes or follows a specific character. Flash Fill automatically detects patterns in your data and applies them to the remaining cells. Here's how you can use it:
- In the cell next to your data (e.g., column B if your data is in column A), type the result you want after removing the unwanted text.
- For example, if the original data is
John, Manager and you want only Manager, type Manager in the adjacent cell.
 Input the Expected Result in the Adjacent Cell
Step 2: Automatic Pattern Recognition
- In the next row of the adjacent column, type the appropriate value following the same pattern.
- For instance, if the second value in your dataset is
Doe, Developer, type Developer in the adjacent cell. - Excel will automatically detect the pattern and suggest results for the remaining rows.
 Automatic Pattern Recognition
Step 3: Press Enter and Preview Result
Hit the Enter key to accept the suggestions.
 Press Enter and Preview Result
 Method 3: How to Remove Text Using Formulas
In Microsoft Excel, formulas offer a powerful and flexible way to manipulate data without modifying the original content. Unlike built-in functions that may directly change the data, formulas provide a non-destructive method, giving you control over calculations and transformations.
Here’s a step-by-step guide to remove text using formulas in Excel, with an example for better understanding.
Step 1: Select the Cell Containing the Text
Identify the cell that contains the text you want to modify.
For example:
- Suppose cell
A2 contains the text Hello, World.
 Enter the Text into Excel
- In an empty cell (e.g.,
B2), click on the Formula Bar to begin entering your formula. - Use the SUBSTITUTE function to remove specific text.
Step 3: Use the SUBSTITUTE Function
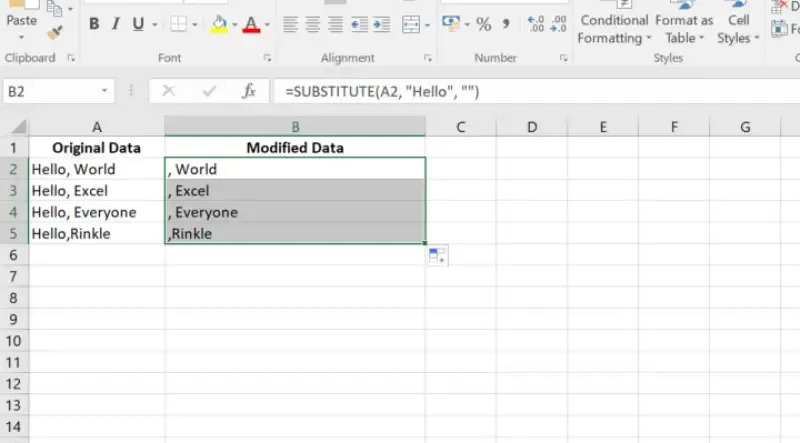
The SUBSTITUTE function is used to replace a specific text within a string with another text. To remove the text, replace it with an empty string ("").
Syntax:
=SUBSTITUTE(cell_reference, "text_to_remove", "replacement_text")
Example:
If cell A2 contains Hello, World and you want to remove the word Hello, enter the following formula in cell B2:
=SUBSTITUTE(A1, "Hello", "")
 Use the SUBSTITUTE Function
Step 4: Press Enter and Preview Results
- After typing the formula, press Enter to see the modified result in the selected cell (
B2).
 Press Enter and Preview Results
This will erase the specified text from the cell.
How to Delete Everything After a Specific Character in Excel
Removing everything after a specific character in Excel, such as a comma, is a common data-cleaning task. You can achieve this using the LEFT and SEARCH functions together. Below is a detailed explanation and example of how this works.
The formula to use is:
=LEFT(cell, SEARCH("character", cell) - 1)
How it Works:
- SEARCH("character", cell): Finds the position of the specified character in the text.
- LEFT(cell, number): Extracts the text from the beginning of the string up to the specified number of characters.
- -1 Adjustment: Subtracting 1 from the position ensures that the specific character itself is excluded from the result.
- Select the cell where you want the result to appear (e.g.,
B2). - Enter the Formula
=LEFT(A2, SEARCH(",", A2) - 1)
- Replace
A2 with the reference to the cell containing the original text. - Replace
"," with the character you want to search for.
 Enter the Formula
- Drag the formula down the column to apply it to other rows. This will automatically adjust the cell references for each row.
 Apply the Formula to Other Cells
Key Points to Note
No Character in String:
If the specific character (e.g., comma) is missing in a cell, the formula will return an error (#VALUE!). To avoid this, you can use an IFERROR wrapper:
=IFERROR(LEFT(A2, SEARCH(",", A2) - 1), A2)This will return the original text if the specified character is not found.
Handling Different Characters:
Replace "," in the formula with any character or symbol (e.g., "@", "#", " " for a space).
Non-Destructive Editing:.
This method doesn’t modify the original data. The cleaned result is displayed in a new column.
How to Delete Everything Before a Specific Character
Removing everything before a specific character in Excel can be done using the RIGHT, LEN, and SEARCH functions. This approach is highly flexible and non-destructive, allowing you to clean and organize your data efficiently.
The formula to use is:
=RIGHT(cell, LEN(cell) - SEARCH("character", cell))How it Works:
- SEARCH("character", cell): Finds the position of the specific character in the text.
- LEN(cell): Calculates the total length of the string.
- LEN(cell) - SEARCH("character", cell): Determines the number of characters to extract from the end of the string, starting after the target character.
- RIGHT(cell, number): Extracts the specified number of characters from the end of the string.
Step 2: Handle Case-Sensitivity
- By default, the SEARCH function is not case-sensitive (it does not differentiate between uppercase and lowercase letters).
- If case-sensitivity is required, replace SEARCH with the FIND function
=RIGHT(cell, LEN(cell) - FIND("character", cell))- Select the cell where you want the cleaned result (e.g.,
C2). - Enter the formula:
=RIGHT(A2, LEN(A2) - SEARCH(",", A2))- Replace
A2 with the reference to the cell containing the original text. - Replace
"," with the character after which you want to keep the text.
 Enter the Formula and Preview Results
Drag down the Formula and Preview Results
 Drag down the Formula
 Step 5: Remove Leading Spaces (Optional)
If there are leading spaces after removing text, wrap the formula in the TRIM function:
=TRIM(RIGHT(A2, LEN(A2) - SEARCH(",", A2)))How to Delete Text After the Nth Occurrence of a Character in Excel
When working with data in Excel, you may encounter a situation where a string contains multiple instances of a character (delimiter), and you need to remove all text after a specific occurrence. This can be achieved using a combination of Excel functions like LEFT, FIND, and SUBSTITUTE. Follow the below steps to delete text after the Nth Occurence of a character:
The formula to use is:
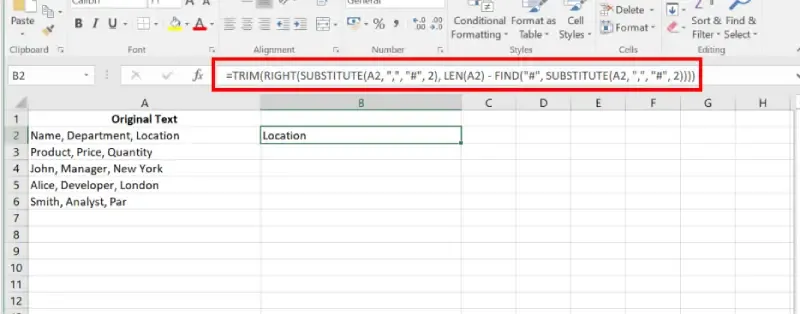
=LEFT(cell, FIND("#", SUBSTITUTE(cell, "char", "#", n)) - 1)Explanation of Formula Components:
SUBSTITUTE(cell, "char", "#", n): Replaces the nth occurrence of the specified character (char) with a unique symbol (e.g., #).- Here,
"char" is the character you want to search for (e.g., ,), and n represents the occurrence you want to target.
FIND("#", ...): Finds the position of the unique symbol # introduced by the SUBSTITUTE function.LEFT(cell, FIND(...) - 1): Extracts all characters to the left of the unique symbol #, excluding the character itself.
- Select an empty cell (e.g.,
B2) where you want the result to appear. - Enter the formula:
=LEFT(A2, FIND("#", SUBSTITUTE(A2, ",", "#", 2)) - 1)- Replace A
2 with the reference to the cell containing the text. - Replace
"," with the character you want to target. - Replace
2 with the occurrence number (n) after which you want to remove the text.
 Apply the Formula
- Drag the formula down the column to apply it to other rows in the dataset.
 Drag down the formula and Preview Results
How to Remove Text Before the Nth Occurrence of a Character in Excel
In Excel, you can remove everything before the nth occurrence of a specific character by using a combination of functions like RIGHT, SUBSTITUTE, and FIND. This approach allows for precise manipulation of text in a flexible and non-destructive way.
Step 1: Understand Your Data
Determine the column where the original data is located and the character you want to target. Identify the nth occurrence of the character before which you want to remove text.
- Select the cell where you want the result to appear (e.g.,
C2). - Enter the formula:
=RIGHT(SUBSTITUTE(A2, ",", "#", 2), LEN(A2) - FIND("#", SUBSTITUTE(A2, ",", "#", 2)))- Replace
B2 with the reference to the cell containing the text. - Replace
"," with the character you want to target. - Replace
2 with the occurrence number (n) after which you want to keep the text.
 Enter the Formula
 Step 3: Remove Leading Spaces (Optional)
To ensure there are no leading spaces in the result, wrap the formula in the TRIM function:
=TRIM(RIGHT(SUBSTITUTE(A2, ",", "#", 2), LEN(A2) - FIND("#", SUBSTITUTE(A2, ",", "#", 2))))- Drag the formula down to apply it to other rows in the dataset.
 Drag the Formula Down
Troubleshooting Common Errors
When using formulas to remove text before or after a specific character in Excel, you may encounter common issues. Here's how to resolve them:
1. SEARCH or FIND Returning Errors
Issue: The formula returns an error such as #VALUE!.
Cause: The text you're searching for does not exist in the specified range or cell.
Solution:
- Double-check the text you're searching for and ensure it matches the content exactly (case-sensitive for FIND).
- Use
IFERROR to handle errors gracefully:
Issue: The formula provides unexpected results or wrong outputs.
Cause: Misalignment between the formula parameters and the data structure.
Solution:
Ensure you’re using the correct syntax:
- SEARCH: Case-insensitive and supports wildcards.
- FIND: Case-sensitive and does not support wildcards.
Confirm the range and search text are correctly referenced.
Trim unnecessary spaces in the data using TRIM before applying the formula.
By addressing these common issues, you can resolve errors and achieve accurate results with the SEARCH or FIND functions in Excel.
Also Read
Conclusion
Mastering how to remove text before or after a specific character in Excel can save time and improve your data accuracy. By using methods like Find & Replace, Flash Fill, or advanced formulas, you can tackle text manipulation challenges head-on. Start applying these techniques to clean data in Excel and unlock a more efficient workflow.
Similar Reads
How to Remove the First Characters of a Specific Column in a Table in SQL?
Here we will see, how to remove the first characters of a specific column in a table in SQL. We can do this task using the String function. String functions are used to perform an operation on an input string and return an output string. There are various string functions like LEN(for SQL server), S
3 min read
How to Remove Special Characters from a String in Ruby?
In this article, we will discuss how to remove special characters from a string in Ruby. In Ruby, special characters can be removed from a string using various methods. Special characters typically include punctuation marks, symbols, and non-alphanumeric characters. Let us explore different methods
2 min read
How to Remove the Last Character From a Table in SQL?
SQL (Structured Query Language) allows for efficient data manipulation and retrieval. A common task in SQL involves removing the last character from a specific column within a table. This can be achieved using string functions like SUBSTRING() and LEN(). In this article, we will demonstrate how to a
4 min read
How to remove the first character of string in PHP?
Remove the very first character of a given string in PHP Examples: Input : GeeksforgeeksOutput : eeksforgeeksInput :, Hello geek!Output : Hello geek!Explanation:In PHP to remove characters from the beginning we can use ltrim but in that, we have to define what we want to remove from a string i.e. re
3 min read
How to Delete All Rows Below Certain Row or Active Cell in Excel
Excel is a powerful data management tool that can be used to store, analyze, and create reports on large data. It is generally used by accounting professionals to analyze financial data but can be used by anyone to manage large data. But what if your Excel sheet is full of extra rows you don’t need?
6 min read
How to Remove Pattern with Special Character in String in R?
Working with strings in R often involves cleaning or manipulating text data to achieve a specific format. One common task is removing patterns that include special characters. R provides several tools and functions to handle this efficiently. This article will guide you through different methods to
3 min read
How to Convert Scientific Notation to Text or Number in Excel?
Microsoft Excel is a universal software tool that is used by companies throughout the world to store data/numbers in the form of a spreadsheet. Excel not only helps users to store the data into spreadsheets, but it also gives us the freedom to use multiple smart features to manipulate, organize and
5 min read
How to remove non-alphanumeric characters in PHP?
Non-alphanumeric characters can be remove by using preg_replace() function. This function perform regular expression search and replace. The function preg_replace() searches for string specified by pattern and replaces pattern with replacement if found. Examples: Input : !@GeeksforGeeks2018? Output
2 min read
How to Remove Spaces in Excel
Have you ever wondered you keep searching data on Excel but it is not returning any values and many times you are trying to add columns or data but you are unable to do so? Well, these are some common problems we all have faced in our life. But do you know why it happens? This happens because of ext
8 min read
How to Remove Time from Date/Timestamp in Excel?
Timestamp stores a combined Date and Time value. In this article, we will look at how we can create Timestamp and remove Time from Date in Excel. To do so follow the steps below: Step 1: Formatting data to create a timestamp. Select the cell, right-click on it choose Format Cells... Step 2: Then in
3 min read