How to Lower CPU Usage in Windows 11/10 | High CPU Usage Fixes
Last Updated :
05 Dec, 2024
Experiencing high CPU usage can significantly slow down your computer, making even simple tasks frustrating. Whether you're running demanding software, multitasking with numerous applications, or playing high-performance games, consistently high CPU usage can lead to overheating, lag, and system instability. Fortunately, there are several ways to bring down CPU usage and optimize your PC for better performance.
From managing startup programs to tweaking system settings, we’ll help you troubleshoot high CPU usage issues and show you how to optimize your system for smooth, lag-free performance. Whether you're using your Windows PC for gaming, video editing, or just using it for day-to-day tasks, these steps can help you reduce CPU utilization under control and ensure your computer runs efficiently.
If you’ve been wondering, “Why is my CPU usage so high?” or “How do I reduce CPU usage on my computer?” or Why it's showing CPU 100% Usage? you’re not alone. 100 CPU Utilization is a common issue faced by many users, especially when their systems are running multiple applications or processes in the background. In this guide, we’ll provide a complete list of fixes and strategies that you can use to resolve high CPU usage on both Windows and Mac devices.
 How to Lower CPU Usage in Windows
Main Reasons for High CPU Usage
High CPU usage can be caused by a variety of factors, including:
- Resource-intensive applications: Some software programs, such as games, video editing software, or resource-heavy websites, can use a significant amount of CPU power.
- Too many open programs: Running multiple programs simultaneously can lead to high CPU usage, especially if they are demanding programs.
- Outdated software: Outdated software can be inefficient and may cause high CPU usage.
- Malware or viruses: Malware can infect your computer and use up CPU resources.
- Hardware issues: A failing hard drive or overheating CPU can also cause high CPU usage.
How to Lower CPU Usage on Windows
High CPU usage on Windows can significantly degrade your system's performance, leading to slowdowns, freezes, and overall sluggishness. This issue can stem from various factors, including resource-intensive applications, background processes, system processes, or even hardware limitations.
Method 1: Close Unnecessary Programs in Windows
One of the most direct ways to reduce CPU usage is to close applications that are not actively in use. Many programs, especially those running in the background, can consume significant CPU resources. By closing these programs, you can free up processing power and improve your system's overall performance..
Step 1: Open Task Manager
- Shortcut: Press Ctrl + Shift + Esc or Ctrl + Alt + Del to open the Task Manager.
- Manual: Right-click on the Taskbar and select "Task Manager" or search for it in the Start menu.
Note: When you open the Task Manager, its pre-default showing Processes of Windows
 Open Task Manager
Step 2: Identify Resource-Intensive Programs
- In the Task Manager, switch to the "Processes" tab.
- Sort the processes by CPU usage to identify the top resource consumers.
 Identify Resource-Intensive Programs
Step 3: Close Unnecessary Programs
- Right-click on the process you want to close and select "End task."
- Be cautious when closing system processes, as this can lead to system instability.
Note: You can also directly End Task by Clicking the "End Task" button given in bottom right corner of the task manager.
Method 2: Disable Startup Programs
Many programs are configured to start automatically when your computer boots up. While some of these programs may be essential, others can significantly impact your system's startup time and overall performance. By disabling unnecessary startup programs, you can reduce the initial load on your CPU and improve system responsiveness.
Step 1: Open Task Manager
- Shortcut: Press Ctrl + Shift + Esc or Ctrl + Alt + Del
- Manual: Right-click on the Taskbar and select "Task Manager" or search for it in the Start menu.
Step 2: Switch to the Startup Tab and Disable Unwanted Program
- Click on the "Startup" tab.
- Right-click on the program you want to disable and select "Disable."
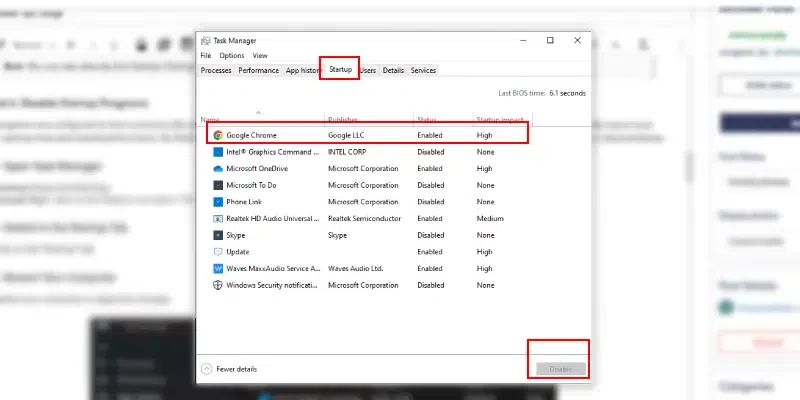 Switch to the Startup Tab
Note: By taking the help of Step 1 you can easily go to startup programms, then by RIght-clicking you can Disable it.
Alternate Method: Using Settings App (Windows 10/11)
Step 1: Open Settings and Click on Apps
- Press the Windows key + I or simply click on windows button and select settings.
- Click on "Apps."
 Open Settings and Click on Apps
Step 2: Select Startup and Disable Unnecessary Programs
- Click on "Startup."
- Toggle the switch to "Off" for the programs you want to disable.
 Select Startup Option
Additional Tips:
- Be Cautious: Avoid disabling critical system programs, as this can lead to system instability.
- Review Startup Impact: Task Manager often shows the startup impact of each program. This can help you prioritize which programs to disable.
Method 3: Update Your Drivers in Windows
Outdated or corrupted device drivers can lead to various performance issues, including high CPU usage. Device drivers are software programs that allow your computer's operating system to communicate with hardware devices like graphics cards, sound cards, and network adapters. Keeping your drivers up-to-date ensures optimal performance and compatibility.
In the below steps we will learn how to update windows "Using Windows Update" feature.
Step 1: Open Settings > Update & Security
- Press the Windows key + I.
- Click on "Update & Security."
 Open Settings > Update & Security
Step 2: Check for Updates
- Click on "Check for updates."
 Check for Updates
Step 3: Install Updates
Windows Update will automatically download and install any available driver updates.
Note: Make sure to Restart the Computer to Successfully Install the Windows update.
Alternate Method: Another way is to Update Windows Drivers is by Using Device Manager
Step 1: Open Device Manager
- Press the Windows key + X and select "Device Manager."
 Open Device Manager
Step 2: Select Driver and Update
- Expand categories like "Display adapters," "Sound, video, and game controllers," and "Network adapters."
- Right-click on a device and select "Update driver."
- Choose "Search automatically for drivers" to let Windows search for the latest drivers.
 Expand Device Categories
Step 3: Choose Update Option
Now you will be asked to choose the update type, here we have choosen Search Automatically for Drivers, this is the easiest way to update your driver or you can also browse from your computer if you have the driver file saved.
 Choose Update Option
Additional Tips:
- Check Manufacturer's Website: Sometimes, the latest drivers may not be available through Windows Update. You can check the manufacturer's website for the latest drivers for your specific hardware.
- Use Driver Update Software: Third-party driver update software can automate the process of finding and installing driver updates. However, use reputable software to avoid potential security risks.
- Be Cautious with Third-Party Drivers: While third-party drivers can sometimes offer additional features or performance improvements, they can also cause stability issues. Only install third-party drivers from trusted sources.
Method 4: Scan for Malware in Windows
Malware, such as viruses, worms, and spyware, can consume significant CPU resources as they run in the background, performing malicious activities. These malicious programs can slow down your system, cause crashes, and even compromise your personal information.
Step 1: Open Windows Security
- Windows 10: Search for "Windows Security" in the Start menu and open it.
- Windows 11: Search for "Windows Security" in the Start menu and open it.
Another Way: You can also go to settings and then search for Privacy & Security and then select Windows Security in both Windows 10 and Windows 11.
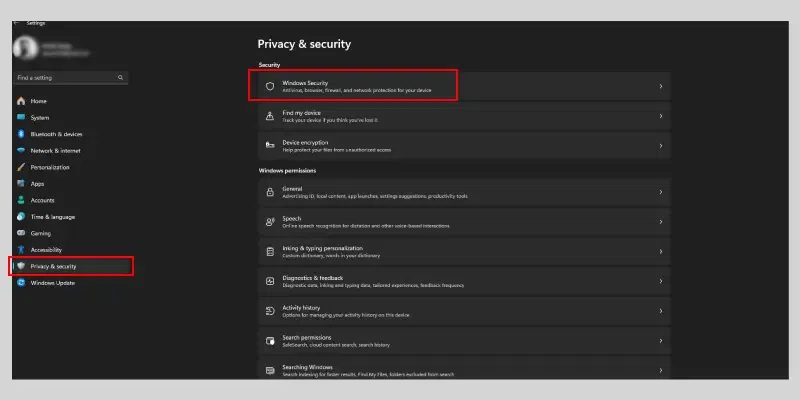 Open Windows Security
Step 2: Select Virus & Threat Protection and Run a Quick Scan
- Click on "Virus & threat protection."
- Under "Current threats," click on "Quick scan."
- Wait for the scan to complete.
 Run a Quick Scan
Optional: Run a Full Scan (for a more thorough check)
- In the same "Virus & threat protection" window, click on "Scan options."
- Select "Full scan" and click "Scan now."
- This might take longer, but it will scan your entire system.
Additional Tips:
- Keep Your Antivirus Updated: Ensure your antivirus software and its definitions are up-to-date.
- Be Cautious with Downloads: Avoid downloading files from untrusted sources.
- Use a Firewall: A firewall can help protect your system from unauthorized network access.
- Be Wary of Phishing Emails: Don't click on suspicious links or open attachments from unknown senders.
Method 5: Adjust Power Settings in Windows
Your computer's power settings can significantly impact CPU usage. Here's how to adjust them on Windows 10 and 11
For Windows 10:
Step 1: Open Control Panel
Search for "Control Panel" in the Start menu and open it.
Step 2: Go to Power Options
Click on "Hardware and Sound," then "Power Options."
Step 3: Choose a Power Plan
Select a power plan that suits your needs:
- Balanced: A good balance between performance and power saving.
- Power saver: Prioritizes battery life over performance.
- High performance: Prioritizes performance over battery life.
Customize Power Plan Settings (Optional):
- Click on "Change plan settings" next to your selected plan.
- Adjust settings like screen brightness, sleep timeout, and power button action.
For Windows 11:
Step 1: Open Settings and Go to Systems
- Press the Windows key + I.
- Click on "System."
Step 2: Select Power & battery
Click on "Power & battery."
 Select Power & battery
Step 3: Choose a Power Plan
Select a power plan that suits your needs:
- Balanced: A good balance between performance and power saving.
- Power saver: Prioritizes battery life over performance.
- High performance: Prioritizes performance over battery life.
Customize Power Plan Settings (Optional):
- Click on "Additional power settings" to access advanced power settings.
- Adjust settings like screen brightness, sleep timeout, and power button action.
 Choose a Power Plan
Method 6: Clean Out Your Computer
Dust and debris inside your computer can cause it to overheat, leading to higher CPU usage as the system tries to cool down. A clean computer can run more efficiently, including lower CPU usage. Here's how to clean your hardware:
Step 1: Clean the Interior
- Turn off and unplug your device: Ensure it's completely powered off.
- Open the case carefully: Follow your device's specific instructions to open it.
- Remove dust: Use compressed air to gently blow dust out of fans, heat sinks, and other components.
- Clean fans: If necessary, use a soft brush to clean fan blades.
- Check for obstructions: Ensure there are no obstructions blocking airflow.
 Clean the Interior
Step 2: Clean the Exterior
- Power off and unplug your device.
- Wipe the exterior: Use a soft, lint-free cloth dampened with a gentle cleaning solution to wipe the screen, keyboard, and mouse.
- Clean the keyboard: Use compressed air to remove debris from the keyboard keys. For stubborn dirt, use a soft-bristled brush or a cleaning gel.
- Clean the mouse: Wipe the mouse with a damp cloth. For optical mice, clean the sensor lens with a soft cloth.
Additional Tips:
- Regular Cleaning: Clean your computer regularly to prevent dust buildup.
- Avoid Extreme Temperatures: Keep your computer away from heat sources and ensure proper ventilation.
- Use a Cooling Pad: A cooling pad can help reduce CPU temperature, especially for laptops.
Troubleshooting Tips
If you’ve tried the above steps and your CPU usage is still high, consider these additional tips:
- Check for system updates: Make sure your operating system is up-to-date.
- Check for system overload: Ensure that no heavy applications like video editors or games are running unless necessary.
- Reset your PC: As a last resort, you can reset your PC to its factory settings to resolve persistent issues.
Conclusion
Lowering CPU usage is very important for maintaining a smooth and fast computing experience. By following these simple methods, such as closing unnecessary programs, updating drivers, and scanning for malware, you can reduce the load on your processor. If these steps don’t work, you may need to check for hardware issues or consult with a professional. Keep your system clean, updated, and free from unnecessary processes to ensure optimal performance.
Similar Reads
How to Fix Msmdsrv.exe Error & High CPU Usage in Windows?
In 1983, the first version of Windows was launched, Windows 1.0 which operated on a 256 Kb RAM only. Since then, the Windows operating system has gone through many changes & modifications. And now, the latest version of Windows 11 is present on devices of 25% of overall Windows users. But as it
5 min read
How to Check for Updates in Windows 11?
In addition to performing regular security checks, it is also important to keep compliant with the current trend of keeping almost every device’s software and application up to date. This also applies to the Windows 11 operating System. Updates may include new possible options, improve the existing
4 min read
How to Fix the System Service Exception Stop Code in Windows 10?
Encountering the System Service Exception stop code in Windows 10 can be frustrating, especially since it often leads to a blue screen error. This type of error is commonly known as a BSOD (Blue Screen of Death). In this guide, we’ll walk you through how to fix the System Service Exception error in
6 min read
How to Update Intel Drivers On Windows 11?
Updating your Intel drivers on Windows 11 ensures your system runs smoothly and optimally, especially when it comes to graphics and performance. If you're looking for a quick and reliable method how to update Intel drivers, you've come to the right place. Whether you want to update your drivers manu
6 min read
How to Check Hard Drive Temperature in Windows 11?
Short Preview!Follow the quick steps to check your hard drive's temperature in Windows 11: Go to SettingsThen System.Storage>Disk & VolumeNow, click on "Properties.A pop-up will open that will show you the exact temperature of your Hard Drive.It is essential to monitor the temperature of your
2 min read
How to Fix When the Cursor Disappears in Windows 10?
If you are working and your mouse cursor disappears on Windows 10. The disappearance of the mouse cursor from the screen is a huge issue for users. It can be a confusing and very annoying issue whether you're just surfing the internet, playing a video game, or working on a document. But worry not th
7 min read
How to Fix the High CPU Usage of Mysqld.exe?
Mysqld.exe running at full capacity in your system can greatly hinder the speed and efficiency of your system as well as your MySQL server. Mysqld.exe is the program that runs MySQL, and if it uses too much of your computer's power, it can cause your whole system to slow down, affecting other progra
7 min read
How To Turn Off Update In Windows 10?
Automatic update in Windows 10 is a severe problem. This issue is facing nearly all users of Windows. Sometimes this issue is so irritating that the users often wish to shift to the older versions of windows. But there is no doubt that Windows 10 is the best operating system ever. The automatic upda
6 min read
How to Upgrade From Windows 10 to Windows 11 For Free
Upgrading from Windows 10 to Windows 11 is free for eligible devices. The best part about this is that you don't need to spend any additional charges on a new PC, you can upgrade to Windows 11 for free. Whether you want to enhance gaming performance, an advanced user interface, or better security, W
7 min read
How to Fix "Critical Process Died" in Windows 10?
Windows OS is more dependent upon the execution of the background activities. You can term such activities as the Critical Process of Windows. You will be surprised to know that you can get Errors on Critical Windows Processes as well. In such cases, you get the Windows Blue Screen Error along with
6 min read