How to Insert a Checkbox in Excel: Step-by-Step Guide
Last Updated :
10 Apr, 2025
How to Add Checkboxes in Excel: Quick Steps
- Enable the Developer Tab >>Go to Developer Tab
- Control Group >> Click Insert
- Select Checkboxes >>Place the Checkboxes
- Link the Checkbox to a Cell
Creating a checklist or adding interactive elements to your spreadsheet in Excel becomes much easier once you learn how to add a checkbox in Excel. Whether you’re managing tasks, tracking progress, or organizing data, Excel check boxes offer a simple yet effective way to make your sheets more functional. In this guide, we’ll walk you through the process of how to add a checkbox to your Excel worksheet.
We’ll also cover how to insert check marks and use checkboxes to create a fully interactive checklist in Excel, allowing you to stay organized and efficient. By the end of this article, you’ll have the skills to add check boxes in Excel and enhance your data management experience.
Prerequisites for Using Checkboxes in Excel
Before inserting a checkbox in Excel, You will first have to insert the turn on the developer tab on the Excel Ribbon, which is by default hidden. Follow the below steps to turn on the Developer tab:
Step 1: Go to Options
On the ribbon, click File > Options.
Step 2: Customize the Ribbon
In the Excel Options window, select Customize Ribbon.

Turn on Developer Tab
Step 3: Add Developer Tab
- Check the box next to Developer in the list of Main Tabs.
- Click OK to save changes.
How to Insert a Checkbox in Excel
You can make a list of tasks or other things for which you want to create a checkbox. Learn Inserting checkboxes in Excel:
Step 1: Select Developer Tab
On the navigation menu bar click on the Developer option.

Select the Developer Tab
Step 2: Click on Drop-Down Arrow
Now click on the drop-down arrow button of the Insert option.

Click on Drop-Down Arrow
Step 3: Select Check Box Option
Next select the checkbox option from the Form Controls menu as shown in the figure:

Select Check Box Option
Step 4: Select the Cell
Now, choose the cell in which you want to add the checkbox, and the checkbox will get inserted in the cell as shown in the below figure.
The keyboard shortcut to add a checkbox in Excel is Alt + N, X.
Note: You should know that we can add only one checkbox at a time. For adding more checkboxes, copy the existing checkbox and paste it to the other cell and continue till you fulfill your need.
Step 5: Preview the Inserted Check box
Finally, a check box is inserted in the Excel Sheet where you want.

Check Box Inserted
Step 6: Edit the Label
- Right-click the checkbox and select Edit Text.
- Type your desired label (e.g., “Task Complete”).
Step 2: Resize or Move the Checkbox
Drag the corners to resize or click and drag to move it to another location.
How to Insert Checkboxes in Excel without Developer Tab
Checkboxes can be inserted without Developer Tab also, Follow the below steps to add checkboxes in Excel without using the developer tab:
Step 1: Open the Excel Worksheet
Launch Excel and open the worksheet where you want to insert checkboxes.
Step 2: Go to the Insert Tab
Navigate to the Insert tab on the Ribbon.
Step 3: Insert a Symbol
- Click on Symbol in the Insert group.
- The Symbol dialog box will appear.
Step 4: Select a Checkbox Symbol
In the Symbol dialog box, set the font to Wingdings (or another symbol font like Segoe UI Symbol).
Scroll through the symbols to find:
- An empty checkbox (☐).
- A checked checkbox (☑).
Select the desired checkbox symbol and click Insert.
Repeat this process for each cell where you want a checkbox.
Step 5: Format the Checkbox
Resize the Checkbox:
Adjust the font size of the cell to resize the checkbox as needed.
Align the Symbols:
Use the Align Center or Align Right/Left options in the Home tab to position the checkbox symbols neatly within the cells.
This method provides a simple and visually effective way to add checkboxes without using form controls or VBA.
How to Link a Checkbox to a Cell
To track the status of a checkbox (checked or unchecked), you need to link it to a specific cell. Follow the below steps to Link a Checkbox to a cell:
Step 1: Right Click on Check Box
Right-click on the checkbox and Among the array of options, select “Format Control“.

This action opens the Format Control dialog box, a pivotal interface for configuring checkbox behavior.

Step 3: Select Value Section
Within the Format Control dialog box, navigate to the “Value” section. Set the value to “Checked“. This strategic choice ensures that the checkbox assumes a “Checked” state as its default configuration upon workbook access.

Step 4: Select Cell Link
Direct your attention to the “Cell Link” section within the dialog box. Input the designated cell reference ‘$C$7’, aligning the checkbox with this specific cell.

Step 5: Make Adjustments and click OK
With the necessary adjustments in place, solidify your configuration by clicking the “OK” button.


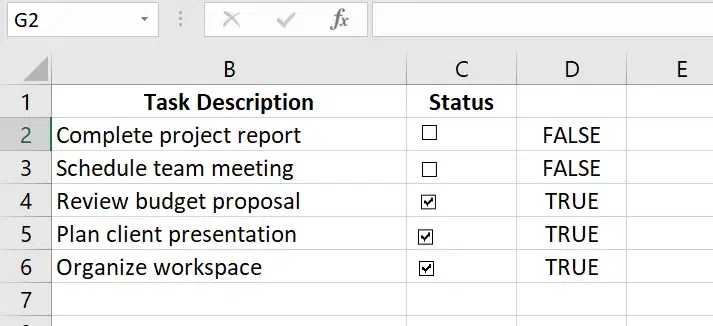
Now checkbox is linked to the cell. In the linked cells, TRUE appears for selected checkboxes and FALSE for cleared checkboxes.
Usage of Checkbox in Excel
To create a to-do list in Excel with checkboxes:.
- As soon as you check-mark the list, the status will change to DONE from TO BE DONE.
- The value of the cell linked to that checkbox changes from FALSE to TRUE.
- It reflects the changes in the Task Completed and percent(%) of Task completed cell.
Follow the below steps to make this interactive To-Do-List:
Step 1: Enter the data
List all the activities.

Enter the data
Step 2: Insert Checkbox
Insert the Checkboxes.

Checkboxes Inserted
Step 3: Link the Checkboxes
Link the checkboxes to cell. You will have to manually link each checkbox one by one.
In the cell, enter the following formula:”=IF(D2,”DONE”,”TO BE DONE”) “and drag for all the cells below.

Now, Enter the following formula “=COUNTA(cell-range”) “ to count the total number of tasks.
In the cell, enter the following formula “=COUNTIF(cell_range, TRUE) “.

Preview Results
How Fix the Position of a Checkbox in Excel
To fix the position of a checkbox in Excel:
Step 1: Right-click on the checkbox.
- Right-click on the checkbox to bring up the context menu.
- Ensure the checkbox is selected (you’ll see a border around it).
In the context menu, select Format Control.

Step 3: Adjust the Object Properties:
In the Format Control dialog box, navigate to the Properties tab.

Step 4: Select your Preferences
You will see three options:
- Move and size with cells (default).
- Move but don’t size with cells.
- Don’t move or size with cells.
Choose either “Move and size with cells” or “Don’t move or size with cells.”

Step 5: Click “OK.”
Click OK to apply the changes.
Conclusion
In conclusion, learning how to insert a checkbox in Excel can significantly improve your ability to manage and track tasks within your spreadsheets. Whether you’re building a to-do list or designing a more complex project management tool, Excel checkboxes provide an easy and efficient way to stay organized. Now that you understand how to add a checkbox and use check marks, you can create interactive checklists in Excel that make tracking progress straightforward and visually appealing. By incorporating these simple features, you can take your Excel documents to the next level of functionality.
Similar Reads
How to Make a Calendar in Excel: Step by Step Guide
Creating a calendar in Excel is a practical solution for personal and professional scheduling, offering flexibility and customization options. Whether you want to use built-in Excel Calendar 2025 templates or design a dynamic calendar with formulas, PivotTables, or VBA calendar creation, Excel provi
6 min read
How to Add a Column in Excel: Step-by-Step Guide
Need to organize your data better in Excel but unsure how to add a column without disrupting your existing setup? Whether you’re working with a simple list or a complex table, inserting columns is a fundamental skill that increases productivity and keeps your data structured. This guide covers 4 eas
6 min read
How to Swap Columns in Excel: Step-by-Step Guide
To Swap Columns in Excel - Quick StepsDrag and Drop: Select a column, drag it to a new position, and release.Cut and Paste: Cut a column (Ctrl + X) for Windows and (Cmd + X) for Mac, then paste it in the new location using Insert Cut Cells.Copy and Paste: Copy a column, then insert the copied cells
8 min read
How to Create a Form in Excel - A Step by Step Guide
Creating forms in Excel is an efficient way to capture and organize data, whether you’re tracking inventory, collecting survey responses, or entering client information. Excel forms are customizable and easy to use, making data entry faster and more organized, especially when handling large datasets
7 min read
How to Make a Bar Graph in Excel: Step by Step Guide
Bar graphs are one of the most versatile tools in Excel for visualizing and comparing data. Whether you’re tracking sales, analyzing survey responses, or presenting project milestones, bar graphs offer a straightforward way to highlight key trends and differences. Learning how to create a bar graph
6 min read
How to Easily Add Checkboxes in Google Docs: A Step-by-Step Guide
Check box Google Docs - Quick StepsOpen Google Docs >> Select the textGo to “Format†>> Select “Bullets & numbering.Click on “Checklist†>> Checkboxes will appear Select a checkbox >> Mark it as checked or unchecked as neededAdding checkboxes in Google Docs is an easy way
10 min read
How to Create Flowchart in Excel: Step-by-Step Guide
A Flowchart is a valuable tool for visualizing processes, workflows, or decision-making paths, making it easier to communicate ideas and identify improvements. This article provides a clear, step-by-step guide on how to create a Flowchart in Excel, using its shapes and formatting tools to design cus
6 min read
How to Delete Filtered Rows in Excel: Step by Step Guide
Efficiently managing data in Excel often involves filtering and removing unnecessary rows. However, deleting filtered rows in Excel can be tricky if not done correctly, as unwanted data may get removed. This article provides a step-by-step guide to help you safely and accurately delete filtered rows
9 min read
Pivot Tables in Excel - Step by Step Guide
Pivot tables are one of the most powerful features in Excel, allowing you to quickly summarize, analyze, and visualize large sets of data. Whether you’re dealing with sales data, financial reports, or any other type of complex dataset, knowing how to create pivot tables in Excel can make your data a
7 min read
How to Merge Cells in Google Sheets: Step by Step Guide
If you're wondering how to merge cells in Google Sheets, you're in the right place. Merging cells can simplify your data layout, making it easier to read and organize. In this article, we'll cover everything from how to combine cells in Google Sheets to how to find merged cells in Google Sheets. Thi
7 min read