How to Deploy MongoDB App to Heroku?
Last Updated :
28 Apr, 2025
Pre-requisite:- MongoDB
MongoDB is an open-source document-oriented database designed to store a large scale of data and allows you to work with that data very efficiently. It is categorized under the NoSQL (Not only SQL) database because the storage and retrieval of data in the MongoDB are not in the form of tables.
Heroku
Heroku is a platform as a service (PaaS) that enables developers to build, run, and operate applications entirely in the cloud.
In this article, we're going to create a simple NodeJS ToDo application that we connect to MongoDB Cluster and Deploy into Heroku.
This article is divided into 3 steps to Deploy MongoDB App to Heroku.
Steps to Deploy MongoDB App on Heroku:
- Create MongoDB Atlas Cluster
- Create NodeJS ToDo App
- Installation of Heroku and Deployment
Step 1:- MongoDB Atlas Cluster
MongoDB Atlas Cluster is a NoSQL Database-as-a-Service offering in the public cloud (available in Microsoft Azure, Google Cloud Platform, and Amazon Web Services).
Below are the steps to create a free MongoDB Cluster(a shared cluster)
- Open the MongoDB Atlas website, and goes toward the first step of creating a Cluster.
- Click on a button, Start Free as shown below. Sign Up if you haven't Signed Up yet or Sign In.

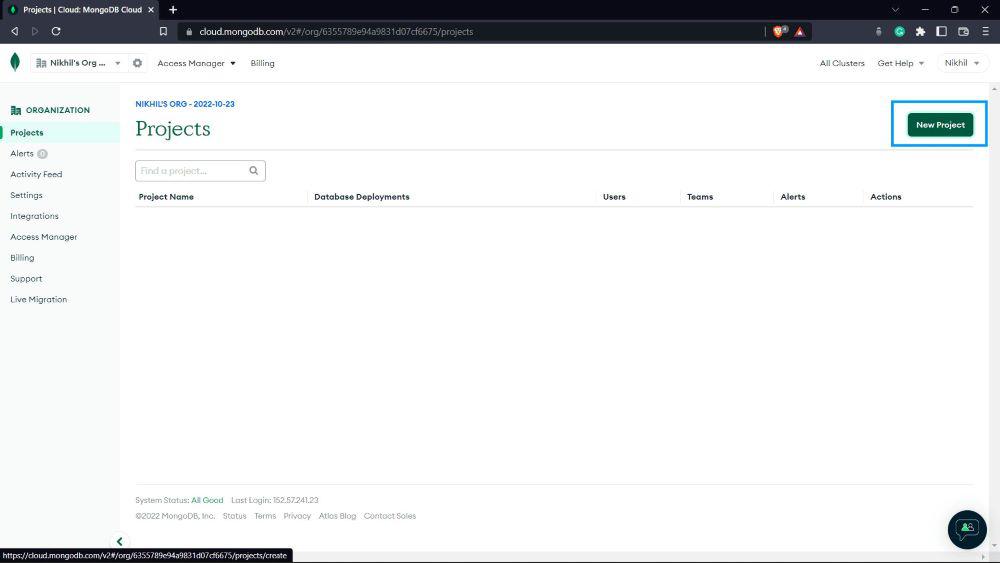
- Once signed in, click on New Project.
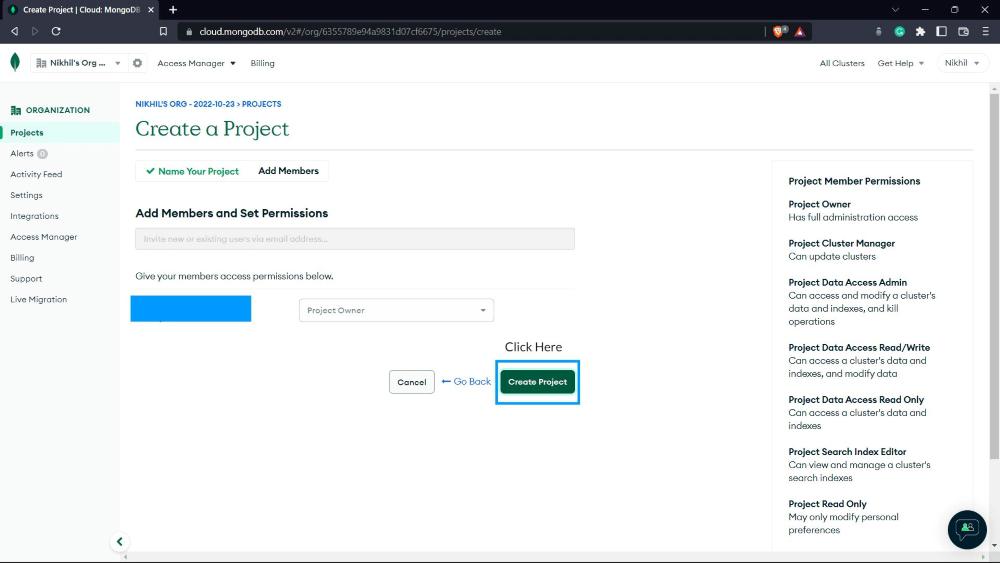
- Give a name to the project and click on Next.
- Click on Build a Database.

- Select the shared cluster and click on Create.

- Make sure you have selected the M0 Sandbox as a cluster and click on Create Cluster

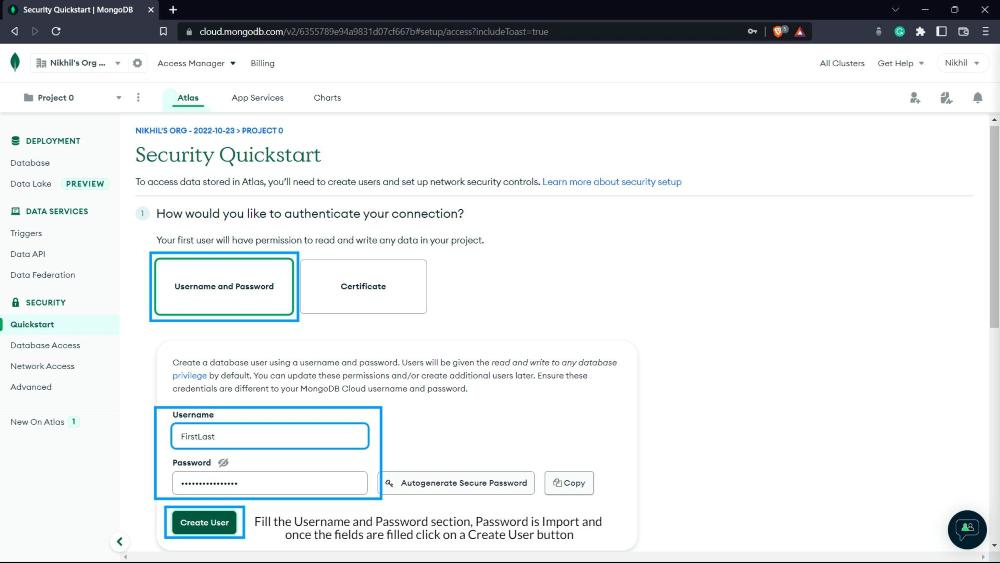
- Here we're creating a User who can access the Cluster Using Password.
- Select the field as Username and Password and fill in the details, and keep in mind a password is required to access the Cluster.
- After that, click on a Create User.

- Click on Browse Collections and then on Add my Own Data as shown below.


- Give a name to the Database and Collection and click on Create Button. The database name is important while manipulating with database in the application.


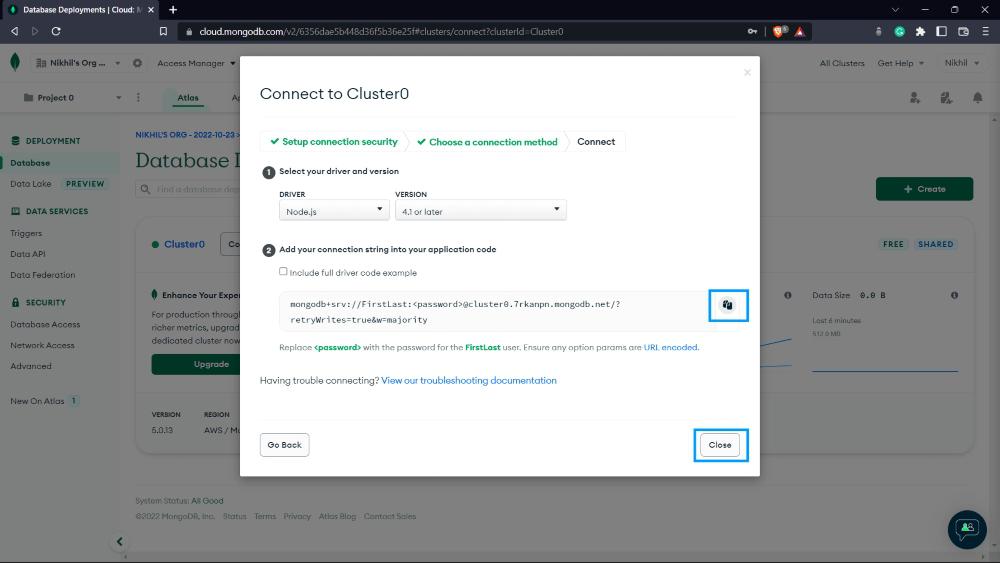
- Copy this URL, this is going to be a Database URL.
- While using this URL, in place of <password> we have to insert the password we have created at a time when we were creating the user.
- Next, click on, Network Access in the left menu and next click Add IP Address.


So now, we have set up our MongoDB Atlas Cluster, and we're ready to move toward the To-Do NodeJS application.
Step 2: NodeJs
Node.js is an open-source and cross-platform runtime environment built on Chrome’s V8 JavaScript engine for executing JavaScript code outside of a browser. You need to recollect that NodeJS isn’t a framework, and it’s not a programming language. It provides an event-driven, non-blocking (asynchronous) I/O and cross-platform runtime environment for building highly scalable server-side applications using JavaScript.
For Downloading And Installation of NodeJS, use this link.
Now follow the steps below after installing.
- Create a folder called ToDO Project
- Open the PowerShell window on that ToDo Project folder.
- Run these commands on the PowerShell window.
# npm init -y
# npm install express mongoose ejs dotenv
4. Create a file with the name index.js and put this below code in the index.js file.
JavaScript
require("dotenv").config();
// basic syntax for dotenv module
// DotEnv is a lightweight npm package that
// automatically loads environment variables
// from a . env file into the process. env object

// Express is a minimal and flexible Node.js web
// application framework that provides
//a robust set of features for web and mobile applications

const express = require("express");

// Mongoose is an Object Data Modeling (ODM) library
// for MongoDB database and Node.js.
const mongoose = require("mongoose");

// creating nodejs app
const app = express();

// app to use body-parser
app.use(express.urlencoded({ extended: true }));
app.use(express.json());

// app set to template engine called ejs
app.set("view engine", "ejs");

// url for mongodb cluster
const url = process.env.DB_URL;

// connecting to mongodb cluster
mongoose.connect(url);

// schema for storing the todo's in DB
const itemsSchema = {
  toDoItem: String,
};

// creating Collection in DB
const Item = mongoose.model("toDoItems", itemsSchema);

app.get("/", function (req, res) {
  // find all the inserted Items in DB
  Item.find({}, (err, toDoItems) => {
    if (!err) {
      res.render("index", {
        toDoItems: toDoItems,
      });
    }
  });
});

app.post("/", function (req, res) {
  //   store the toDo we're getting in variable toDo
  const toDo = req.body.toDo;

  const toDoItem = new Item({ toDoItem: toDo });

  //   store the toDo item in the DB
  toDoItem.save(() => {
    // redirect to home page
    res.redirect("/");
  });
});

app.listen(process.env.PORT || 3000);
5. Create a file with the name .env and put your Cluster URL we copied earlier as shown below.

6. Create a folder with name views in the project folder
7. Create a file with the name index.js in the views folder and put the below code in it
HTML
<!DOCTYPE html>
<html lang="en">
  <head>
    <meta charset="UTF-8" />
    <meta http-equiv="X-UA-Compatible" content="IE=edge" />
    <meta name="viewport" content="width=device-width, initial-scale=1.0" />
    <title>To Do List</title>
  </head>
  <body>
    <% toDoItems.map((item , number)=>{ %>
    <div style="border: 2 black">
      <p><%= number + 1 %> : <%= item.toDoItem %></p>
    </div>
    <% }) %>

    <form action="/" method="POST">
      <input
        type="text"
        name="toDo"
        placeholder="New Item"
        autocomplete="off"
        value=""
        autofocus
      />
      <button type="submit">+</button>
    </form>
  </body>
</html>
- Now we're done with the NodeJS ToDo app, make sure that your project folder looks like this as shown below

In the PowerShell window, run the command
# node index.js
Open your browser and search localhost:3000, and you should get the output as shown

- Now you can add a todo item in the input field, and you can see that this item is added to the database


- After that, we can see that this todo item is added to the MongoDB cloud database

- So now we're ready to move toward Heroku.
Step 3: Use Heroku. It is a cloud-based application deployment and management service. For downloading and installation of Heroku, click here. So considering that you have installed Heroku CLI on your machine. Go to the official website of Heroku. Sign up if you haven't yet, or Sign In.

- Open your git terminal and run this command → heroku login. This window will pop in front of you, click on Log In.

- Now the next step is to track your codebase in a Git repository.
- Create a file with the name .gitignore inside the project folder and put the below code inside it.
       /node_modules
       npm-debug.log
       .DS_Store
/*.env- .gitignore should look like this.

- In a project folder directory, run these commands
git init
git add .
git commit -m "initial"
- The next step is, add a Heroku git remote and run this command in CLI → heroku create.
This is basically the URL for our application generated by the Heroku

- The next Step is to create a file Procfile inside the project folder without any extension, and it should look like as below
web: node index.js

- The next step is used to check the version of NodeJS in your machine by using command → node --version.

- Now paste the below code in package.json file of project folder below the dependencies according to your NodeJS version.
          ,"engines": {
          "node": "16.17.1"
           },
- We're very close to see our application running on the cloud, next step is to Track our codebase in repository and push it onto Heroku to do this run the commands
git add .
git commit -m "deployment setup is done"
git push heroku master
- Now we have to set up our environment variable, the key-value pairs inside the .env file, a Database URL in our case. We can set up environment variable in the Heroku site.
- This is our app created by Heroku, click on it.

- Click on Settings and then click on Reveal config vars.

- Here we have to insert a key-value pair as we inserted in a .env file as DB_URL as a key and value as URL of Cluster along with the Database name.
- Once the fields are full, click on an Open App button at top right, (it opens our app remotely).

- This is our app running remotely with a URL, now we can test for new entries of ToDo items in the database

- And Here we go, a new entry is inserted into our Cloud Database by Remotely Working App

So we successfully deployed the MongoDB Application to Heroku.
Similar Reads
How to Deploy a Replica Set in MongoDB? MongoDB replica sets are crucial for ensuring high availability, fault tolerance, and data redundancy in MongoDB deployments. A replica set is a group of MongoDB instances that maintain the same dataset, offering a reliable solution for production environments.In this article, we will explain the pr
5 min read
How to Install MongoDB on Android? MongoDB is a NoSQL document-oriented database used to store data in high volume. Instead of using columns and rows or tables that were used in traditional relational databases like SQL, MongoDB makes use of collections and documents. MongoDB is written in C++ language. MongoDB is developed and manag
9 min read
How To Deploy a Django Application to Heroku with Git CLI? Deploying a Django application to Heroku using the Git command-line interface (CLI) is a simple process. Heroku provides a platform-as-a-service (PaaS) that enables you to deploy, manage, and scale your applications easily. This guide will walk you through the steps to deploy your Django application
3 min read
How to Create a MongoDB Dump of Database MongoDB is a popular NoSQL database known for its flexibility, scalability, and ease of use. However, to protect our data from potential data loss or corruption, it’s critical to have a reliable MongoDB backup strategy in place. In this article, we will go through the process of creating a MongoDB d
7 min read
How to Connect Node to a MongoDB Database ? Connecting Node.js to MongoDB is a common task for backend developers working with NoSQL databases. MongoDB is a powerful, flexible, and scalable database that stores data in a JSON-like format. In this step-by-step guide, we'll walk through the entire process from setting up your development enviro
6 min read