Django has become one of the popular frameworks over the past few years. Often, after creating your Django project, you are confused, about how to share it with people around you. This article revolves around how you can host your Django application on Pythonanywhere for free.
Uploading your code to PythonAnywhere
PythonAnywhere provides free Python hosting Django projects and makes your Django project live to the world.PythonAnywhere is also very easy.
Uploading your code to PythonAnywhere is a straightforward process that allows you to run Python scripts and web applications in a cloud-based environment. Here's a step-by-step guide on how to upload your code to PythonAnywhere.
Step 1: Setup your Django Project (Local Changes)
Initialize your Django Project
django-admin startproject deploy_on_pythonanywhereOpen the project in your editor and under settings.py search "ALLOWED_HOSTS" and allow all hosts:
ALLOWED_HOSTS = ['*']Create requirements.txt file using the command
pip3 freeze > requirements.txt
File structure of our project looks like this:
deploy_on_pythonanywhere
├── db.sqlite3
├── deploy_on_pythonanywhere
│   ├── asgi.py
│   ├── __init__.py
│   ├── __pycache__
│   │   ├── __init__.cpython-38.pyc
│   │   ├── settings.cpython-38.pyc
│   │   ├── urls.cpython-38.pyc
│   │   └── wsgi.cpython-38.pyc
│   ├── settings.py
│   ├── urls.py
│   └── wsgi.py
├── manage.py
└── requirements.txt
Let's Start our Django Server
cd deploy_on_pythonanywhere
python3 manage.py runserver

As you can see that, your server is running on localhost. But wait... that's not over, let's make it live for the world
Step 2: Upload Project to GitHub
Follow this link to push the project on github - How to Upload a Project on Github?
Step 3: Deploy Project on pythonanywhere
Create an account on pythonanywhere - Click Here. After Register, you can see the page like this

Now click on Console then select Bash you'll see like this

Run following commands on bash:
Clone GitHub repo
git clone https://github.com/Prakhar-Mangal/deploy_on_pythonanywhere
Now create and setup environment variables
python3 -m venv env #create virtual environment
source env/bin/activate #activate virtual environment
cd deploy_on_pythonanywhere #navigate inside your project
pip install -r requirements.txt #installing dependencies using requirements.txt
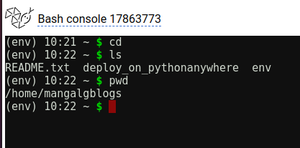
Now copy the path of your directories which you installed on bash. Type command on bash
cd
ls # get list of directories
pwd #copy the path for future use
Here it looks like:
Hurree, we set up our project successfully. Now click on Web then select Add a new web app

Click on next and follow the procedure
Select Django as the framework

Select python3.8 (latest) and click on next till last.

Now under the Web section open the WSGI configuration file.

Edit WSGI configuration file on line no. 12 and 17 remove the word mysite with your project name which you cloned from GitHub, in my case it is deploy_on_pythonanywhere.

Now it looks like this and then click on save:

Select Virtualenv section under Web:

Enter the path of Virtualenv as we created using bash (refer above pwd command for path)

Click on Reload under the Web section and visit the link
Problem faced while hosting python website on PythonAnywhere
Install all the required python packages before creating new web app in python anywhere so that you can avoid errors while hosting.
CSS,JS integration problem : It occurs when we did not given the path of the static file in python anywhere web app so give the path of static file in STATIC FILE SECTION.

Cloning GitHub website code problem : Sometimes when we clone website from GitHub it asks for username and password after giving the right username and password it still shows some error you can avoid this problem by creating classic token in GitHub you can take help from https://www.iorad.com/player/2052920/Github---How-to-generate-classic-personal-access-tokens-#trysteps-1 paste the token at password place.
Other webpages URLs' linking problem : If we used http://localhost:8000 in the website there is need to change this thing with your real path https://username.pythonanywhere.com/urlpathname otherwise when your website get hosted your other URLs present in html, JS etc. would not work.
Security problem : We can make our website secure using SECURITY of PythonAnywhere we just need to enable FORCE HTTPS.
