How to Delete Multiple RecyclerView Items in Android?
Last Updated :
20 Dec, 2021
RecyclerView is an advanced version of ListView with improved performance. When you have a long list of items to show you can use RecyclerView. It has the ability to reuse its views. In RecyclerView when the View goes out of the screen or is not visible to the user it won’t destroy it, it will reuse these views. This feature helps in reducing power consumption and providing more responsiveness to the application. In this article, we are going to see that how we can delete multiple items from a recycler view in android studio. Before moving further let us know about RecyclerView.
Prerequisites:
Before implementing the concept taught in this article, you should have the knowledge of implementing a recycler view in android studio. If you don't know how to implement a recycler view then go through the following article: RecyclerView in Android with Example
What we are going to build in this article?
Here is a sample video of what we are going to implement in this article. Note that we are going to implement this application using Java language.
Step by Step Implementation
Step 1: Create a New Project
- Open a new project.
- We will be working on Empty Activity with language as Java. Leave all other options unchanged.
- You can change the name of the project at your convenience.
- There will be two default files named activity_main.xml and MainActivity.java.
If you don’t know how to create a new project in Android Studio then you can refer to How to Create/Start a New Project in Android Studio?
Step 2: Adding the required dependencies
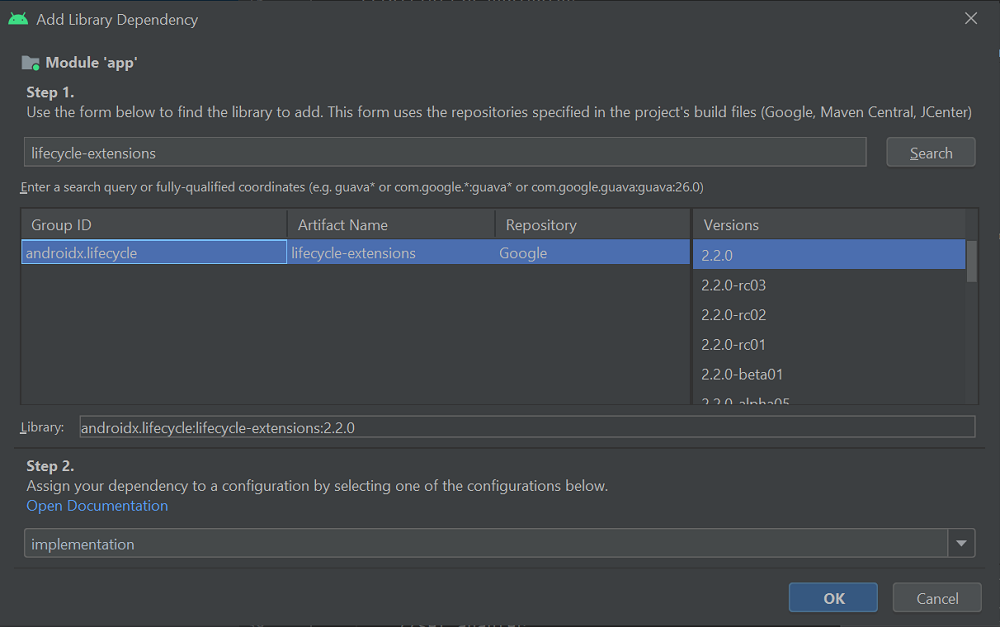
Open Gradle Scripts > build.gradle(module). Go to app > right click > open module settings > dependencies > Add dependency > Library dependency.

Type material in the search bar and click on search. Select the dependency shown in the below image-

Type "lifecycle-extensions" in the search bar and click on search. Select the dependency shown in the below image-
Step 3: Add new vector assets in drawable
Navigate to drawable > right-click > new > vector asset and then select the following assets from clip art.
1. Check circle:

2. Select all:

Step 4: Working with xml files
Navigate to the app > res > layout > activity_main.xml and add the below code to that file. Below is the code for the activity_main.xml file.
XML
<?xml version="1.0" encoding="utf-8"?>
<androidx.constraintlayout.widget.ConstraintLayout
    xmlns:android="http://schemas.android.com/apk/res/android"
    xmlns:app="http://schemas.android.com/apk/res-auto"
    xmlns:tools="http://schemas.android.com/tools"
    android:layout_width="match_parent"
    android:layout_height="match_parent"
    tools:context=".MainActivity">

    <androidx.recyclerview.widget.RecyclerView
        android:layout_width="match_parent"
        android:layout_height="match_parent"
        android:id="@+id/recycler_view"
        tools:listitem="@layout/item_main"
        />

    <TextView
        android:layout_width="match_parent"
        android:layout_height="match_parent"
        android:id="@+id/tv_empty"
        android:text="No Data Found"
        android:textSize="24sp"
        android:textStyle="bold"
        android:textColor="@color/design_default_color_primary"
        android:gravity="center"
        android:visibility="gone"
        />

</androidx.constraintlayout.widget.ConstraintLayout>
Follow the path app > res > layout > right click > new > layout resource file and create a new file named as item_main.xml. Use the below code in item_main.xml file-
XML
<?xml version="1.0" encoding="utf-8"?>
<LinearLayout
    xmlns:android="http://schemas.android.com/apk/res/android"
    android:layout_width="match_parent"
    android:layout_height="wrap_content"
    android:orientation="horizontal"
    android:padding="4dp"
    android:layout_gravity="center"
    >

    <TextView
        android:layout_width="0dp"
        android:layout_height="wrap_content"
        android:layout_weight="1"
        android:id="@+id/text_view"
        android:padding="12dp"
        />

    <ImageView
        android:layout_width="wrap_content"
        android:layout_height="wrap_content"
        android:id="@+id/check_box"
        android:layout_marginStart="12dp"
        android:layout_marginEnd="12dp"
        android:visibility="gone"
        android:src="@drawable/ic_check_circle"
        />

</LinearLayout>
Follow the path app > res > right click > new > android resource file > Resource type > menu and create a new file named as menu.xml. Use the below code in menu.xml file-
XML
<?xml version="1.0" encoding="utf-8"?>
<menu xmlns:android="http://schemas.android.com/apk/res/android"
    xmlns:app="http://schemas.android.com/apk/res-auto">

    <item
        android:id="@+id/menu_delete"
        android:title="Delete"
        android:icon="@drawable/ic_delete"
        app:showAsAction="always"
        />
    <item
        android:id="@+id/menu_select_all"
        android:title="Select all"
        android:icon="@drawable/ic_select_all"
        app:showAsAction="always"/>
</menu>
Step 5: Working with java files
Go to the MainActivity.java file and refer to the following code. Below is the code for the MainActivity.java file. Comments are added inside the code to understand the code in more detail.
Java
package com.example.multiple_item_delete;

import androidx.appcompat.app.AppCompatActivity;
import androidx.recyclerview.widget.LinearLayoutManager;
import androidx.recyclerview.widget.RecyclerView;

import android.os.Bundle;
import android.widget.TextView;

import java.util.ArrayList;
import java.util.Arrays;

public class MainActivity extends AppCompatActivity {

    // initialize variables
    RecyclerView recyclerView;
    TextView tvEmpty;
    ArrayList<String> arrayList=new ArrayList<>();
    MainAdapter adapter;


    @Override
    protected void onCreate(Bundle savedInstanceState) {
        super.onCreate(savedInstanceState);
        setContentView(R.layout.activity_main);

        // assign variable
        recyclerView=findViewById(R.id.recycler_view);
        tvEmpty=findViewById(R.id.tv_empty);

        // add values in arraylist
        arrayList.addAll(Arrays.asList("One","Two","Three","Four","Five","Six","Seven","Eight","Nine","Ten","Eleven"
        ,"Twelve","Thirteen","Fourteen","Fifteen","Sixteen","Seventeen","Eighteen","Nineteen","Twenty"));

        // set layout manager
        recyclerView.setLayoutManager(new LinearLayoutManager(this));

          // Initialize adapter
        adapter=new MainAdapter(this,arrayList,tvEmpty);

          // set adapter
        recyclerView.setAdapter(adapter);
    }
}
Follow the path app > java > com.example.multiple_item_delete > right click > new > java class and create a new file named as MainAdapter.java. Use the below code in MainAdapter.java file-
Java
package com.example.multiple_item_delete;

import android.app.Activity;
import android.graphics.Color;
import android.text.Layout;
import android.view.ActionMode;
import android.view.LayoutInflater;
import android.view.Menu;
import android.view.MenuInflater;
import android.view.MenuItem;
import android.view.View;
import android.view.ViewGroup;
import android.widget.ImageView;
import android.widget.TextView;
import android.widget.Toast;

import androidx.annotation.NonNull;
import androidx.appcompat.app.AppCompatActivity;
import androidx.fragment.app.FragmentActivity;
import androidx.lifecycle.LifecycleOwner;
import androidx.lifecycle.Observer;
import androidx.lifecycle.ViewModelProviders;
import androidx.recyclerview.widget.RecyclerView;

import java.util.ArrayList;

public class MainAdapter extends RecyclerView.Adapter<MainAdapter.ViewHolder> {

    // initialize variables
    Activity activity;
    ArrayList<String> arrayList;
    TextView tvEmpty;
    MainViewModel mainViewModel;
    boolean isEnable=false;
    boolean isSelectAll=false;
    ArrayList<String> selectList=new ArrayList<>();

    // create constructor
    public MainAdapter(Activity activity,ArrayList<String> arrayList,TextView tvEmpty)
    {
        this.activity=activity;
        this.arrayList=arrayList;
        this.tvEmpty=tvEmpty;
    }

    @NonNull
    @Override
    public ViewHolder onCreateViewHolder(@NonNull ViewGroup parent, int viewType) {
           // initialize variables
        View view= LayoutInflater.from(parent.getContext()).
                inflate(R.layout.item_main,parent,false);

          // initialize view Model
        mainViewModel= ViewModelProviders.of((FragmentActivity) activity)
                .get(MainViewModel.class);

        // return view
        return new ViewHolder(view);
    }

    @Override
    public void onBindViewHolder(@NonNull ViewHolder holder, int position) {

          // set text on text view
        holder.textView.setText(arrayList.get(position));

        holder.itemView.setOnLongClickListener(new View.OnLongClickListener() {
            @Override
            public boolean onLongClick(View v) {
                // check condition
                if (!isEnable)
                {
                    // when action mode is not enable
                    // initialize action mode
                    ActionMode.Callback callback=new ActionMode.Callback() {
                        @Override
                        public boolean onCreateActionMode(ActionMode mode, Menu menu) {
                            // initialize menu inflater
                            MenuInflater menuInflater= mode.getMenuInflater();
                            // inflate menu
                            menuInflater.inflate(R.menu.menu,menu);
                            // return true
                            return true;
                        }

                        @Override
                        public boolean onPrepareActionMode(ActionMode mode, Menu menu) {
                            // when action mode is prepare
                            // set isEnable true
                            isEnable=true;
                            // create method
                            ClickItem(holder);
                            // set observer on getText method
                            mainViewModel.getText().observe((LifecycleOwner) activity
                                    , new Observer<String>() {
                                        @Override
                                        public void onChanged(String s) {
                                            // when text change
                                            // set text on action mode title
                                            mode.setTitle(String.format("%s Selected",s));
                                        }
                                    });
                            // return true
                            return true;
                        }

                        @Override
                        public boolean onActionItemClicked(ActionMode mode, MenuItem item) {
                            // when click on action mode item
                            // get item  id
                            int id=item.getItemId();
                            // use switch condition
                            switch(id)
                            {
                                case R.id.menu_delete:
                                    // when click on delete
                                    // use for loop
                                    for(String s:selectList)
                                    {
                                        // remove selected item list
                                        arrayList.remove(s);
                                    }
                                    // check condition
                                    if(arrayList.size()==0)
                                    {
                                        // when array list is empty
                                        // visible text view
                                        tvEmpty.setVisibility(View.VISIBLE);
                                    }
                                    // finish action mode
                                    mode.finish();
                                    break;

                                case R.id.menu_select_all:
                                    // when click on select all
                                    // check condition
                                    if(selectList.size()==arrayList.size())
                                    {
                                        // when all item selected
                                        // set isselectall false
                                        isSelectAll=false;
                                        // create select array list
                                        selectList.clear();
                                    }
                                    else
                                    {
                                        // when  all item unselected
                                        // set isSelectALL true
                                        isSelectAll=true;
                                        // clear select array list
                                        selectList.clear();
                                        // add value in select array list
                                        selectList.addAll(arrayList);
                                    }
                                    // set text on view model
                                    mainViewModel.setText(String .valueOf(selectList.size()));
                                    // notify adapter
                                    notifyDataSetChanged();
                                    break;
                            }
                            // return true
                            return true;
                        }

                        @Override
                        public void onDestroyActionMode(ActionMode mode) {
                            // when action mode is destroy
                            // set isEnable false
                            isEnable=false;
                            // set isSelectAll false
                            isSelectAll=false;
                            // clear select array list
                            selectList.clear();
                            // notify adapter
                            notifyDataSetChanged();
                        }
                    };
                    // start action mode
                    ((AppCompatActivity) v.getContext()).startActionMode(callback);
                }
                else
                {
                    // when action mode is already enable
                    // call method
                    ClickItem(holder);
                }
                // return true
                return true;
            }
        });
        holder.itemView.setOnClickListener(new View.OnClickListener() {
            @Override
            public void onClick(View v) {
                // check condition
                if(isEnable)
                {
                    // when action mode is enable
                    // call method
                    ClickItem(holder);
                }
                else
                {
                    // when action mode is not enable
                    // display toast
                    Toast.makeText(activity,"You Clicked"+arrayList.get(holder.getAdapterPosition()),
                            Toast.LENGTH_SHORT).show();
                }
            }
        });
        // check condition
        if(isSelectAll)
        {
            // when value selected
            // visible all check boc image
            holder.checkbox.setVisibility(View.VISIBLE);
            //set background color
            holder.itemView.setBackgroundColor(Color.LTGRAY);
        }
        else
        {
            // when all value unselected
            // hide all check box image
            holder.checkbox.setVisibility(View.GONE);
            // set background color
            holder.itemView.setBackgroundColor(Color.TRANSPARENT);
        }
    }

    private void ClickItem(ViewHolder holder) {

        // get selected item value
        String s=arrayList.get(holder.getAdapterPosition());
        // check condition
        if(holder.checkbox.getVisibility()==View.GONE)
        {
            // when item not selected
            // visible check box image
            holder.checkbox.setVisibility(View.VISIBLE);
            // set background color
            holder.itemView.setBackgroundColor(Color.LTGRAY);
            // add value in select array list
            selectList.add(s);
        }
        else
        {
            // when item selected
            // hide check box image
            holder.checkbox.setVisibility(View.GONE);
            // set background color
            holder.itemView.setBackgroundColor(Color.TRANSPARENT);
            // remove value from select arrayList
            selectList.remove(s);

        }
        // set text on view model
        mainViewModel.setText(String.valueOf(selectList.size()));
    }

    @Override
    public int getItemCount() {
        return arrayList.size();
    }

    public class ViewHolder extends RecyclerView.ViewHolder {
        // initialize variables
        TextView textView;
        ImageView checkbox;

        public ViewHolder(@NonNull View itemView) {
            super(itemView);

            // assign variables
            textView=itemView.findViewById(R.id.text_view);
            checkbox=itemView.findViewById(R.id.check_box);

        }
    }
}
Follow the path app > java > com.example.multiple_item_delete > right-click > new > java class and create a new file named as MainViewModel.java. Use the below code in MainViewModel.java file-
Java
package com.example.multiple_item_delete;

import androidx.lifecycle.MutableLiveData;
import androidx.lifecycle.ViewModel;

public class MainViewModel extends ViewModel {

    // initialize variables
    MutableLiveData<String> mutableLiveData=new MutableLiveData<>();

    // create set text method
    public void setText(String s)
    {
        // set value
        mutableLiveData.setValue(s);
    }

    // create get text method
    public MutableLiveData<String> getText()
    {
        return mutableLiveData;
    }
}
Output:
Here is the final output of our application.