How to Delete Blank Rows in Excel: 7 Methods Explained
Last Updated :
22 Nov, 2024
How to Remove Empty Rows in Excel- Quick Steps
- Select the data range.
- Press Ctrl + G >> Click Special >>Choose Blanks >> Click OK.
- Right-click on any blank cell >>Click Delete >>Choose Entire Row >> Click OK.
Deleting blank rows in Excel is crucial for maintaining clean, organized, and easy-to-analyze spreadsheets. Blank rows can cause issues with data analysis, disrupt sorting and filtering, and make your sheet appear cluttered. This guide will walk you through quick and effective methods to identify and remove blank rows, helping streamline your workflow and improve data accuracy. Whether you’re working with large datasets or small tables, learning how to eliminate blank rows in excel ensures your data remains consistent and ready for analysis.
Note: Never remove blank rows by simply selecting blank cells and deleting them without caution, as this can lead to unexpected data shifts and potential errors in your Excel spreadsheet.

7 Easy Methods to Eliminate Blank Rows in Excel
Here are seven efficient methods to delete blank rows in Excel table. Choose the one that best suits your needs!
Method 1: How to Remove Empty Rows in Excel (Single Row)
This is the most common and easy way to delete the blank rows, but again these are only for cases when we have less number of rows. Follow the below steps to Remove a Single Blank Row in Excel.
Step 1: Open an Excel Sheet with Blank Rows
Open your Excel sheet containing blank rows. Here, for your convenience, we have marked the blank row with green color.

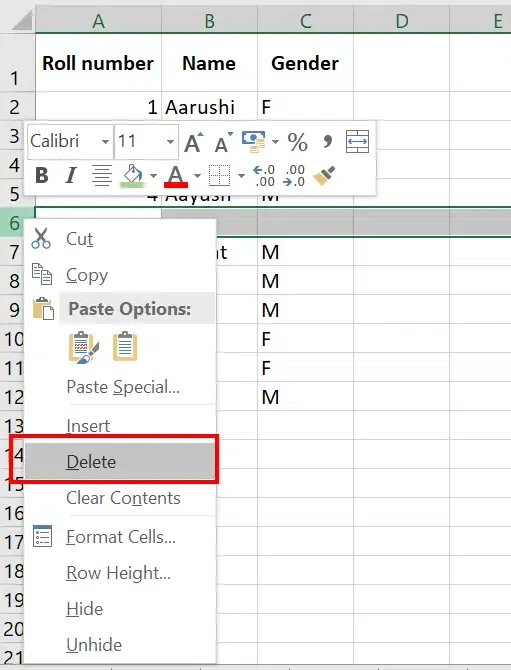
Step 2: Select the Empty Row, Right Click and Click on Delete
Select the Empty row by clicking on it, Right Click to open the menu and Select Delete.
Step 3: Preview Result
Now, just go to the Delete menu and select Delete Sheet Rows from the dropdown. The blank rows will be deleted from your spreadsheet.

Preview the Result
Method 2: How to Remove Multiple Blank Rows in Excel using Filter Option
Adding a filter first, then deleting the rows, is an old technique for getting rid of empty rows. Follow the below steps to delete multiple blank rows all at once:
Step 1: Select the Dataset
Mark all the data you want to clear up.
To cover a large data set you can press CTRL+ SHIFT + DOWN to mark rows and CTRL + SHIFT + RIGHT to mark columns

Select the data set
Step 2: Go to Data tab, Select Filter, and Uncheck “Select ALL”
Click on the Data Menu, Click on the Filter icon, and deselect Blanks.
Alternatively, you can Select Blanks only which will leave you with just Blank rows
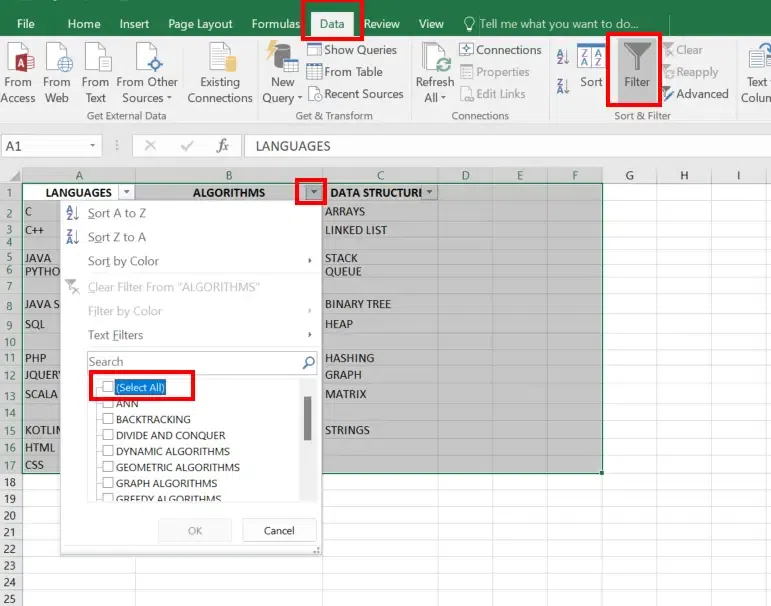
Select the data>> Go to Filter Option>>Uncheck Select all
Step 3: Put a Check on “Blanks” and Click ok

Check Blanks and Click OK
Step 4: Empty Rows Displayed
You will be left with nothing in the rows if you choose blanks. These cells are marked in blue, as you can see. You can simply remove these.
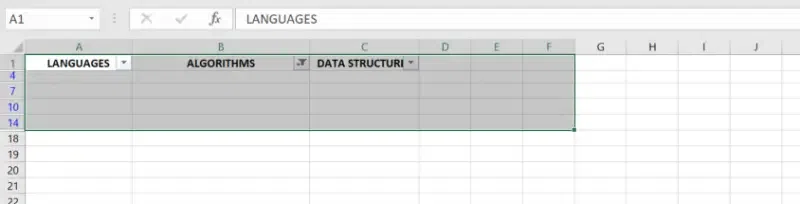
Preview Empty Rows
Step 5: Select Filtered Blank Rows, Right-Click and Click on Delete Rows
Select all the filtered blank rows, Right-Click on the selected cells and choose Delete Rows, and then Click OK.

Select Filtered Rows>>Right Click >>Select Delete
Step 6: Clear Applied Filter
Now we’ll have to clear the applied filter, press the Clear button under the Data tab.
.webp)
Method 3: Shortcut to Remove Multiple Blank Rows in Excel
To remove multiple blank rows in Excel using a keyboard shortcut, you can use the following steps:
For Windows
Step 1: Select the data range
Step 2: Press Ctrl + G to go to Go To
Step 3: Press Alt + S to go to Special
Step 4: Press K for Blanks
Step 5: Press Enter
Step 6: Press Ctrl + – to delete the entire row
For MAC
To remove multiple blank rows in Excel on a Mac using a shortcut:
Step 1: Select the data range that may contain blank rows.
Step 2: Press Command + Shift + G to open the “Go To Special” dialog box.
Step 3: Select “Blanks” and click OK. This will highlight all blank cells in the selected range.
Step 4: Press Control + – (minus key). In the pop-up window, select “Entire row” and click OK.
Method 4: How to Eliminate Blank Rows in Excel if Certain Column is Blank
Use this technique if you have a table with a lot of empty cells dispersed over many columns, and you simply need to eliminate the rows with no data in any cell in any column.
.webp)
Since there is no key column in this situation, we cannot tell whether the row is empty or not. The helper column is therefore added to the table
Let us add the “Blanks” column at the end, Insert the following formula in the first cell of the “Blanks” column
=COUNTBLANK(A2:D2) and Copy the formula throughout the entire column.
In the example, a “Blanks” column (E) is added, and the formula “=COUNTBLANK(A2:D2)“calculates the number of blank cells in each row. Pressing Enter displays the count of blank cells in column E for each row.

Step 2: Apply Filter
Now that we have added a key column to our table, add a filter to the Blanks column, to show only rows with the max value (4). Here, number 4 represents that all the cells in a certain row are empty.

Step 3: Select Filtered Rows and Remove Rows
Select all the filtered rows and remove the rows by right-clicking and selecting Delete option. Clear the filter applied under the Data tab.

You may now eliminate the helper column. Alternatively, you can add a fresh filter to the column to only display the rows with one or more blank cells.
Method 5: How to Delete Blank Rows in Excel Using Go To Special
This method helps you to delete rows in your data if they contain 1 or more blank cells.
Step 1: Enter the Dataset
Enter the data in your Excel Sheet.

Step 2: Go to Home, Select Find and Select and Click on Go to Special
In the Home tab, Click the “Find & Select” button on the right side of the Ribbon, to find the blank rows. Now click on ‘Go To Special‘.

Select the Blanks option from the prompt box and Click on the OK button. This selects the blank cells in the data.

Step 4: Go to Delete Option and Select Delete Sheet Rows
Now delete the entire rows instead of just the selected cells. In the Home tab, go to the delete button click on the arrow below it, and select ‘Delete Sheet rows‘.

Step 5: Rows Deleted
Now you can see the result after deleting the rows which have blank cells.

Method 6: How to Delete Selected Blank Rows in Excel
Follow the below steps to Delete Selected Blank Rows in Excel:
Quick Tip: If You delete Blank Rows by Selecting Blank Cells the entire data will be deleted
For example, we have an Employee dataset, and we want to eliminate the empty rows
.webp)
Step 1: Select Empty Rows, Navigate to Delete Option and Select Entire Row

Step 2: Preview Results

Method 7: How to Delete Blank Rows in Excel using Sorting
When you have blank rows in between of Data then sorting data comes in play, you can effectively move all blank rows to the bottom of your data, making it easy to identify and remove them. Follow the below steps to Delete Blank Rows Using Sorting.
Step 1: Select Dataset
Select the entire range of data where you want to delete the blank rows.

Select the Data
Step 2: Go to the Data Tab and Select Sort
Go to the Data menu and select Sort. You can select the sorting type as per your wish either in ascending or descending.

Go to Data tab and Click on Sort
Step 3: Preview the Sorted Data
In the below example, data has been arranged in ascending order and all the blank rows are arranged at the bottom.

Data Sorted
Step 4: Identify and Delete the Blank Rows
- Scroll to the bottom of the dataset to see the blank rows.
- Select the blank rows by clicking on the row numbers on the left.
- Right-click on the selected rows and choose “Delete

Select the blank rows>> right click >>select delete
Conclusion
In conclusion, knowing how to efficiently delete blank rows in Excel is an essential skill for anyone working with data. By using the methods mentioned in the above article, you can quickly and effectively remove blank rows in Excel, keeping your spreadsheets clean and easy to navigate. Whether you choose to use filtering techniques, helper columns, or VBA macros, each approach offers a reliable way to remove empty rows from Excel. By maintaining well-organized data, you’ll enhance your ability to analyze and present information clearly.
Similar Reads
How to Delete Blank Rows in Excel
How to Remove Empty Rows in Excel- Quick StepsSelect the data range.Press Ctrl + G >> Click Special >>Choose Blanks >> Click OK.Right-click on any blank cell >>Click Delete >>Choose Entire Row >> Click OK.Deleting blank rows in Excel is crucial for maintaining cle
10 min read
How to Delete a Sheet in Microsoft Excel
Ever tried to manage your sheets in MS Excel? Keeping your data and sheets managed is a good idea of making your sheets well organized sometimes you also need to edit, organize and delete your sheets. In the case you are managing your sheets in a proper manner then you will need to delete some sheet
4 min read
How to Delete Pages in Excel
In Excel, the concept of "pages" typically refers to worksheets, print areas, or extra blank spaces that may clutter your file. Whether you’re looking to clean up your workbook, remove unwanted sheets, or delete unnecessary print areas, knowing how to delete pages in Excel is essential for maintaini
3 min read
How to Delete Filtered Rows in Excel: Step by Step Guide
Efficiently managing data in Excel often involves filtering and removing unnecessary rows. However, deleting filtered rows in Excel can be tricky if not done correctly, as unwanted data may get removed. This article provides a step-by-step guide to help you safely and accurately delete filtered rows
9 min read
How to Delete a Pivot Table in Excel?
A pivot table is a tool in Excel that allows you to quickly summarize data in the spreadsheet. When it comes to deleting a Pivot Table, there are a few different ways you can do this. The method you choose will depend on how you want to delete the Pivot Table. 1.Delete the Pivot Table and the Result
3 min read
How to Find the First Empty Row of an Excel File in Python
When working with data in Excel files, one common task is to find the first empty row where new data can be added. Whether you're automating a data entry process or performing data analysis, Python offers several methods to accomplish this task efficiently. In this article, we'll explore different a
2 min read
How to freeze rows and columns in Excel
Navigating large datasets in Excel can quickly become overwhelming, especially when key headers or reference columns disappear as you scroll. That’s where the freeze panes feature comes in. Freeze panes in Excel allow you to lock specific rows or columns in place, ensuring critical data remains visi
10 min read
How to Delete All Rows Below Certain Row or Active Cell in Excel
Excel is a powerful data management tool that can be used to store, analyze, and create reports on large data. It is generally used by accounting professionals to analyze financial data but can be used by anyone to manage large data. Data is entered into the rows and columns. Read the article given
5 min read
How to Delete Rows in Google Docs
Managing tables in Google Docs often involves organizing or cleaning up data, which can require deleting unnecessary rows. Whether you're updating a single row or need to remove multiple rows at once, Google Docs provides simple tools for efficient table editing. This guide will explain how to delet
4 min read
How to Remove Duplicates in Excel? 4 Quick & Easy Methods
Removing duplicates in Excel is essential when cleaning up data to ensure accuracy and avoid redundancy. Whether you’re working with small datasets or large spreadsheets, Excel provides built-in tools and methods to help you identify and remove duplicates effectively. This guide will walk you throug
9 min read