How to Change Mouse Sensitivity on Windows 11?
Last Updated :
15 Apr, 2025
Are you struggling with your mouse sensitivity on Windows 11? Don't worry, you're not alone. Many users find adjusting mouse sensitivity a bit tricky. But fear not, as we're here to guide you through the process step by step. Changing mouse sensitivity can greatly enhance your user experience, whether you're gaming, browsing, or working on your PC. If the cursor's too quick or slow, it can affect how you use your computer. In this article, we'll provide you with simple and easy-to-follow instructions on how to adjust mouse sensitivity, scroll speed, and pointer size on Windows 11. Windows 11 offers straightforward ways to change this.

You can change it via the Settings app or Control Panel.
How to Change Mouse Sensitivity
Let's go through each method step by step to change mouse sensitivity in Microsoft Windows 11.
Method 1: Change Mouse Speed via Settings
Changing your mouse speed through the settings menu in Windows 11 is a straightforward process. This method allows you to customize your mouse sensitivity according to your preferences. By following these simple steps, you can quickly adjust your mouse speed and improve your overall user experience on Windows 11.
Step 1: Use Win + I shortcut key to open settings or click the start button with gear symbol for opening settings.
Step 2: Select “Bluetooth & devices” and click on “mouse” on your left sidebar.
Step 3: Go to “Mouse pointer speed” section and move slider to change the sensitivity level. By shifting it to the left the cursor slows down, and to the right makes it faster.

Method 2: Change Mouse Speed via Control Panel
If you prefer a more traditional approach to changing the sensitivity of your mouse, you can use the Control Panel in Windows 11. This method offers a straightforward way to adjust your mouse settings to suit your preferences. Here's how you can do it:
Step 1: Go to start, find control panel. The shortcut is Win+R and type “control” enter.
Step 2: Under “Devices and Printers,” select “Hardware and Sound” followed by “Mouse.”
Step 3: Navigate to "Mouse Properties" > "Pointer Options".
Step 4: Adjust the "Motion" slider to change the mouse sensitivity.

Step 5: Click "Apply" and then "OK" to confirm your changes.
Method 3: Change Mouse Speed via Registry
If you're looking to change the sensitivity of your mouse with more precision, you can change settings via the Registry. This method offers advanced customization options beyond what's available in the standard settings. However, it's important to proceed with caution as altering registry settings can affect your system if done incorrectly. Follow these steps carefully to adjust the mouse sensitivity through the Registry:
Step 1: Open the Run dialog by Pressing Win + R.
Step 2: Now, Type regedit and press Enter, Registry Editor will be opened.
Step 3: If prompted by User Account Control (UAC), click "Yes" to grant administrative privileges.
Step 4: Navigate to
HKEY_CURRENT_USER\Control Panel\Mouse.
Step 5: Double-click the MouseSensitivity then on input change the value from 1 to 20.
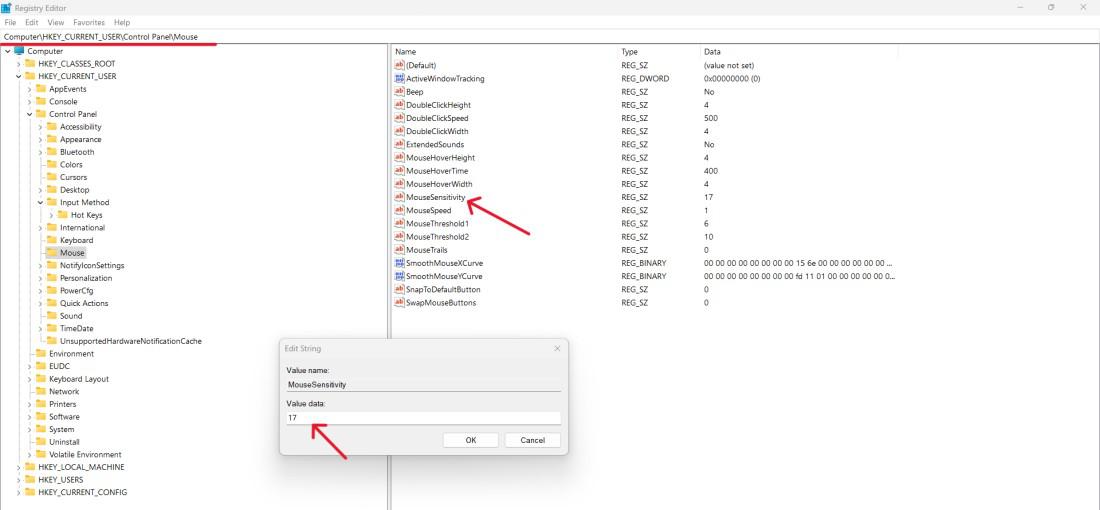
Step 6: Click on OK button
If you're finding your mouse scrolling too fast or too slow on Windows 11, adjusting the scroll speed can make a big difference. Here's a quick guide on how to change the scroll speed to match your preferences:
Step 1: Open the Settings app and navigate to "Bluetooth & Devices" > "Mouse."
Step 2: Under “Scrolling” select the number of lines which is under “Roll the mouse wheel to scroll”.

Step 3: Click "Apply" to save your scroll speed changes
Personalize the Mouse Pointer using the Settings App
Customize your mouse pointer to suit your preferences using the Settings app on Windows 11. This feature allows you to personalize the appearance and behavior of your mouse pointer, enhancing your overall user experience. Follow these simple steps to adjust settings such as pointer size to make your pointer feel just right for you.
Step 1: On Settings, select “Devices” then “Mouse”.
Step 2: Open the Mouse Properties by clicking “Additional mouse options”.
Step 3: Click on the “pointers” tab to select other pointer schemes or adjust specific pointers.

Step 4: Click "Apply" and then "OK" to apply your changes.
Conclusion
In conclusion, adjusting mouse sensitivity on Windows 11 is a simple yet crucial step in optimizing your computing experience. By fine-tuning your mouse settings, you can achieve precise control, whether you're gaming, working, or simply browsing the web. With the easy-to-follow steps outlined in this guide, you can effortlessly customize your mouse sensitivity to suit your preferences. In the Settings app or Control panel, check various options to modify your mouse settings; and do not forget about scroll speed and your pointer customization. So, take control of your cursor and enjoy a smoother, more responsive user experience on Windows 11.
Similar Reads
How to Change the Time in Windows 11? Are you struggling to adjust the time on your Windows 11 computer? Don't worry, you're not alone. Knowing how to change the time on your device is crucial for keeping it synchronized and accurate. Whether you need to adjust for time zones, daylight saving time, or simply correct an incorrect time di
6 min read
How to Change Font Size on Windows 11? Are you struggling to change the font size on Windows 11 system? Look no further! This guide is here to help you guide through the process with ease. Windows 11 offers a variety of options when it comes to customizing your display, including changing the size of text in windows 11 to better suit you
5 min read
How to Change the Screen Timeout in Windows 11? Are you wondering how to change the screen timeout in Windows 11? The screen will turn off after a specified period of inactivity on Windows 11 by the default settings. The device features an adjustable setting that turns off the screen whenever the gadget is idle, to conserve battery power, and adj
5 min read
How To Change Screen Resolution in Windows 10? Windows 10 offers the flexibility to adjust screen resolution. While the standard recommendation is 1920 x 1080 pixels, On the other hand, you can experiment with different resolutions to find the one that suits you best, and you can always switch back with the same steps. Changing your screen resol
6 min read
How to Change Screen Brightness on Windows 11? Knowing how to change screen brightness on Windows 11 is essential for optimizing your display settings. Whether you want to increase brightness for better visibility or decrease brightness to reduce eye strain, Windows 11 brightness control offers various methods to adjust the display. This guide w
5 min read
How to Change the Notification Sound on Windows 11? Windows 11 provides a modern interface with improved features. Users can customize notification sounds to change how their computer alerts them to messages, emails, and reminders. This helps users stay updated and engaged. In this article, we will show you how to change the notification sound on Win
5 min read