Taking screenshots can be useful for testing, debugging, or visual checks. Here we will see how to capture screenshots in Selenium WebDriver using Python
Ensure you have Python 3.x, Selenium WebDriver, ChromeDriver, and a code editor like PyCharm or Visual Studio Code installed. We will explore methods for capturing screenshots in Selenium WebDriver.
1. Full Page Screenshot
Capturing a screenshot of the entire page is the most useful. Create the test2.py file and update the code.
from selenium import webdriver
import os

# Initialize the ChromeDriver (assumes chromedriver is in the PATH)
driver = webdriver.Chrome()

try:
    # Open the page
    page_url = "https://bonigarcia.dev/selenium-webdriver-java/"
    driver.get(page_url)

    # Capture screenshot of the entire page
    screenshot_path = "bonigarcia-screenshot.png"
    driver.get_screenshot_as_file(screenshot_path)
    print(f"Screenshot captured at: {screenshot_path}")

    # Verify that the screenshot file exists
    if os.path.exists(screenshot_path):
        print("Screenshot saved successfully!")
    else:
        print("Screenshot file does not exist!")

finally:
    # Close the browser
    driver.quit()
webdriver.Chrome() controls the browser, driver.get(url) opens the URL, driver.get_screenshot_as_file(path) captures and saves the screenshot, and os.path.exists(path) checks if the file was saved successfully.
Output:

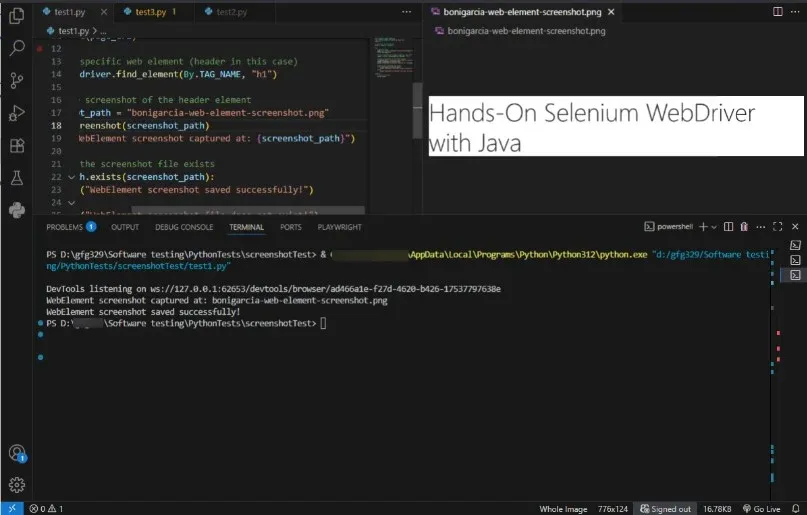
2. Screenshot of a Specific Web Element
Sometimes, you may only need to capture a specific part of a webpage, like a button, header, or image. Selenium WebDriver lets you take screenshots of individual web elements using the screenshot() method.
Create the test1.py file and update the code.
from selenium import webdriver
from selenium.webdriver.common.by import By
import os

# Initialize the ChromeDriver
driver = webdriver.Chrome()

try:
    # Open the page
    page_url = "https://bonigarcia.dev/selenium-webdriver-java/"
    driver.get(page_url)

    # Find a specific web element (header in this case)
    header = driver.find_element(By.TAG_NAME, "h1")

    # Capture screenshot of the header element
    screenshot_path = "bonigarcia-web-element-screenshot.png"
    header.screenshot(screenshot_path)
    print(f"WebElement screenshot captured at: {screenshot_path}")

    # Verify the screenshot file exists
    if os.path.exists(screenshot_path):
        print("WebElement screenshot saved successfully!")
    else:
        print("WebElement screenshot file does not exist!")

finally:
    # Close the browser
    driver.quit()
driver.find_element(By.TAG_NAME, "h1") locates the first <h1> element on the page, and header.screenshot(path) captures and saves a screenshot of that specific header element.
Output:
3. Using Third-Party Libraries for Enhanced Screenshots
Selenium provides basic screenshot capabilities, you may want to use third-party libraries to enhance the screenshot functionality or capture more advanced visual elements. mss is a third-party library that allows you to capture a screenshot of a specific region of the screen, and it works cross-platform.
To install mss:
pip install mssOnce you’ve installed mss, you can use it to capture screenshots of specific regions of the screen, like this:
Test3.py
import mss
import time

# Initialize the ChromeDriver
from selenium import webdriver
from selenium.webdriver.common.by import By
import os

driver = webdriver.Chrome()

try:
    # Open the page
    page_url = "https://bonigarcia.dev/selenium-webdriver-java/"
    driver.get(page_url)

    # Find a specific web element (header in this case)
    header = driver.find_element(By.TAG_NAME, "h1")

    # Capture screenshot of the header element
    screenshot_path = "bonigarcia-web-element-screenshot.png"
    header.screenshot(screenshot_path)
    print(f"WebElement screenshot captured at: {screenshot_path}")

    # Verify the screenshot file exists
    if os.path.exists(screenshot_path):
        print("WebElement screenshot saved successfully!")
    else:
        print("WebElement screenshot file does not exist!")

    # Capture the whole screen using mss
    with mss.mss() as sct:
        # Define the region you want to capture (x1, y1, width, height)
        monitor = sct.monitors[1]  # Default screen
        screenshot = sct.grab(monitor)

        # Save the screenshot as a PNG file
        output_path = "mss_screenshot.png"
        mss.tools.to_png(screenshot.rgb, screenshot.size, output=output_path)
        print(f"mss Screenshot captured and saved as: {output_path}")
        time.sleep(2)

finally:
    # Close the browser
    driver.quit()
This will capture the entire screen (you can specify a particular region as well) and save it as mss_screenshot.png. This gives you an added layer of flexibility for capturing screen regions alongside Selenium's standard web element screenshots.
Output:

In this code, mss takes a screenshot of the full screen, but you can specify a region by passing coordinates to capture only a part of the screen.
4. Organizing and Naming Screenshots
It's important to organize your screenshots well, especially when you have many tests running. Use dynamic names by appending timestamps or test names. You can use Python’s datetime module to generate unique names for your screenshots:
test4.py
import datetime
from selenium import webdriver
from selenium.webdriver.common.by import By
import os

# Initialize the ChromeDriver
driver = webdriver.Chrome()

try:
    # Open the page
    page_url = "https://bonigarcia.dev/selenium-webdriver-java/"
    driver.get(page_url)

    # Find a specific web element (header in this case)
    header = driver.find_element(By.TAG_NAME, "h1")

    # Capture screenshot of the header element
    timestamp = datetime.datetime.now().strftime("%Y-%m-%d_%H-%M-%S")
    screenshot_filename = f"bonigarcia-header-screenshot_{timestamp}.png"

    header.screenshot(screenshot_filename)
    print(f"WebElement screenshot captured at: {screenshot_filename}")

    # Verify the screenshot file exists
    if os.path.exists(screenshot_filename):
        print("WebElement screenshot saved successfully!")
    else:
        print("WebElement screenshot file does not exist!")

finally:
    # Close the browser
    driver.quit()
Output:

This verify that every screenshot has a unique name based on the time it was taken, helping you avoid overwriting screenshots from different test runs By following these method best practices outlined here, you can ensure your screenshots are useful, organized, and easy to reference during testing.