How to call testng.xml file from pom.xml in Maven?
Last Updated :
22 Aug, 2024
Maven is a tool that is widely used for automation whenever developers work on Java projects. apart from the Java language, the Maven software supports other projects that are written in C#, Ruby, etc. The Maven project is controlled and hosted by the famous Apache software foundation.
What is a testng.xml file?
Testng.xml is a popular file that is used in the maven software or project, it is provided by the TestNG testing framework and it is used to define and control the execution of the tests. the testng.xml file is used to specify the test classes as well as the test methods to run and also provides other settings for the testing.
What is a pom.xml file?
The pom.xml file stands for the project object model and it is a file that is used for the configuration of the project, it is used for defining the project's structure and dependencies, as well as other configurations for the project.
How to call the testng.xml file from pom.xml in Maven?
Following are the steps required for calling the testng.xml file from pom.xml:
Step 1: Create java file:
The first step is to create a testng.xml file for the original java file, for this, we will need to have a java file.
Note: If you currently do not have a java file then you can use the following java file, it is not mandatory to have the file name as testng.xml
Java
package mynewpackage;
import org.testng.annotations.Test;

public class MyCases {

    @Test
    public void testOne() {
        System.out.println("this is my first test");
    }

    @Test
    public void testTwo() {
        System.out.println("this is my second test");
    }

    @Test
    public void testThree() {
        System.out.println("this is my third test");
    }

    @Test
    public void testFour() {
        System.out.println("this is my fourth test");
    }

    @Test
    public void testFive() {
        System.out.println("this is my fifth test");
    }

  	@Test
    public void testSix() {
        System.out.println("this is my sixth test");
    }
}
Step 2: Create testng.xml file:
After creating or copying code for the java file, we will have to create the testng.xml file, for this simply right click on the java file and go to TestNG > Convert to TestNG and click on finish. it will automatically create the testng.xml file for us.
 Create testng.xml file.
If you are using the above java code then the following testng.xml file will be generated (it will differ if the java code is different):
XML
<?xml version="1.0" encoding="UTF-8"?>
<!DOCTYPE suite SYSTEM "http://testng.org/testng-1.0.dtd">
<suite name="Suite">
<test thread-count="5" name="Test">
<classes>
<class name="mynewpackage.MyCases"/>
</classes>
</test> <!--Test -->
</suite> <!-- Suite -->
Step 3: Run pom.xml file:
Next step is to run the pom.xml file, unlike the testng.xml file the pom.xml file will be already present inside the maven project, as you can see in the image below:
 Run pom.xml file.
pom.xml file will contain the following code in it:
XML
<project xmlns="http://maven.apache.org/POM/4.0.0"
	xmlns:xsi="http://www.w3.org/2001/XMLSchema-instance"
	xsi:schemaLocation="http://maven.apache.org/POM/4.0.0 http://maven.apache.org/xsd/maven-4.0.0.xsd">
	<modelVersion>4.0.0</modelVersion>

	<groupId>com.ats</groupId>
	<artifactId>RuntestngXmlFromPOM</artifactId>
	<version>0.0.1-SNAPSHOT</version>
	<packaging>jar</packaging>

	<name>RuntestngXmlFromPOM</name>
	<url>http://maven.apache.org</url>

	<properties>
		<project build.sourceEncoding>UTF-8</project.build.sourceEncoding>
	</properties>

	<dependencies>
		<dependency>
			<groupId>org.testng</groupId>
			<artifactId>testng</artifactId>
			<version>6.8.3</version>
		</dependency>
	</dependencies>

	<build>
		<plugins>
			<plugin>
				<groupId>org.apache.maven.plugins</groupId>
				<artifactId>maven-surefire-plugin</artifactId>
				<version>3.0.0-M5</version>
				<configuration>
					<suiteXmlFiles>
						<suiteXmlFile>testngsecond.xml</suiteXmlFile>
						<suiteXmlFile>testng.xml</suiteXmlFile>
					</suiteXmlFiles>
				</configuration>
			</plugin>
		</plugins>
	</build>
</project>
Step 4: Call testng.xml from pom.xml:
Now the next step is to run the testng.xml file using the pom.xml for this right click on the pom.xml file and click on the maven run option.
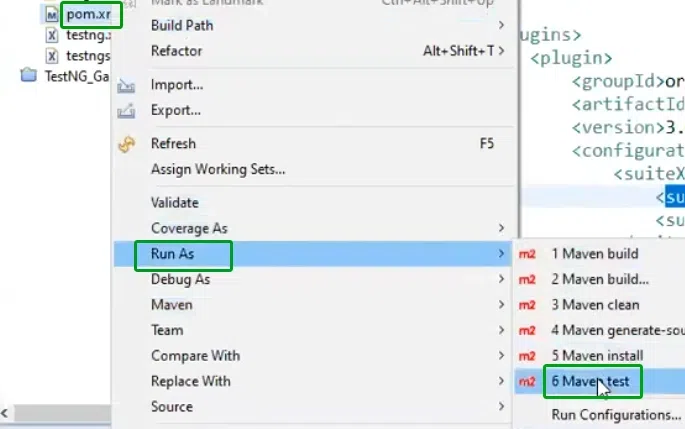 Call testng.xml from pom.xml
Step 5: Test output:
Once you click on the maven run option, it will display a small pop up window in which the output will be displayed, it will be similar to the output below:
 Test output.
This means that we have successfully called the testng.xml file using the pom.xml file in the maven project.
Conclusion
This is a method which allows the maven to execute the various tests which are defined within the testng.xml file, this setup uses the TestNG and it integrates it with the maven software which enables the test execution to happen automatically during the build process and also helps us in making sure that the test management is more efficient.