How to Add Rows in Google Docs - 4 Methods
Last Updated :
05 Dec, 2024
Google Docs is a powerful word processor, but it's not just limited to text. You can also create and manipulate tables within Google Docs to better organize data and add structure to your content. One of the most common tasks when working with tables is adding rows. Whether you are working on a simple list, or a complex table, or need to insert data, learning how to add rows will make your document more organized and efficient.
In this guide, we will walk you through the different methods to add rows to a table in Google Docs. Whether you need to add rows at the beginning, middle, or end of your table, the process is simple.
Note: Google Docs doesn’t automatically allow you to add rows like it does in Google Sheets, but you can easily add rows to your table with just a few clicks. Whether you're using Google Docs for professional reports, school projects, or even for personal use, learning how to manage your table rows will make your work much easier.
 How to Add Rows in Google Docs
This is the most direct way to add rows to an existing table in Google Docs. The + Icon that is visible after selecting the existing row will insert a row below, this provides easy access to the options you need to adjust your table’s layout.
Step 1: Open Your Google Doc
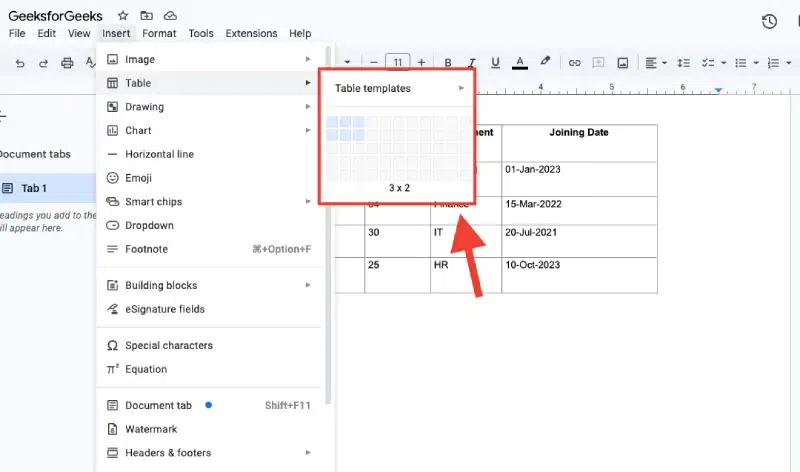
Start by opening the document that contains the table you want to modify. If you don’t have a table yet, you can insert one by going to Insert > Table and selecting the size of your table.
Step 2: Select the Row Where You Want to Add a New Row
Click anywhere inside the row directly above or below where you want the new row to appear. For example, if you want to insert a row above the current row, select the row below.
 Select the cell to add a row
Step 3: Click on + Icon
Now click on the + Icon that will be visible on the left hand corder of the selected row. This will automatically add a row below the existing selected row.
 Click on "+" Icon
Method 2: Right-Click to Add Rows in Google Docs
Right-clicking is another quick method to insert rows in a table in Google Docs. It’s particularly helpful if you are already working within the table and don’t want to navigate to the Table menu.
Step 1: Open Your Google Doc
Open the document containing your table.
Step 2: Select a Row
Click inside the row where you want to add a new row above or below. (As shown in previous Method)
Step 3: Right-Click on the Table and Choose the Row Insertion Option
Right-click on the selected row. A menu will pop up with several options.
From the menu, choose:
- Insert row above: This will add a row above the selected row.
- Insert row below: This will add a row directly below the selected row.
 Choose the Row Insertion Option
Method 3: Using Keyboard Shortcut to Add Rows in Docs (For Advanced Users)
If you want to speed up the process and avoid using the mouse, there are no direct keyboard shortcuts for adding rows in Google Docs. However, you can still quickly navigate and insert rows by using keyboard shortcuts for navigation and the menu.
Step 1: Open Your Google Doc
Ensure that the table is in the document.
Step 2: Go to the Last Row of the Table
Use the Arrow Keys to move up or down to navigate to the last row of the table.
 Go to the Last Row of the Table
Step 3: Press Tab Key in Windows or Mac and Preview Changes
Navigate to the last cell of the table, then press the Tab key to instantly on Windows or MacOS Device to add a new row below.
 New Row Added after Pressing Tab Key
Method 4: How to Add Multiple Rows to a Table in Docs
Sometimes, you may need to insert more than one row at once. While Google Docs doesn't allow inserting multiple rows in a single command, you can repeat the process to quickly add several rows.
Tip: To make the process quicker, if you need multiple rows added in succession, consider inserting a large table at the start (e.g., 10 rows), and then simply delete unnecessary rows later.
Step 1: Highlight the Rows
Select the rows where you want to add additional rows beneath.
Step 2: Click on Insert
Click insert and go to the Table menu at the top of toolbar.
 Click on Insert
 Step 3: Choose the Row Insertion Option
Select Insert X rows below, where X is the number of rows you’ve selected. This will insert multiple rows at once.
 Choose the Row Insertion Option
- Note: If you select (3x2) it means you re adding 3 columns and 2 rows in table
Troubleshooting Tips for Adding Rows in Google Docs
While adding rows is usually straightforward, you might run into a few issues. Here are some common problems and how to fix them:
1. Row Won’t Insert
- Cause: This may happen if the cursor isn’t properly placed in a row or if the table is in a mode where editing is restricted.
- Fix: Make sure the cursor is within the table and inside a row. If you’re working in a shared document, check if someone else has locked the table for editing.
2. Table Won’t Adjust Size Properly After Adding Rows
- Cause: This may happen when the document margins are too small, or the table’s automatic size adjustment is turned off.
- Fix: Click on the table and drag the small blue squares at the table’s edges to adjust its size. Alternatively, go to Table Properties and adjust the row size manually.
- Cause: Sometimes, formatting might get skewed if you add rows while the table is already formatted.
- Fix: After adding the row, use Format > Clear formatting to reset the table’s formatting, or use the Table Properties to readjust row heights and column widths.
Additional Tips and Tricks for Google Docs Tables
1. Resizing Rows
After adding a new row, you might want to resize the rows or columns. To do this, hover over the lines separating rows or columns until you see a double-sided arrow. Click and drag to adjust the size.
2. Merging Cells
If you want to combine cells in a row (e.g., to create a header row spanning multiple columns), select the cells you want to merge, right-click, and choose Merge cells.
3. Coloring Rows or Columns
For better readability or to make your table look more attractive, you can add color to entire rows or individual cells. Select the row or cells, then click on the Table Properties or use the toolbar to choose a fill color.
Conclusion
Adding rows to a table in Google Docs is an essential skill that can help you manage and present data effectively. Whether you choose to use the Table menu, right-click, or keyboard shortcuts, the process is simple and intuitive. By knowing how to manipulate rows and structure your data, you can create cleaner, more organized documents that are easy to read and visually appealing.
Understanding how to adjust not only the rows but also the spacing, size, and formatting of the table will enhance your document’s overall layout and functionality. Now that you’re equipped with all the tips and tricks to add rows in Google Docs, you can confidently format any document to suit your needs.
Also Read:
Similar Reads
How to Add Page Numbers in Google Docs - 4 Methods
How to Number Pages in Google Docs - Quick Steps Open Google Docs > Select a Document Go to Insert Tab > Select Page NumbersSpecify Format > Page Numbers Added Adding page numbers to a Google Docs document is a simple yet essential task that enhances organization and readability, especially
8 min read
How to Add a Page in Google Docs
How to Add another page in Google Docs - Quick StepsOpen Google Docs >>Go to the Insert TabSelect Page Breaks>>New Page AddedEver found yourself meticulously crafting a document in Google Docs, only to realize it needs more space? If you're drafting a thesis, compiling a report, or craft
9 min read
How to Delete Rows in Google Docs
Managing tables in Google Docs often involves organizing or cleaning up data, which can require deleting unnecessary rows. Whether you're updating a single row or need to remove multiple rows at once, Google Docs provides simple tools for efficient table editing. This guide will explain how to delet
4 min read
How to Use Add-Ons in Google Docs
Enabling add-ons in Google Docs can significantly enhance your writing experience, especially for tasks like formatting, collaboration, and research. If you find that your Google Docs add-ons are not showing, don't worry; it’s easy to fix!In this article, we’ll walk you through how to enable add-ons
15+ min read
How to Do Subscript in Google Docs : 3 Easy Methods
How to Add Subscript in Google Docs - Quick Steps Highlight the text you want to format as subscript.Go to the Format menu at the top.Select Text > Subscript from the dropdownAdding subscripts in Google Docs is a simple and effective way to format text for chemical equations, mathematical express
7 min read
How To Make a Matrix In Google Docs
How to Insert Matrix in Google Docs - Quick StepsOpen your Google Docs document.Click where you want the matrix.Go to "Insert" Tab >> Go to Equation >> choose "Insert equation."Use the provided matrix template >>Fill in your matrix values.Click outside the equation box to exit.Your
7 min read
How to Convert a PDF to Google Docs: 4 Methods
How to Turn a PDF into a Google Doc - Quick StepsOpen Google Drive Click on Upload > Upload the PDFLocate the PDF > Perform a Right-click Select "Open With" > Google DocsGo to File Menu in Google Docs > Download as Google DocsLooking to convert a PDF into an accessible Google Doc? Conver
8 min read
How to Use AI in Google Docs
Discover the incredible potential of AI in Google Docs! From offering smart suggestions to predicting your next words, AI enhances your writing experience. Learn how to Use AI in Google Docs to effortlessly improve your documents in our easy-to-follow guide. AI in Google DocsUse AI in Google Docs Wh
4 min read
How to Move a Table in Google Docs
Google Docs, a free online document editor offered by Google, provides an array of features for document creation, editing, collaboration, and storage. Users can initiate a document from scratch or opt for one of its templates. Within Google Docs, you have the flexibility to alter fonts, font colors
7 min read
How to Remove Lines in Google Docs
Have you ever encountered unwanted lines in Google Docs that disrupt the flow of your document? Whether it’s a table border, a horizontal line created by typing hyphens or underscores, or paragraph borders, these lines can sometimes make your document look cluttered. The good news is, removing them
8 min read