How to Add a Column in Excel: Step-by-Step Guide
Last Updated :
06 Feb, 2025
Need to organize your data better in Excel but unsure how to add a column without disrupting your existing setup? Whether you’re working with a simple list or a complex table, inserting columns is a fundamental skill that increases productivity and keeps your data structured.
This guide covers 4 easy methods to add a column in Excel, including inserting single or multiple columns and working with Excel tables. You’ll learn shortcuts, step-by-step instructions, and pro tips to streamline your workflow. Let’s get started!
 How to Add a Column in Excel: Step by Step Guide
How to Insert Columns using the Right Click Method
If you prefer using the mouse, this is the simplest way to insert a new column.
Step 1: Select a column
Click on the letter of the column where you want to insert a new one. For Example, if you want to insert a column to the left of Column B, click on the letter "B" to select the entire column.
 Select a Column
 Step 2: Right-click and Choose "Insert"
Right-click on the selected column to open the context menu. From the menu, click on "Insert". This will initiate the process of adding a new column.
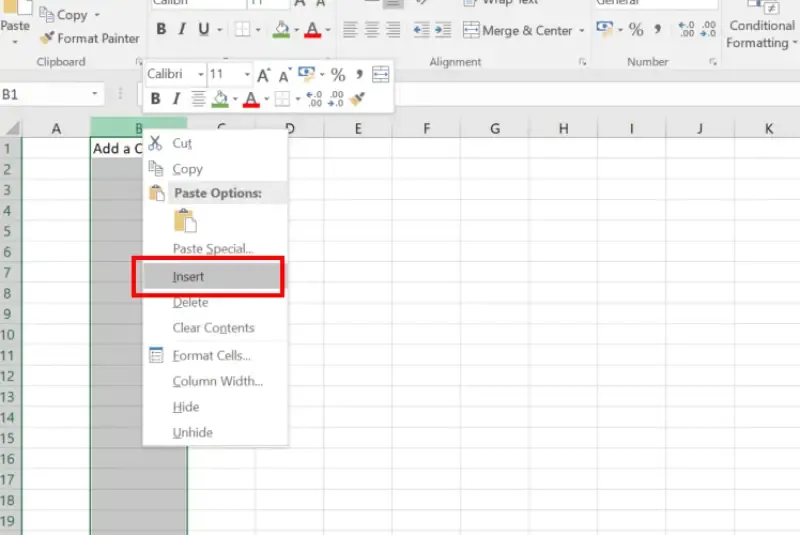 Right-Click and Choose Insert
 Step 3: Excel Shifts Existing Columns
Excel will automatically shift the selected column (and all columns to its right) one position to the right, creating space for the new column. For Example, if you inserted a column to the left of Column B, the original Column B will become Column C, and the new column will now be Column B.
Step 4: Preview Results
After the new column is inserted, verify that the existing data has shifted correctly and that the new column is in the desired location. You can now enter data or formulas into the newly inserted column.
 Excel will move the existing columns to the right
How to Insert Columns via the “Home” Tab
If you prefer using Excel’s toolbar, the Ribbon provides a simple way to insert a new column.
Step 1: Select a Cell in the Column
Click on any cell within the column where you want to insert a new column. For Example, if you want to insert a column to the left of Column C, click on any cell in Column C.
 Select a Cell
Step 2: Open the Home Tab
Navigate to the Home tab in the Excel Ribbon. This tab contains various tools and options for formatting and managing your worksheet.
Step 3: Insert a Column
In the Cells group (located on the right side of the Ribbon), click on the Insert button. From the dropdown menu, select “Insert Sheet Columns”. This will insert a new column to the left of the selected cell or column.
 Select a Cell >> Go to Home Tab>>Click on Insert Tab >> Click on Insert Sheet Columns
Step 4: New Column is Added
Excel will automatically insert a new column to the left of the selected column and shift the existing columns to the right. For Example, if you inserted a column to the left of Column C, the original Column C will become Column D, and the new column will now be Column C.
 New Column Added
 Step 5: Verify and Use the New Column
Check that the new column has been inserted correctly and that the existing data has shifted as expected. You can now start entering data or formulas into the newly inserted column.
How to Insert Multiple Columns at Once in Excel
If you need to add multiple columns at the same time, follow these steps:
Step 1: Select Multiple Columns
Highlight the same number of columns as the number of new columns you want to insert.
Example: To insert two new columns, select any two existing columns.
 Select Multiple Columns
Step 2: Insert the Columns
- Right-Click Method: Right-click on the selected columns and choose “Insert” from the context menu.
- Ribbon Method: Go to the Home tab, click on Insert in the Cells group, and then select “Insert Sheet Columns” from the dropdown menu.
Step 3: Excel Adds the Columns
Excel will insert the same number of new columns as you selected. The existing columns (and their data) will shift to the right to make space for the new columns.
 Select the Columns >>Right Click >> Select Shift Cells Left
How to Add a Column to a Table in Excel
If your data is formatted as an Excel Table, inserting a new column works a bit differently.
Step 1: Click on a Cell in the Last Column
Select any cell in the last column of the table.
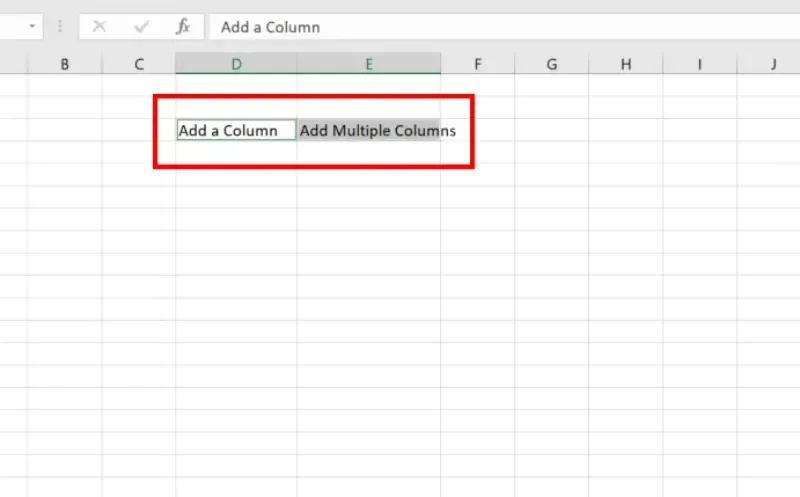
Step 2: Add a New Column Name
Type a new column name in the blank cell next to the last column.
 Click on a Cell >>Add a New Column Name
Step 3: Excel Expands the Table
Excel will recognize the new column name and extend the table to include the new column. The new column will inherit the table’s formatting and functionality, such as formulas or structured references.
 Excel Expands the Table
Bonus Tip: To insert a column within the table, right-click any column header and choose Insert Column Left or Insert Column Right.
Conclusion
Adding a column in Excel is a simple task that can transform how you organize and analyze data. Whether you use the right-click method, the Home tab, insert multiple columns at once, or work within Excel tables, these steps ensure your workflow stays smooth and efficient.
Now that you know how to add a column in Excel, try these methods in your next project. From budgets to reports, mastering this skill will save time and keep your spreadsheets clutter-free.
Similar Reads
How to Create a Form in Excel - A Step by Step Guide
Creating forms in Excel is an efficient way to capture and organize data, whether you’re tracking inventory, collecting survey responses, or entering client information. Excel forms are customizable and easy to use, making data entry faster and more organized, especially when handling large datasets
7 min read
How to Insert a Checkbox in Excel: Step-by-Step Guide
How to Add Checkboxes in Excel: Quick Steps Enable the Developer Tab >>Go to Developer TabControl Group >> Click InsertSelect Checkboxes >>Place the CheckboxesLink the Checkbox to a CellCreating a checklist or adding interactive elements to your spreadsheet in Excel becomes much ea
8 min read
How to Unhide and Show Hidden Columns in Excel: Step by Step Guide
There are lots of times when you need to hide certain columns on a temporary basis so you can focus on the specific data. But knowing how to unhide the hidden columns is also important if you want to work on the hidden data again. This complete guide on how to unhide hidden columns in Excel will wal
9 min read
How to Make a Bar Graph in Excel: Step by Step Guide
Bar graphs are one of the most versatile tools in Excel for visualizing and comparing data. Whether you’re tracking sales, analyzing survey responses, or presenting project milestones, bar graphs offer a straightforward way to highlight key trends and differences. Learning how to create a bar graph
6 min read
How to use Copilot in Excel with Examples (Step-by-Step Guide)
As of 2024, Microsoft introduced a new feature called Copilot for Excel, part of the broader Microsoft 365 suite, designed to enhance productivity and streamline data manipulation using AI-powered tools. The introduction of Excel Copilot is transforming how professionals across industries manage and
9 min read
How to Create Flowchart in Excel: Step-by-Step Guide
A Flowchart is a valuable tool for visualizing processes, workflows, or decision-making paths, making it easier to communicate ideas and identify improvements. This article provides a clear, step-by-step guide on how to create a Flowchart in Excel, using its shapes and formatting tools to design cus
6 min read
How to Find Duplicates in Excel (2025 Step-by-Step Guide)
Managing data effectively in Excel often requires identifying duplicate entries, which can clutter your analysis or lead to inaccuracies. Knowing how to find duplicates in Excel is essential for maintaining data integrity. From using COUNTIF to find duplicates to applying advanced filters and PivotT
9 min read
How to Sort a Pivot Table in Excel : A Complete Guide
Sorting a Pivot Table in Excel is a powerful way to organize and analyze data effectively. Whether you want to sort alphabetically, numerically, or apply a custom sort in Excel, mastering this feature allows you to extract meaningful insights quickly. This guide walks you through various Pivot Table
7 min read
How to Create a Graph in Excel: A Step-by-Step Guide for Beginners
Anyone who wants to quickly make observations and represent them graphically should know how to create graphs with Excel. Whether it is the preparation of business analysis papers, academic research documents or financial reports among other things, learning how to make graphs in Excel can significa
8 min read
How to Hide and Unhide Columns in Excel 2024: Easy Steps and Tips
Knowing how to hide and unhide columns in Excel can increase your workflow, especially when working with large datasets. Instead of deleting columns, hiding them allows you to focus on essential information. In this how-to Excel article, you will learn effective methods for hide and unhide columns i
7 min read