Hadoop - Python Snakebite CLI Client, Its Usage and Command References
Last Updated :
14 Oct, 2020
Python Snakebite comes with a CLI(Command Line Interface) client which is an HDFS based client library. The hostname or IP address of the NameNode and RPC port of the NameNode must be known in order to use python snakebite CLI. We can list all of these port values and hostname by simply creating our own configuration file which contains all of these details of NameNode like the hostname of Localhost and RPC(Remote Procedure Call) port. In our demonstration, we will be using a more simpler way to use snakebite CLI by directly passing this port and host values to the command itself. Remote Procedure Call or RPC is a way to allocate port dynamically and is used for server and remote administration applications.
The values we are using here for hostname and port value can be found in the hadoop/etc/hadoop/core-site.xml file in fs.default.name property in your system. We can visit Snakebite CLI documentation to get more information about Snakebite CLI configuration.
We can also check fs.default.name property value with the help of the below command.
hdfs getconf -confKey fs.defaultFS # We can also use fs.default.name but fs.defaultFS is most favourable
Let's see the fs.default.name property value manually in core-site.xml file in our system to know host or port.

We can see our default host is localhost or the port is 9000.
Usage Of Snakebite CLI
With the help of python snakebite CLI, we can easily implement most of the commands that we use with hdfs dfs like ls, mv, rm, put, get, du, df, etc. So let's perform some basic operation to understand how Snakebite CLI works.
Using Snakebite CLI via path in command line - eg: hdfs://namenode_host:port/path
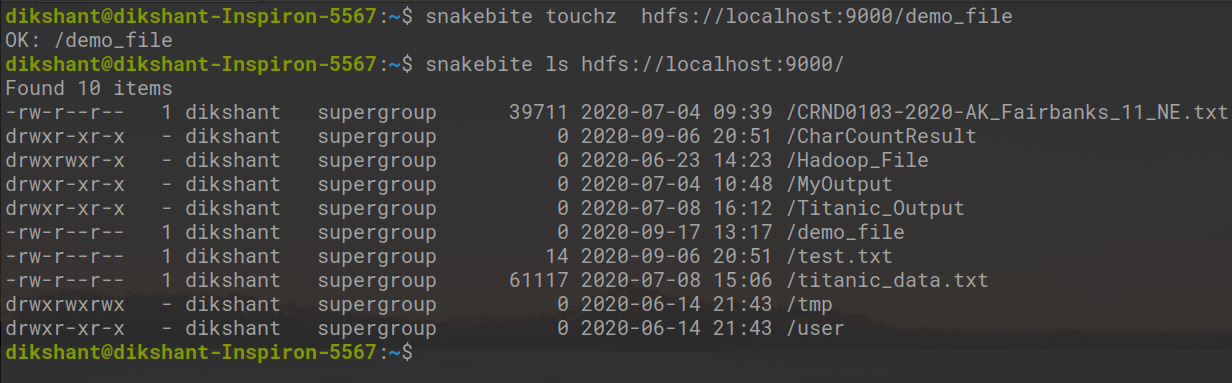
1. Listing all the directory's available in the root directory of HDFS
Syntax:
snakebite ls hdfs://localhost:9000/<path>
Example:
snakebite ls hdfs://localhost:9000/

2. Removing a file from HDFS
Syntax:
snakebite rm hdfs://localhost:9000/<file_path_with_name>
Example:
snakebite rm hdfs://localhost:9000/data.txt

3. Creating a Directory(Name of the directory is /sample in my case)
Syntax:
snakebite mkdir hdfs://localhost:9000/<path_with_directory_name>
Example:
snakebite mkdir hdfs://localhost:9000/sample

4. Removing a Directory(Name of the directory is /sample in my case)
snakebite rmdir hdfs://localhost:9000/sample

Now with the above example, we get the idea of how we can implement and use the snakebite command-line interface. The important difference between the snakebite CLI and hdfs dfs is that the snakebite is a complete python client library and does not use any java library to communicate with the HDFS. The snakebite library's command interacts faster with HDFS then hdfs dfs.
CLI Command Reference
The Python Snakebite library provides lots of facilities to work with HDFS. All the switches and commands for reference can be listed with help of simple snakebite command.
snakebite

We can observe that all the commands available in hdfs dfs similar commands are also available in the snakebite command-line interface. Let's perform a few more to get a better insight into snakebite CLI.
Check the snakebite version with the below command
snakebite --ver

1. cat: It is used to print the file data
Example:
snakebite cat hdfs://localhost:9000/test.txt

2. copyToLocal (or) get: To copy files/folders from hdfs store to the local file system.
Syntax:
snakebite copyToLocal <source> <destination>
Example:
snakebite copyToLocal hdfs://localhost:9000/test.txt /home/dikshant/Pictures

3. touchz: It creates an empty file.
Syntax:
snakebite touchz hdfs://localhost:9000/<name_of_directory>
Example:
snakebite touchz hdfs://localhost:9000/demo_file
4. du: display disk usage statistics
snakebite du  hdfs://localhost:9000/    # show disk usage of root directory

snakebite du  hdfs://localhost:9000/Hadoop_File   # show disk usage of /Hadoop_File directory i.e. already available

5. stat: It will give the last modified time of directory or path. In short, it will give stats of the directory or file
snakebite stat  hdfs://localhost:9000/

snakebite stat  hdfs://localhost:9000/Hadoop_File

6 setrep: This command is used to change the replication factor of a file/directory in HDFS. By default, it is 3 for anything which is stored in HDFS (as set in hdfs core-site.xml)
snakebite setrep 5 hdfs://localhost:9000/test.txt
In the below image, we can observe that we have change the replication factor from 1 to 5 for the test.txt file.

Similarly, we can perform multiple operations on HDFS using python snakebite CLI.
Similar Reads
How to create telnet client with asyncio in Python
Telnet is a client/server application protocol that uses TCP/IP for connection. Telnet protocol enables a user to log onto and use a remote computer as though they were connected directly to it within the local network. The system that is being used by the user for the connection is the client and t
4 min read
Python | Set 6 (Command Line and Variable Arguments)
Previous Python Articles (Set 1 | Set 2 | Set 3 | Set 4 | Set 5) This article is focused on command line arguments as well as variable arguments (args and kwargs) for the functions in python. Command Line Arguments Till now, we have taken input in python using raw_input() or input() [for integers].
2 min read
Run shell command from GUI using Python
In this article, we are going to discuss how we can create a GUI window that will take Operating System commands as input and after executing them, displays the output in a pop-up window. Modules Required: PyAutoGui: It is a module in python which is used to automate the GUI and controls the mouse a
2 min read
What is Python? Its Uses and Applications
Python is a programming language that is interpreted, object-oriented, and considered to be high-level. What is Python? Python is one of the easiest yet most useful programming languages and is widely used in the software industry. People use Python for Competitive Programming, Web Development, and
8 min read
How to Install and use SSL Certificate In Python
A secure Socket Layer (SSL) Certificate is a Digital certificate that can be used for the authentication of a website and it helps to establish an encrypted connection between the user and server. SSL is a secure layer that creates an encrypted link between a web server and a web browser. SSL keeps
2 min read
Snakebite Python Package For Hadoop HDFS
Prerequisite: Hadoop and HDFS Snakebite is a very popular python package that allows users to access HDFS using some kind of program with python application. The Snakebite Python Package is developed by Spotify. Snakebite also provides a Python client library. The protobuf messages are used by the s
3 min read
Command-Line Option and Argument Parsing using argparse in Python
Command line arguments are those values that are passed during the calling of the program along with the calling statement. Usually, python uses sys.argv array to deal with such arguments but here we describe how it can be made more resourceful and user-friendly by employing argparse module. Python
7 min read
Open and Run Python Files in the Terminal
The Linux terminal offers a powerful environment for working with Python files, providing developers with efficient ways to open, edit, and run Python scripts directly from the command line. Open and Run Python Files in the Linux TerminalIn this article, we'll explore various techniques and commands
2 min read
Understanding Versions, Ranges, and Constraints in Python Poetry
Managing dependencies is a fundamental aspect of maintaining a Python project. Poetry, a powerful dependency management tool, simplifies this process by providing a clear and concise way to declare, manage, and resolve dependencies. Here we check how to specify dependencies in Poetry, adding, removi
3 min read
How to use Python Pexpect to Automate Linux Commands?
Pexpect is a Python library for spawning child processes and controlling them automatically. Pexpect can be used to automate interactive applications such as SSH, FTP, password, telnet, etc. Pexpect works by spawning child processes and responding to expected patterns. Installation: Pexpect can be i
4 min read