How to generate TestNG HTML report for your tests.
Last Updated :
27 Jun, 2025
TestNG is a powerful testing framework for Java, widely used by developers to create and execute test cases for software applications. It is an automatically generated summary of test execution results presented in a user-friendly HTML format. This report provides detailed insights into the execution of your tests, making it easy to analyze and debug your test results.,
Key features of a TestNG HTML report include:
- Number of Tests Executed: Displays the total number of tests that were run, including those that passed, failed, or were skipped.
- Test Case Details: Includes information such as the execution time for each test case and its result (pass/fail).
- Stack Traces: If a test fails, the report includes stack traces, which help in debugging and understanding why a test failed.
- Hierarchical View: The report shows a hierarchical view of the tests, including test suites, test classes, and individual test methods, helping you understand the structure of your tests.
Prerequisites
Before starting, confirm you have the following pre-requisites:
- Java JDK: Version 8 or higher installed.
- Eclipse IDE: IDE with the latest version for Java development.
- TestNG Plugin: Installed in Eclipse for running TestNG tests.
- Maven: Dependency management.
- Web Browser: To view HTML reports.
- Basic TestNG Knowledge: Familiarity with annotations like @Test, @BeforeMethod, and testng.xml.
Steps for Generating HTML reports in TestNG
Create a Maven-based Java project in Eclipse to generate TestNG HTML reports.
Step 1: Create a New Maven Project
To begin, open Eclipse and navigate to the menu bar. Click on File, then select New, and finally choose Maven Project. In the dialog box that appears, ensure you check the "Create a simple project (skip archetype selection)" option. After checking it, click Next. On the following screen, you'll need to enter the project details:
- Group Id:
com.geeks - Artifact Id:
testng-reports-demo - Version:
1.0-SNAPSHOT
Once these details are filled in, click Finish. Eclipse will then proceed to create the project, including a pom.xml file, which is central to Maven-based projects.
To set up TestNG in a Maven project, open your pom.xml file and add the following dependencies for TestNG and the Maven Surefire Plugin:
XML
<project xmlns="http://maven.apache.org/POM/4.0.0" xmlns:xsi="http://www.w3.org/2001/XMLSchema-instance"
  xsi:schemaLocation="http://maven.apache.org/POM/4.0.0 http://maven.apache.org/xsd/maven-4.0.0.xsd">
  <modelVersion>4.0.0</modelVersion>
  <groupId>com.example</groupId>
  <artifactId>testng-reports-demo</artifactId>
  <version>1.0-SNAPSHOT</version>
  <dependencies>
    <!-- TestNG Dependency -->
    <dependency>
      <groupId>org.testng</groupId>
      <artifactId>testng</artifactId>
      <version>7.10.2</version>
      <scope>test</scope>
    </dependency>
  </dependencies>
  <build>
    <plugins>
      <!-- Maven Surefire Plugin for TestNG -->
      <plugin>
        <groupId>org.apache.maven.plugins</groupId>
        <artifactId>maven-surefire-plugin</artifactId>
        <version>3.3.1</version>
        <configuration>
          <suiteXmlFiles>
            <suiteXmlFile>testng.xml</suiteXmlFile>
          </suiteXmlFiles>
        </configuration>
      </plugin>
    </plugins>
  </build>
</project>
Save the pom.xml file. After saving, Eclipse will automatically download the necessary libraries and set up the project.
Step 3: Install TestNG Plugin in Eclipse
To install TestNG in Eclipse, go to the Help menu, then select Eclipse Marketplace. In the search bar, type TestNG and click Go. Once TestNG appears, click Install and follow the prompts. After the installation is complete, restart Eclipse to setup.
 TestNG for Eclipse.
Step 4: Create a TestNG Test Class
To create a new test class, right-click on the src/test/java folder in your project and select New > Class. Name the class LoginTest.java and place it under the package com.example.tests. Then, create the class with the following code:
Java
package com.example.tests;

import org.testng.annotations.BeforeMethod;
import org.testng.annotations.Test;
import static org.testng.Assert.*;

public class LoginTest {
    private String appStatus;

    @BeforeMethod
    public void setUp() {
        appStatus = "Initialized"; // Simulate app setup
    }

    @Test
    public void testValidLogin() {
        String result = simulateLogin("[email protected]", "Pass123!");
        assertEquals(result, "Success", "Valid login should succeed");
    }

    @Test
    public void testInvalidLogin() {
        String result = simulateLogin("[email protected]", "WrongPass");
        assertEquals(result, "Failure", "Invalid login should fail");
    }

    @Test
    public void testEmptyEmail() {
        String result = simulateLogin("", "Pass123!");
        assertEquals(result, "Error: Email required", "Empty email should show error");
    }

    // Simulate login logic
    private String simulateLogin(String email, String password) {
        if (email.isEmpty()) {
            return "Error: Email required";
        }
        if (email.equals("[email protected]") && password.equals("Pass123!")) {
            return "Success";
        }
        return "Failure";
    }
}
Step 5: Create testng.xml
To create the testng.xml file, right-click on the project root directory and select New > File. Name the file testng.xml. Then, add the following dependencies to the testng.xml file:
XML
<!DOCTYPE suite SYSTEM "https://testng.org/testng-1.0.dtd">
<suite name="LoginTestSuite">
  <test name="LoginTests">
    <classes>
      <class name="com.example.tests.LoginTest"/>
    </classes>
  </test>
</suite>
Step 6: Run Tests in Eclipse
To run the TestNG suite, right-click on the testng.xml file and select Run As > TestNG Suite. This will trigger the execution of the tests defined in the testng.xml file, and the results will be displayed in the console and the TestNG report.
Output:
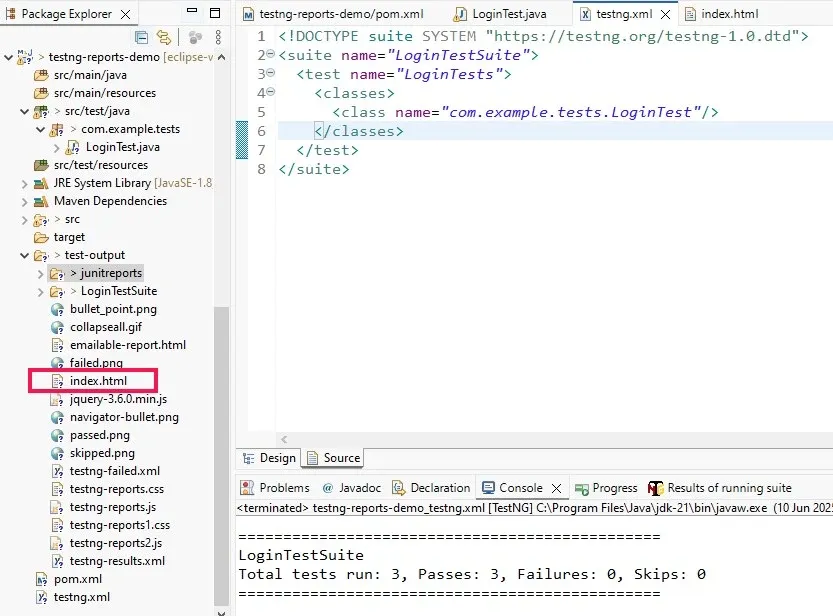 TestNG Report Index html file output
View the Generated TestNG HTML Report
Double-click the index.html file to open it in a browser, or right-click the file and select Open With > Web Browser. This will display the TestNG report, showing details like the number of tests run, passed, failed, skipped, and the overall test execution time. It will also highlight any failed tests and provide insights into the errors.
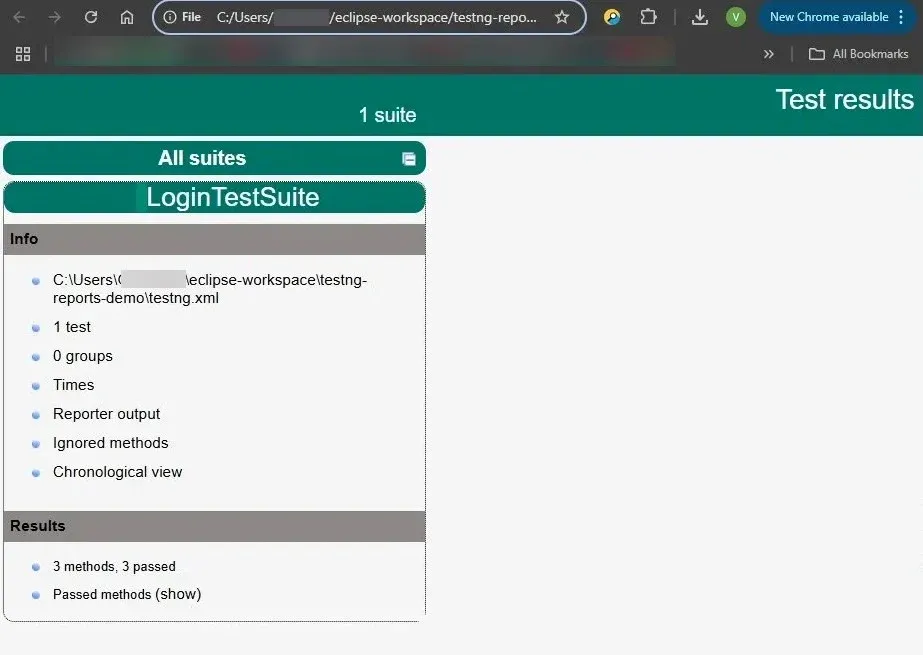 Index HTML Report Output in Web Browser
By following these process, which includes setting up a project, effectively running tests, and accurately interpreting the generated reports, developers can consistently ensure the delivery of high-quality applications with minimal defects. With tools like TestNG, Maven, and Eclipse, combined with best practices and customization options, TestNG HTML reports provide a powerful way to validate software efficiently.
Similar Reads
How to Create Test Suite in TestNG? In this article we will learn about test suites and how can we build them using Java and TestNG. TestNG is a modern testing framework that is used very widely used today. It has a broad base of features that allow us to write unit tests and club them together in groups. Table of Content What is a Te
11 min read
How to Write Test Cases - Software Testing Software testing is known as a process for validating and verifying the working of a software/application. It re-check that the software functions are meets the requirements without errors, bugs, or any other issues and provides the expected output to the user. The software testing process is not li
15+ min read
How to Create Requirements in TestLink? Creating requirements in TestLink is a crucial process for test management and quality assurance. TestLink is a popular open-source test management tool that helps teams define, track, and manage requirements effectively. By establishing clear requirements, you ensure that your testing efforts are a
3 min read
How to retrieve all test methods name in TestNG suite? TestNG is a powerful testing framework that provides easy configuration and management of test cases. One useful feature of TestNG is the ability to retrieve and display all test methods in a test suite. In this example, we demonstrate how to access and print the names of all test methods defined in
4 min read
How to Generate HTML Report from Cucumber JSON File in BDD Framework? In a Test Automation Framework, it’s very important to have a Summary Report of test execution. There are many report options such as Cucumber Report, Extent Report, etc. which are pretty detailed reports, but most of the time these reports are generated either inside the CI/CD tool (i.e. Jenkins, e
9 min read