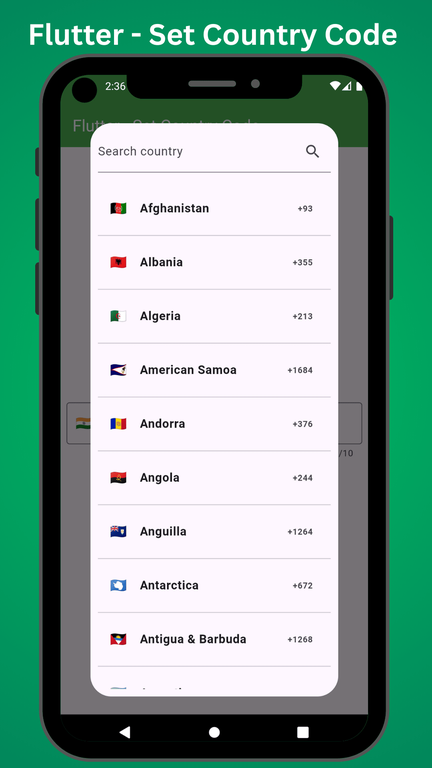
Flutter - Set Country Code Before the Phone Number
Last Updated :
18 Apr, 2025
Flutter is the platform where we can make a multi-platform application that is widely used to make applications in India as well as out of India. To make your app for multiple countries, you may be required to add a phone Textformfield with a country code selector. For every country, there is a different country code for India, it is +91, and we have a mobile number of 10 digits. It is much more difficult to cover all country's codes. So here we have come up with an amazing solution with just a few steps. Now, let us see how it will look.

Step By Step Implementation
Step 1: Create a New Flutter Application
Create a new Flutter application using the command Prompt. To create a new app, write the below command and run it.
flutter create app_name
To know more about it refer this article: Creating a Simple Application in Flutter
Step 2: Adding the Dependency
To add the dependency to the pubspec.yaml file, add intl_phone_field as a dependency in the dependencies part of the pubspec.yaml file, as shown below:
Dart
dependencies:
  flutter:
    sdk: flutter
  intl_phone_field: ^3.2.0
Now run the below command in the terminal.
flutter pub get
Or
Run the below command in the terminal.
flutter pub add intl_phone_field
Step 3: Import dependencies
To use libraries, import all of them in the respective .dart file,
import 'package:intl_phone_field/intl_phone_field.dart';
Step 4: Working With main.dart
Add the boilerplate code below in main.dart to initialize the Firebase in the main function and create a basic structure with an MaterialApp.
main.dart:
Dart
import 'package:flutter/material.dart';
import 'package:intl_phone_field/intl_phone_field.dart';

// Entry point of the Flutter application
void main() {
  runApp(const CountryCode());
}

// Main widget of the application
class CountryCode extends StatelessWidget {
  const CountryCode({super.key});

  @override
  Widget build(BuildContext context) {
    return MaterialApp(
      // Disables the debug banner
      debugShowCheckedModeBanner: false,
      home: Scaffold(
        appBar: AppBar(
          title: const Text("Flutter - Set Country Code"),
          backgroundColor: Colors.green,
          foregroundColor: Colors.white,
        ),
        body: Padding(
          padding: const EdgeInsets.all(8.0),
          child: Center(
            child: // Code Here
          ),
        ),
      ),
    );
  }
}
Step 5: Working with IntlPhoneField
Dart
IntlPhoneField(
    // Padding for the flag button
    flagsButtonPadding: const EdgeInsets.all(8),
    // Position of the dropdown icon
    dropdownIconPosition: IconPosition.trailing,
    decoration: const InputDecoration(
    // Label for the input field
    labelText: 'Phone Number',
    // Border style for the input field
    border: OutlineInputBorder(
            borderSide: BorderSide(),
        ),
    ),
    // Default country code (India)
    initialCountryCode: 'IN',
    // Displays the cursor in the input field
    showCursor: true,
    // Shows the dropdown icon for country selection
    showDropdownIcon: true,
    onChanged: (phone) {
        // Callback when the phone number changes
        // Prints the complete phone number
        print(phone.completeNumber);
    },
),
You can customize this as per your requirement. There are multiple properties in this that you can use to customize it just like you customize your input fields.
Let us discuss a few important properties here:
There are 4 properties for this
- onCountryChanged: It will call when you change the country and will return the details about the country like flags, code, name, and all.
- onSaved: It will call when you try to save the input from the keyboard. It will work the same as it works in textfield, textformfield. The only difference is this It will return the phone number countrycode with the phone number as Datatype, not as String.
- onSubmitted: It will call when you submit the textfield from the keyboard, it will just give you a number entered not with the country code. Same work as in textfield.
- onTap: It will call when you tap on the widget we have added in step 3.
- onChanged: This method is called when you change the country code or type the mobile number. It will also give you a complete phone number with country code like in the onSaved method.
- initialCountryCode: It will take the country code that you want to use by default. Just like for India, it is IN. Please note that pass the country code in uppercase only. Otherwise, it will take a default country code i.e +93 (Afghanistan).
- dropdownIconPosition It will take only 2 values either IconPosition.trailing or IconPosition.leading. By default, it is IconPosition.leading.
- dropdownIcon: It will take IconData as a value. It may be any type of icon.
And there are many more to go. You can check it when you use this widget.
Complete Source Code
main.dart:
Dart
import 'package:flutter/material.dart';
import 'package:intl_phone_field/intl_phone_field.dart';

// Entry point of the Flutter application
void main() {
  runApp(const CountryCode());
}

// Main widget of the application
class CountryCode extends StatelessWidget {
  const CountryCode({super.key});

  @override
  Widget build(BuildContext context) {
    return MaterialApp(
      // Disables the debug banner
      debugShowCheckedModeBanner: false,
      home: Scaffold(
        appBar: AppBar(
          title: const Text("Flutter - Set Country Code"),
          backgroundColor: Colors.green,
          foregroundColor: Colors.white,
        ),
        body: Padding(
          padding: const EdgeInsets.all(8.0),
          child: Center(
            child: IntlPhoneField(
              // Padding for the flag button
              flagsButtonPadding: const EdgeInsets.all(8),
              // Position of the dropdown icon
              dropdownIconPosition: IconPosition.trailing,
              decoration: const InputDecoration(
                // Label for the input field
                labelText: 'Phone Number',
                // Border style for the input field
                border: OutlineInputBorder(
                  borderSide: BorderSide(),
                ),
              ),
              // Default country code (India)
              initialCountryCode: 'IN',
              // Displays the cursor in the input field
              showCursor: true,
              // Shows the dropdown icon for country selection
              showDropdownIcon: true,
              onChanged: (phone) {
                // Callback when the phone number changes
                // Prints the complete phone number
                print(phone.completeNumber);
              },
            ),
          ),
        ),
      ),
    );
  }
}
Output: