When building Flask applications, middleware helps modify requests and responses before they reach the application or the client. Flask itself supports middleware using hooks like before_request and after_request, but WSGI (Web Server Gateway Interface) middleware works at a lower level. It sits between the web server and the application, intercepting and modifying requests and responses before they reach Flask.
This allows us to add features without modifying the Flask app itself, some of the features are:
- Logging
- Authentication
- Compression
How to Implement WSGI Middleware
WSGI middleware follows a specific pattern:
- It is implemented as a class that takes the Flask app as an argument.
- The class must define a __call__ method, which processes the WSGI environment (incoming request details) and start_response (the response handler).
- The modified request is then passed to the Flask app.
Let's look at the Syntax to create and apply WSGI middleware to a flask app.
class CustomWSGIMiddleware:
def __init__(self, app):
self.app = app # Wraps the Flask app
def __call__(self, environ, start_response):
# Modify request before passing it to Flask
print(f"Incoming request: {environ['REQUEST_METHOD']} {environ['PATH_INFO']}")
# Process the request with the Flask app
response = self.app(environ, start_response)
# Modify response if needed
return response
Now, to apply the above WSGI Middleware to a flask app use this:
app.wsgi_app = CustomWSGIMiddleware(app.wsgi_app)
Let's create some basic Flask applications using WSGI Middleware to get a better and understanding.
Creating Custom WSGI Middleware
A simple WSGI middleware is a Python class that wraps around the Flask app and modifies requests or responses. Let's create a basic flask app and implement a custom wsgi middleware in it:
Python
class WSGILoggingMiddleware:
    def __init__(self, app):
        self.app = app

    def __call__(self, environ, start_response):
        print(f"Incoming request: {environ['REQUEST_METHOD']} {environ['PATH_INFO']}")
        return self.app(environ, start_response)

from flask import Flask

app = Flask(__name__)
app.wsgi_app = WSGILoggingMiddleware(app.wsgi_app)  # Applying WSGI middleware

@app.route('/')
def home():
    return "Hello, WSGI Middleware!"

if __name__ == '__main__':
    app.run(debug=True)
Explanation:
__call__: This method intercepts the request before it reaches Flask.
environ: Contains request details like method and path.
start_response: Used to pass the response back to the WSGI server.
app.wsgi_app = WSGILoggingMiddleware(app.wsgi_app): Applies the middleware to Flask.
Output:
Run the application using command "python app.py" and the request details will be logged in the terminal. Below is the snapshot.
 Request details in terminal
Using Third-Party WSGI Middleware
Instead of writing custom middleware, you can use pre-built WSGI middleware. A popular option is Werkzeug’s ProxyFix, which helps handle reverse proxy headers (like Nginx or a load balancer). Reverse proxies often modify headers like REMOTE_ADDR, HTTP_HOST, and SCRIPT_NAME, which Flask wouldn't recognize correctly by default.
Python
from werkzeug.middleware.proxy_fix import ProxyFix
from flask import Flask

app = Flask(__name__)
app.wsgi_app = ProxyFix(app.wsgi_app, x_for=1, x_proto=1, x_host=1, x_port=1, x_prefix=1)

@app.route('/')
def home():
    return "ProxyFix Middleware Applied!"

if __name__ == '__main__':
    app.run(debug=True)
Explanation:
- ProxyFix(app.wsgi_app, x_for=1, x_host=1):
- x_for=1 tells Flask to trust the first X-Forwarded-For header, which contains the client’s actual IP.
- x_host=1 ensures Flask uses the X-Forwarded-Host header to determine the correct host.
- The middleware fixes incorrect request metadata when Flask is behind a reverse proxy.
Demonstation:
Start the app server using "python app.py" command in the terminal and then open postman and make a GET Request to the URL - "http://127.0.0.1:5000/". It will show the default client IP (localhost), as there are no proxy headers. Below is the snapshot-
 Status- 200 OK
Now add the following header to simulate a proxy an make GET Reques to the same URL-
- Key: X-Forwarded-For
- Value: 203.0.113.5
Flask will correctly recognize the forwarded IP as the client’s IP-
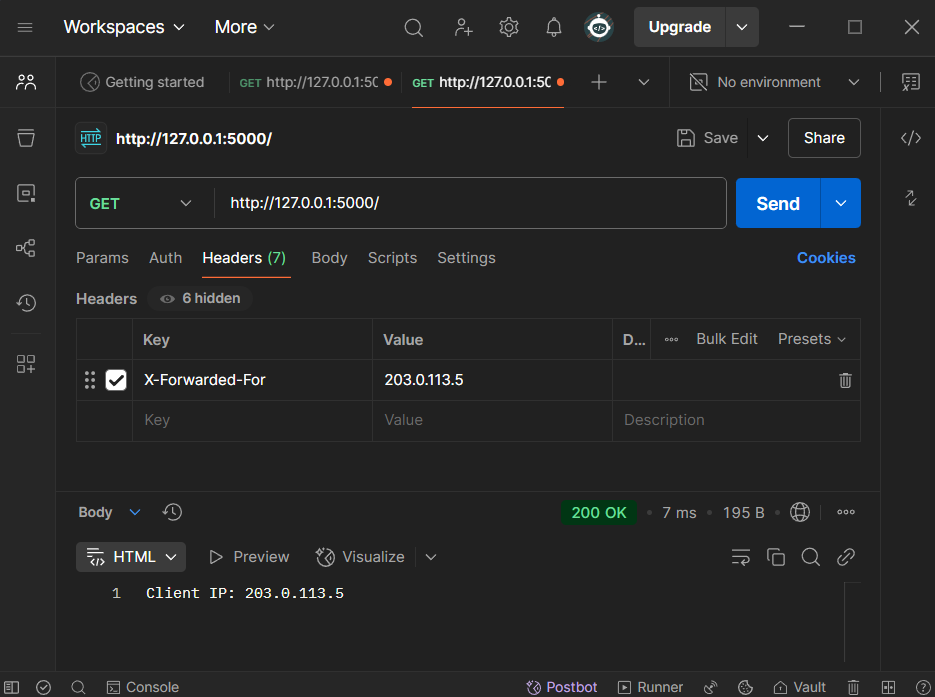 Proxy IP
Similar Reads
Flask Middlewares
Middleware is a powerful concept in web applications that allows you to process requests and responses before they reach the main application logic. In Flask, middleware functions sit between the client request and the final response, enabling tasks like logging, authentication, request modification
5 min read
Python Falcon - Middleware
Middleware in Falcon is a powerful mechanism that allows you to preprocess requests and post-process responses globally across your application. It acts as a bridge between incoming and outgoing requests, allowing you to perform authentication, logging, and request/response modification tasks. What
5 min read
Flask - Templates
In this article, we are going to learn about the flask templates in Python. Python is a high-level, open-source, object-oriented language, consisting of libraries, used in many domains, such as Web Development, Machine Learning, and so on. In web development, Python is used for building REST APIs, s
8 min read
Update Flask using PIP
Flask, a popular web framework for Python, evolves with new features, bug fixes, and improvements. Keeping your Flask installation up-to-date ensures that you can leverage the latest enhancements and security patches. In this guide, we'll walk through the process of updating Flask using pip, the pac
2 min read
Middleware in Django
Middleware is a series of processing layers present between the web server and the view (controller in some frameworks), allowing the user to intercept, modify, and add behavior to these requests and responses. What is Middleware in Django?In Python Django, middleware is a framework that provides a
9 min read
Flask - Variable Rule
Flask variable rules allow us to create dynamic URLs by defining variable parts within the route. This makes it possible to capture values from the URL and pass them to view functions. Variable RulesA variable rule is defined using <variable-name> within the route.The captured variable is auto
3 min read
Flask Security with Talisman
A Flask is a powerful web framework which basically used for developing interesting web applications in the Python language. While developing this kind of web application with the help of  Flask, it is more important to make sure that the security of our application is strong for that the talisman c
3 min read
Retrieving HTML Form data using Flask
Flask is a lightweight WSGI web application framework. It is designed to make getting started quick and easy, with the ability to scale up to complex applications. It began as a simple wrapper around Werkzeug and Jinja and has become one of the most popular Python web application frameworks. Read th
3 min read
Flask Rendering Templates
Flask is a lightweight Python web framework that enables developers to build web applications easily. One of its key features is template rendering, which allows dynamic content generation using Jinja2 templating. In this guide, we'll explore how to render templates in Flask. Setting up FlaskSetting
7 min read
Read File Without Saving in Flask
Flask is a flexible, lightweight web-development framework built using python. A Flask application is a Python script that runs on a web server, which listens to HTTP requests and returns responses. It is designed for simple and faster development. In this article we will discuss how can we Read fil
2 min read