The setup for AWS Direct Connect involves creating a connection, configuring your on-premises routers, setting up virtual interfaces, establishing BGP peering, and thoroughly testing the connection. Once deployed, Direct Connect offers enhanced security, speed, and reliability for cloud access, outperforming standard internet connections. For maximum uptime, ensure redundancy is in place and monitor the system regularly.
Introduction
When the AWS Direct Connect is fully operational, Direct Connect can enhance your cloud access by boosting security, speed, and reliability compared to traditional internet. Make sure to build in redundancy for availability and continuously monitor the connection's health.
Setting up AWS Direct Connect entails a few important steps: first, you create the connection, configure your routers, set up the necessary virtual interfaces, and establish BGP peering, before finally testing the connection.
Features of AWS Direct Connect
There are many features offered by the AWS Direct Connect, these features help us to use the AWS direct connect more effectively and manage our private connections with lower latency and helps us in achieving more efficiency.
Following are some of the features of the AWS Direct Connect:
- Dedicated Network Connection: Provides a private connection between your premises and AWS.
- High Performance: Reduces latency compared to internet-based connections and offers more consistent network performance.
- Private Virtual Interfaces: Users can establish public VIFs to access AWS public services and private VIFs for connecting to Amazon VPCs.
- Redundancy and Failover: Supports multiple connections to ensure high availability and fault tolerance.
- Cost-effective: Reduces outbound data transfer costs when compared to traditional internet connectivity.
Syntax for AWS Direct Connect
AWS Direct Connect doesn’t have a traditional programming language syntax but involves a series of steps in the AWS Management Console or using the AWS CLI to configure connections. Below are some CLI commands which are used with Direct Connect:
Create Connection
aws directconnect create-connection --location <location> --bandwidth <speed> --connection-name <name>
Create Virtual Interface
aws directconnect create-private-virtual-interface --connection-id <id> --new-private-virtual-interface <json>
Describe Connections
aws directconnect describe-connections
These commands allow you to create, manage and view Direct Connect resources via the AWS CLI.
Setting up AWS Direct Connect Environment
For setting up an AWS direct connect environment we will have to first create a virtual private network and then create subnet for it then finally we can set it up and access it, following are the steps required for setting up the AWS direct connect environment:
Step 1: Create VPC
Create a VPC, for this we will go to AWS dashboard and search VPC Dashboard and then select "Your VPCs" option and then click on the create VPC button.
 Create VPC.
Step 2: Add VPC Details
Add the VPC details, here we will have to add the details such as name tag, IPv4 CIDR block and then click on the create block.
If you are not awawre about CIDR then refer to this article: Classless Inter Domain Routing (CIDR)
 Add VPC Details.
Step 3: Subnet for VPC
a subnet within the VPC by defining a specific range of IP addresses dedicated to the virtual private cloud. we can create a subnet by clicking on the Create subnet button.
 Create Subnet for VPC.
Step 4: Add subnet details
Next we will have to add the subnet details, details such as name tag and VPC, here we will paste the VPC ID which we got from creating VPC from above steps.
 Add subnet details.
Step 5: Open Virtual Private Gateway
Create a virtual private gateway for it, in order to creating a virtual private gateway go to the left side menu and click on the "Virtual Private Gateway" button.
 Open Virtual Private Gateway.
Step 6: Create Virtual Private Gateway
We will create a virtual private gateway, for this click on the create virtual private gateway button.
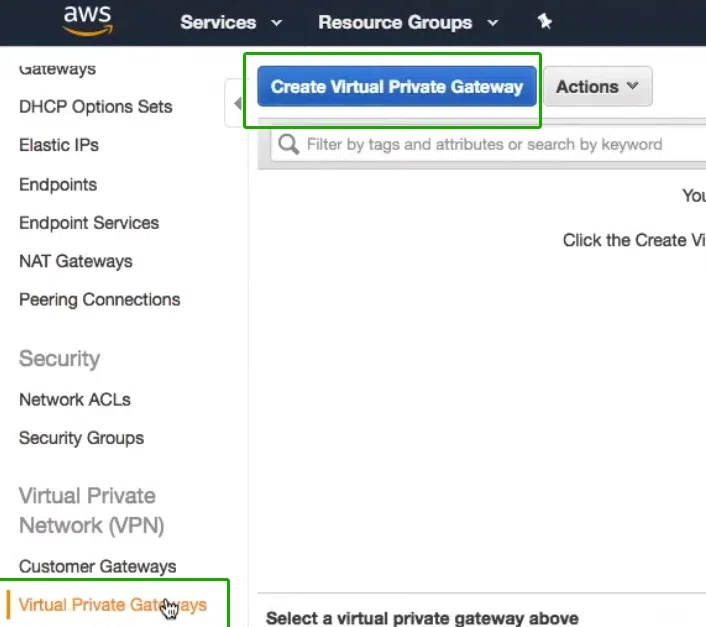 Create Virtual Private Gateway.
Add the details for the virtual private gateway such as name and ID of the VPG and the type, after this we will click on the "Attach to VPC" button for attaching this VPG to the VPC that we created.
 Attach to VPC.
Step 7: Create Route Table
Once we have created and attached the virtual private gateway, we will have to attach it to the VPC and after that we need to create a route table it is a collection of data which is used for locating the destination address.
 Create Route Table.
Step 8: Add Route Table Details
Once we click on the create route table button, we can add the details of the route table, here we only have to add two details, first we will have to add the name tag and then select the VPC that we had just created.
 Add Route Table Details.
Step 9: Edit Route for the Route Table
Once the route table is created and the details are added, we will have to edit the route for the route table, for this click on the create button and you will be redirected to the home page of route tables, from here select the route table and go to routes > edit route.
 Edit Route for the Route Table.
Step 10: Add Route Details
Now we will have to add the destination and VPC details such as the CIDR block address which was used in the previous steps for creating VPC, this step is important to connect routes.

Step 11: Propogate the Route
Once the route is saved the next step will open automatically where we will have to propagate the route, propagation is the process of dynamically adding the entry of the route.
 Propogate the Route.
Step 12: Associate Gateway for Direct Connect
Once the propagation is saved, we will have to go back to direct connect gateway and then go to associate gateway and associate the gateway that we have created.
 Associate Gateway for Direct Connect.
Once the associate gateway is attached to the VPC of our choice we will have to launch an EC2 instance for this, to launch it simply go to Services > EC2 Dashboard and click on "Launch Instance" as you can see in the image:
 Launch instance.
After launching the instance we will add the basic details required for the instance such as AMI, instance type and configuration of the instance as well as other configurations.
To learn more about creating and launching EC2 instance, read the following:
Create EC2 Instance in AWS (Amazon): Complete Tutorial
 Instance details.
Step 13: Verify AWS Direct Connect Setup
Once the EC2 instance is launched successfully, we can check and verify if it is working properly or not. for checking this we will first have to copy the private IP from the bottom of the page:
 Verify AWS Direct Connect Setup.
Once we copy the Private IP we can open a terminal and ping this IP address to check if the setup is up and running or not.
 ping private IP.T
As you can see in the image above, we are able to successfully ping the IP address obtained from the direct connect setup and it is sending response packet as well, this means that the AWS Direct Connect setup is successfully configured.
Basic Examples and Explanations
Lets understand more about the cases in which we can configure and use the AWS Direct Connect and make sure we have a better functioning system:
Example 1: Creating a Direct Connect Connection:
You can create a Direct Connect connection using the AWS Management Console or CLI. For example, if you want to set up a connection between your data center and an AWS region, you would configure a physical link and then establish virtual interfaces.
Example 2: Configuring a Virtual Private Interface (VIF):
After your physical connection is established, set up a private virtual interface to route traffic to your Virtual Private Cloud (VPC). This involves specifying a VLAN ID, IP addressing, and BGP configuration to make sure the data is routed securely and efficiently.
Advantages of AWS Direct Connect Setup
Reliable Connection: Direct Connect ensures more reliable and steady performance when compared to the fluctuating reliability of internet connections.
Security: By bypassing the public internet, Direct Connect improves security for confidential data and network traffic.
Cost Savings: Reduces outbound data transfer costs, especially for data-heavy applications.
Disadvantages of AWS Direct Connect Setup
Geographical Restriction: AWS Direct Connect’s reach is location-dependent, meaning users with distant data centers could have to collaborate with third-party services.
Initial Setup Complexity: Requires collaboration with network providers and can be complex to set up, specially for users unfamiliar with BGP or router configuration.
Cost of Dedicated Infrastructure: Involves costs for dedicated connections and might not be cost-effective for smaller workloads.
Applications of AWS Direct Connect Setup
Disaster Recovery: AWS Direct Connect makes sure there is a reliable and high-speed connection for disaster recovery solutions, enabling rapid data transfer to AWS during critical situations.
Real-time Applications: AWS Direct Connect Provides low-latency connections necessary for time-sensitive applications like video streaming and financial services.
Big Data Analytics: For organizations running big data analytics, Direct Connect is crucial. It ensures high throughput and secure data transfer between on-premises sources and AWS platforms such as Amazon S3 and Redshift, facilitating seamless data analysis.
Conclusion
Configuring AWS Direct Connect offers a fast, reliable, and secure way to connect your on-premises infrastructure to AWS, bypassing the public internet. By following the steps to set up Direct Connect, you can benefit from consistent network performance, reduced latency, and enhanced security for your workloads. Whether you're transferring large datasets, running hybrid cloud environments, or meeting regulatory compliance requirements, AWS Direct Connect provides a robust and scalable solution. With proper planning and configuration, Direct Connect enables your organization to optimize cloud connectivity and enhance overall operational efficiency