Date Modifications with Power Query in Excel
Last Updated :
20 Jan, 2023
A data preparation and transformation engine is Power Query. Power Query includes a Power Query Editor for implementing transformations as well as a graphical interface for obtaining data from sources. With Power Query (also referred to as Get & Transform in Excel), you may import or connect to external data and then modify that data to match your needs, for instance, by combining tables, altering the data type, or eliminating a column. When you're ready to produce charts and reports, load your query into Excel. You may periodically update the data by refreshing it.
Steps to Open Power Query in Excel
Step 1: First create a table in Excel.

Step 2: Select the field and then navigate to the data tab on the top of the ribbon. Then select the Get data option and choose From other sources and select From Table/Range option.
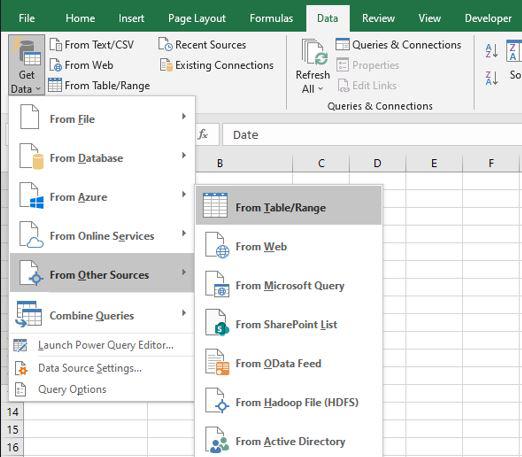
Step 3: Then Create Table dialog box appears. Here select the table range and then click OK.

Step 4: Now you can see it converts the excel table to a power query Editor.

Date modification with Power Query
Age
The number of days between the specified date and the current date is determined when you choose the Age option and choose a date column. Next, you must swap out the current date for the one in the second date column.
Step 1: Select the date column. Navigate to the add column tab on the top of the ribbon and then go to the Date and select Age.

Step 2: Now as you can see with this command, the Date value is transformed into the AgeFromDateTime based time format: Days.Hours:Minutes: Seconds or 2923.11:48:53.3504693.

Date Only
When you choose the Date Only option and choose a date column, the time is removed from the display and only the date is displayed. It creates a new column with the date name and shows only the date.
Step 1: Select the date column. Navigate to the add column tab on the top of the ribbon and then go to the Date and select Date Only.

Step 2: Now as you can see with this command, the Date value is transformed into the Date-based format: Date or 12-01-2015.

Year
When you choose the Year option while selecting a date column, just the year is displayed and the date and time are not displayed. It adds a new column with the name of the year and displays only the year. There are several choices available: year, the start of the year, and the end of the year.
Step 1: Select the date column. Navigate to the add column tab on the top of the ribbon and then go to the Date and select Year.

Step 2: Now as you can see with this command, the Date value is transformed into the Year: Year or 2015.

Month
When you choose the month option while selecting a date column, just the month is displayed and the date and time are not displayed. It adds a new column with the name of the year and displays only the year. There are several choices available: month, the start of the month, the end of the month, the days in the month, and the name of the month.
Step 1: Select the date column. Navigate to the add column tab on the top of the ribbon and then go to the Date and select the Month option here we are choosing Days in a month.

Step 2: Now as you can see with this command, the Date value is transformed into the Days in Month: Days in every month or 31/30.

Quarter
When you choose the Quarter option while selecting a date column, just the Quarter is displayed. It adds a new column with the name of the quarter and displays only the quarter. There are several choices available: a quarter of the year, the Start of the quarter, and the End of the quarter.
Step 1: Select the date column. Navigate to the add column tab on the top of the ribbon and then go to the Date and select the Quarter option here we are choosing Quarter of Year.

Step 2: Now as you can see with this command, the Date value is transformed into the Quarter of the year: Quarter or 1.

Week
When you choose the week option while selecting a date column, just the week is displayed. It adds a new column with the name of the week and displays only the week. There are several choices available: The week of the year, the week of the month, the start of the week, and the end of the week.
Step 1: Select the date column. Navigate to the add column tab on the top of the ribbon and then go to the Date and select the Week option here we are choosing Week of year.

Step 2: Now as you can see with this command, the Date value is transformed into the Week of the Year: Week or 3.

Day
When you choose the day option while selecting a date column, then just the day is displayed. It adds a new column with the name of the day and displays only the day. There are several choices available: day, day of the week, day of the year, the start of the day, end of the day, and name of the day.
Step 1: Select the date column. Navigate to the add column tab on the top of the ribbon and then go to the Date and select the Day option here we are choosing Name of Day.

Step 2: Now as you can see with this command, the Date value is transformed into the Name of the Day: Day Name or Monday/Tuesday.

Parse
When you choose the Parse option and choose a date column, the time is removed from the display and only the date is displayed. It creates a new column with the Parse name and shows only the date.
Step 1: First you need to convert the date to text then the parse function will get active.

Step 2: Then select the date column. Navigate to the add column tab on the top of the ribbon and then go to the Date and select the Parse.

Step 3: Now as you can see with this command, the Date value is transformed into the Parse: Parse or 12-01-2015.

Subtract Days
When you choose the Subtract Days option and choose both date columns, then it subtracts both columns. It creates a new column with the subtraction name and shows the result of the subtraction.
Step 1: First select the two columns. Navigate to the add column tab on the top of the ribbon and then go to the Date and select the Subtract Days.
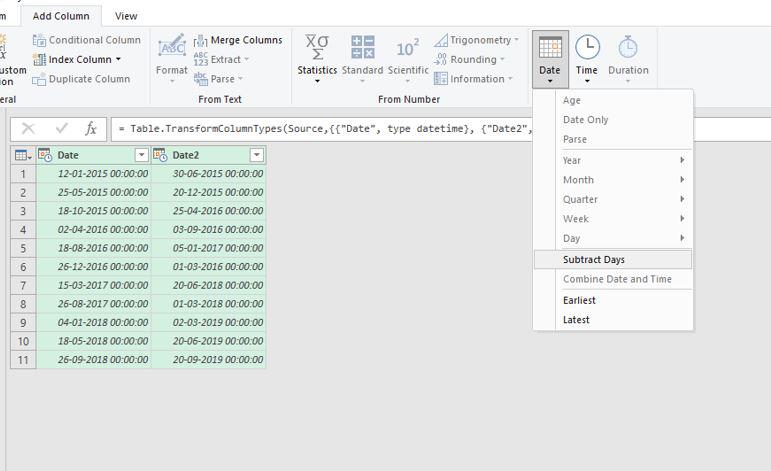
Step 2: Now as you can see with this command, subtract the two dates: Subtract Days or -169.

Combine Date and Time
When you choose the Combine Date and Time option and choose both date and time columns, then it combines both columns. It creates a new column with the merged name and shows the result of the combination.
Step 1: First select the two columns. Navigate to the add column tab on the top of the ribbon and then go to the Date and select the Combine Date and Time.

Step 2: Now as you can see with this command, Combines the date and time column: Combine Date and Time or 12-01-2015 12:02:12.

Earliest and Latest Days
Searches for the earliest or latest day. Since there is only one value as a result, it is useless for New Column and only useful for Transform.
Similar Reads
Text Modifications with Power Query in Excel
In Excel, Power Query is a business intelligence tool that is used to analyze the data imported from different sources. With the help of power query, we can easily clean, transform and reshape our data as per requirement along the way of analyzing the data. In this example, we will learn about the T
5 min read
Loading Data with Power Pivot in Excel
There are two ways to input data into Power Pivot: Data may be immediately loaded into PowerPivot, populating the database, or it can be loaded into Excel and added to the Data Model. You may either create connections and/or use the existing connections to import data into the Power Pivot Data Model
5 min read
Data Models in Excel Power View
The Data Model gives us the ability to work with multiple tables and integrate them with each other using a specified relationship to build a relational database inside Microsoft Excel. It helps to work with larger datasets and provides us with a huge set of interactive features for creating, modify
5 min read
Exploring Data with Power View in Excel
Microsoft Excel's Power View is a complex visualization function that allows users to create graphs, charts, and reports. It makes it simple for organizations to create reports and dashboards that can be shared with stakeholders, managers, and other team members on a daily, weekly, and monthly basis
4 min read
Exploring Data with Power View Maps in Excel
Maps in Power View present your data from a geographical perspective. Power View maps employ Bing map tiles, so you can zoom and pan just like any other Bing map. To make maps function, Power View must transfer data to Bing through a secure online connection for geocoding, which is why it prompts yo
3 min read
Exploring Data with Excel Power Pivot
Power Pivot is an Excel one can use to perform intense information investigation and make modern information models. With Power Pivot, we can squash up enormous volumes of information from different sources, perform data examination quickly, and share experiences without any problem. In both Excel a
7 min read
How to Create a Relative File Path with Power Query in Excel?
In today's digital environment, sharing Excel files effectively is vital. A common issue is that Excel's Power Query uses absolute file paths, which can break when files are opened on different systems. To enhance portability and maintain data connections, it's crucial to convert these absolute path
9 min read
Analyzing Large Datasets With Power Pivot in Microsoft Excel
The setting for Power Pivot… If you are a successive Excel client, then you are most likely acquainted with turn tables. They are utilized for sorting out speedy bits of knowledge from modest quantities of information and can likewise be transformed into straightforward charts. In any case, even Exc
5 min read
How To Get Current Date in Power Query?
Power query is a analysis tool in excel.From 2016 version onwards it was inbuilted in the Excel . Power Query helps us to perform all type of tasks regarding to transformation. Â In this article is we will see how to get current date in power query . Getting Current Date in Power QueryTo get the curr
2 min read
Excel - Types of Merging of Queries in Power Query
In Power Query, we have an option to Combine two tables using “Merge queriesâ€. Merge Queries: Merge with current query with another queryMerge Queries as New: Merge with current query with another query and create New query In this article, we explore different types of merging of queries in Power Q
2 min read