Before diving into the vast field of Android Development, there is a need to understand the tool required for it. The name of the tool is Android Studio, used for developing Android Applications. Android Studio is developed by Google and Jetbrains. It's the most widely used software for developing Android Applications. So in this article, there is a deep discussion about Android Studio. Like how to install it, tips and tricks that increase productivity while developing an Android application. So stay tuned till the end.

So in this article, we have covered the following things:
- What is Android Studio?
- How to Install Android Studio?
- File Structure of a Project in Android Studio
- Writing first Android Studio Application
- Understanding the Designing Part
- Understanding the Coding Part
- Run Android App
- Essential Android Studio Keyboard Shortcuts
- Some Android Studio Tips and Tricks
- Complete Android Studio Tutorial
1. What is Android Studio?
Before starting and learning any programming language, the one thing required to learn to program is IDE (Integrated Development Environment). It provides a convenient way to write code. If there are any errors or bugs after compiling, they can be debugged. So, Android Studio is an official IDE for developing Android applications. It provides features that enrich productivity while writing code. It provides features like:
- A flexible Gradle build system, easy to manage all the dependencies in a single place.
- It allows you to run and test applications if one doesn't have an Android smartphone. Because of its feature-rich emulator, it can run one or more emulators at a time to test client-server applications. And it also allows you to run and test physical Android Smartphones.
- It provides a unified environment so that applications can be developed for all types of Android devices.
- Intelligent code completion feature.
- Predefined code templates.
- Git integration makes developers maintain repositories, and also helps to build common app features and import sample code.
- C++ and Native Development Kit(NDK) support.
2. How to Install Android Studio?
To install Android Studio, visit the Android Studio Download page. Make sure to install the latest stable version of the Android Studio. Before installing the Android Studio, check the system requirements on the same page, so that the system meets its minimum requirement to run Android Studio smoothly. Visit Android Install and Set up Android Studio in Windows. To find out how to install the Android Studio on Windows OS-based systems. Or one may visit the official page Install Android Studio to find out how to install Android Studio on Windows, Mac, and Linux.
3. File Structure of a Project in Android Studio
Android studio project folder structure: There are two view types of the project file structure in Android Studio. One is Android View(Summarised), another is Project View(Detailed View). Most beginners use the Android View(Summarised). Have a look at the following image to see the differences between these views. One can read the detailed info about the Android project folder structure here: Android Project folder Structure

Android Studio Application File structure:

This folder is responsible for holding the Application's Manifest file, looking at the main application's Business logic (Java/Kotlin), drawable files (images, vector graphics), Application's UI layout files, mipmap (app's icon files), colors(application's branding color), strings(all the texts, used for localizing the application), styles(predefined or user-defined styles of application), app-level gradle file(managing the dependencies). To find out more about the app file structure read: Android Application File Structure
Application Manifest File: The manifest file is an important part of our app because it defines the structure and metadata of our application, its components, and its requirements. This file includes nodes for each of the Activities, Services, Content Providers, and Broadcast Receiver that make the application and, using Intent Filters and Permissions, determine how they co-ordinate with each other and other applications. To get more insights about the Android Manifest read: The Application Manifest File. The typical very basic manifest file looks like this:

res/values folder: The values folder used to store the values for the resources that are used in many Android projects includes features of color, styles, dimensions, padding values, margin values, etc. There are 4 main files under the res/values folder. Those are: colors.xml, dimens.xml, strings.xml, styles.xml. Read on the res/values folder to find out the details of the res/values folder. Have a look at the following image where it's found:

build.gradle file: Gradle is a build system (open source) that is used to automate building, testing, deployment, etc. Every Android project needs a Gradle for generating an apk from the .java and .xml files in the project. It is located in the root project directory and its main function is to define the build configurations that will be applied to all the modules in the project. Read: build.gradle and get to know more about the various build.gradle. Have a look at the following image to get the location of build.gradle files.

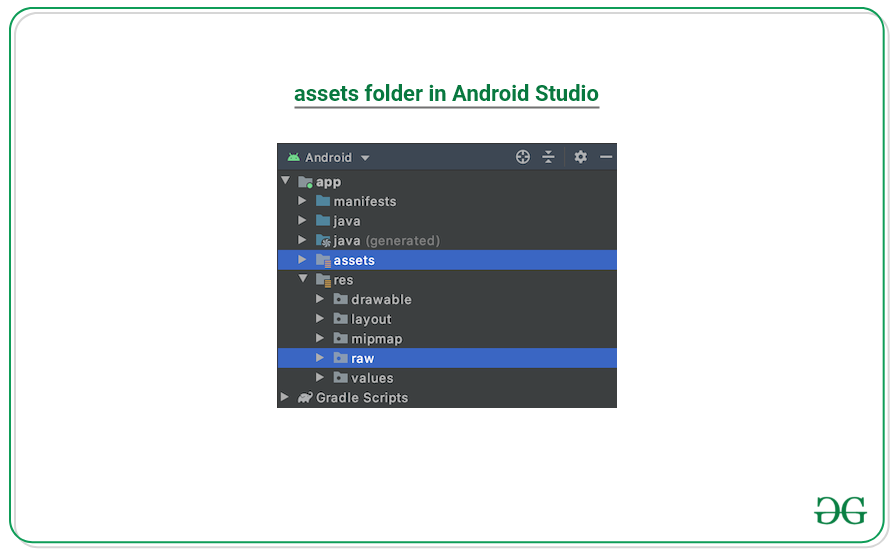
Assets Folder: Assets provide a way to add arbitrary files like text, XML, HTML, fonts, music, and video in the application. If one tries to add these files as “resources“, Android will treat them into its resource system and you will be unable to get the raw data. Read Assets Folder in Android Studio for a detailed view of the assets folder. Have a look at the following image to get the location of the assets folder in Android Studio.
Resource Raw Folder: The raw folder in Android is used to keep mp3, mp4, sfb files, etc. The raw folder is created inside the res folder: main/res/raw. So we will simply create it inside the res folder. Read: Resource Raw Folder in Android Studio to know details about the raw folder. Have a look at the following image to get the location of the folder where it needs to be created:

Logcat window: Logcat Window is the place where various messages can be printed when an application runs. Suppose, you are running your application and the program crashes, unfortunately. Then, Logcat Window is going to help you to debug the output by collecting and viewing all the messages that your emulator throws. Read: Logcat window in Android Studio to know more about the Logcat in Android Studio. Have a look at the following image to locate the Logcat window:

debug.keystore file: is one of the most important files which is present in almost every application when we download that app from the Google Play Store. This file is basically considered as the certificate of any application which is being verified by Google each and every time. Each app that you are using on your phone needs to be signed. Read: Where is debug.keystore in Android Studio? to know where it is located and to generate the certificate for the Android app.
4. Writing first Android Studio Application
As in features of Android Studio, it's mentioned that Android Studio provides various numbers of templates by default. It allows you to select them before creating a project. To create a new project click on "Create New Project".

After clicking, another new window pops up to select several predefined templates. Pick what suits the current project needs. If there is no desired template, choose "Empty Activity" and click on the "Next" button.
To find out more on this, refer to Android Studio Main Window

After clicking on the Next button, another window pops up asking to enter the name of the project, package name, location to save the project, programming language to select(as two programming languages are supporting Kotlin & Java), and the minimum SDK API level (The minimum API level that is supported by the app). After entering the information, click on the "Finish" button.

Congratulations, the first Android Studio project is ready. Initially, it shows the tip of the day, which gives tips to improve work efficiency. Before going to explore the Android Studio, get familiar with the initial screen which is shown below.

For a better understanding of the Android Studio environment, it has been divided into 4 parts:
1. Menu Part: In this section, it provides options to create a new project, open an existing android studio project, a button to run the application, dropdown for selecting the desired device to run and test an application on.
2. Coding Area: This section provides for writing code for files like .xml, .java, .kt. It allows you to open multiple files at a time in different tabs, but it allows you to edit one file at a time.
3. Project Structure: This area allows us to explore every file of the project. There are various views of the structure. Android is a summarised view of the project structure hierarchy and Project is a detailed view of the project hierarchy. Have a look at the following image.

4. Current Execution Part: One of the most important parts of the Android Studio environment. It provides a detailed view of the current execution of the process or activity. It shows what errors, build outputs, logcat results, etc.
5. Understanding the Designing Part
All the UI layouts of the application can be found under the res/layout directory. These are of the .xml extension, responsible for building the UIs for application. Android Studio provides two types of ways of designing UI for applications. One is Text, where one needs to design the UI by hardcoding and one is the Design section that provides a convenient drag and drop mechanism for building UI. Have a look at the following image which shows how the code is being written, it goes on to show the result in the right pane.

The following image shows the drag and drop environment for widgets to pick and add in the UI of the application. One can switch to the Design layout by clicking on the bottom left button, shown as the following.

6. Understanding the Coding Part
As we have understood the design part similarly, another main part is the coding part. In the image below you can see a file named MainActivity.kt. Yes, this is the file where you write the backend part. The logic part. For example, you want to add two numbers. So, after entering two numbers in the EditText, when the user clicks on the Button, it will give the output as the sum of two numbers. So to calculate the sum, you have to write the logic in its part.

Note: If you select Language as Java during project creation, then the file name will be MainActivity.java.

7. Run Android App
To run an application there are two ways to do it. One is using an emulator, another is using a physical device by connecting it through a USB cable. Refer to How to install Android Virtual Device(AVD) how to set up an android virtual device or refer to How to Run the Android App on a Real Device? setting up a real physical android device and running applications on it. Have a look at the following image of what the Android Virtual Device looks like on the first run of the application.

8. Essential Android Studio Keyboard Shortcuts
Keyboard shortcuts make work a lot easier and increase productivity. One may refer to 10 Important Android Studio Shortcuts You Need the Most getting to know the essential keyboard shortcuts for Android Studio.
9. Android Studio Tips and Tricks
There are some tips and tricks that can be used to master Android development using Android Studio. These tips and tricks are:
- Setting up the theme of Android Studio
- Changing color of Logcat
- Fast Searching
- Split Screen
- Distraction-free mode
- Code completion
- Multi cursor feature and many more
You may refer to the following articles to find out more about Android Studio Tips and Tricks
10. For the complete Android Studio Tutorial, you may refer to this article: Android Studio Tutorial
Similar Reads
A Complete Guide to Learn XML For Android App Development
XML stands for Extensible Markup Language. XML is a markup language much like HTML used to describe data. It is derived from Standard Generalized Markup Language(SGML). Basically, the XML tags are not predefined in XML. We need to implement and define the tags in XML. XML tags define the data and us
7 min read
A Complete Guide to Learn Kotlin For Android App Development
Kotlin is a statically typed, cross-platform, general-purpose programming language for JVM developed by JetBrains. This is a language with type inference and fully interoperable with Java. Kotlin is concise and expressive programming as it reduces the boilerplate code. Since Google I/O 2019, Android
8 min read
Learn Java For App Development - A Complete Guide
Java is one of the powerful general-purpose programming languages, created in 1995 by Sun Microsystems (now owned by Oracle). Java is Object-Oriented. However, it is not considered as pure object-oriented as it provides support for primitive data types (like int, char, etc). Java syntax is similar t
9 min read
Master Android Development With Kotlin: A Complete Guide
We regret to inform you that the Android App Development with Kotlin – Live Course by GeeksforGeeks is currently unavailable. For information on related courses and opportunities, please click here.Thank you for your interest.
1 min read
Guide to Install and Setup IntelliJ IDEA for Android App Development
To start developing Android applications, one has to set up a proper development environment. It facilitates developers to use the tools needed in creating an app and ensure that all operations/processes carried out in a smooth manner. An IDE(Integrated Development Environment) is a complete applica
5 min read
100 Days of Android Development: A Complete Guide For Beginners
In the dynamic world of Mobile application development mastering in developing applications is not just a skill but rather a journey. Welcome to the 100 days of Android Development journey where we will dive into different Android development important components day by day. The definition of Androi
7 min read
App Development for Android in 2017: Challenges and Solutions
Since Android OS took over the world, it’s hard to imagine the outsourcing niche without a mobile app development. Usually, the launching of the app is a quite time-consuming process. When a company decides to make an enterprise application, it is needed here and now. That’s why the mechanism of bui
10 min read
Top 10 Android Studio Alternatives For App Development
Android Studio is an IDE that is Android Studio which is an environment for integrated development of the software. But sometimes the requirement is unique which takes either the compiled methods to use Android studio which not only consumes time but is hard to understand as well. So developers look
8 min read
Why Should You Learn Android App Development?
Nowadays, we have one thing which is always close to us, and it also tells about our interests, behavior, etc. It also makes our lives easier in education, health, banking, and many other fields. But what is that? I hope you have found the answer. Yes, it is a smartphone. Earlier, mobile phones were
6 min read
How to Create a Social Media App on Android Studio?
Social media is not a new term for us. Our daily life is incomplete, or we can say we human beings survive on food, water, air, and social media. We are dependent to such an extent that we tend to share every bit of information about ourselves on social media platforms. Similarly, Android Studio is
8 min read