Showing posts with label crafty technique. Show all posts

Monday, April 27, 2020

Lost in the Haze....Craft Saturday to the Rescue!

Hello All...How have you all been during this strange time we're living in? I hope you're safe, well, and enjoying the time off. If you're an essential, I hope you all know how much we appreciate you.


I feel like I've been living in a haze - no real sense of time, days, etc. It seems like an endless blur. Don't get me wrong - I love staying home and cherish the time with DH - I think I could actually be a hermit if truth be told. 

That being said all of the uncertainty and contradicting information swirling around the virus has taken it's toll on me. I am a bit odd being I'm an artist living in a Left Sided Brain. I know that's not how it should be but my logical left brain is often at war with my right brain artsy desires. That is why I haven't posted virtually anything this month. I want to create but I sit in my room and stare at all of the virus news (right, wrong or indifferent) trying to make sense of it and my creativity has been stifled.  


I was talking to my Mom recently and we decided we needed a virtual Craft Saturday....if you recall we try to have a crafty day at least once a month playing with different mediums, techniques, etc.  So I challenged my Mom and my nephew (who is living with her at the moment) to create a torn paper collage with the theme of a bird.  They accepted the challenge and I'm here with the results to share with all of you!


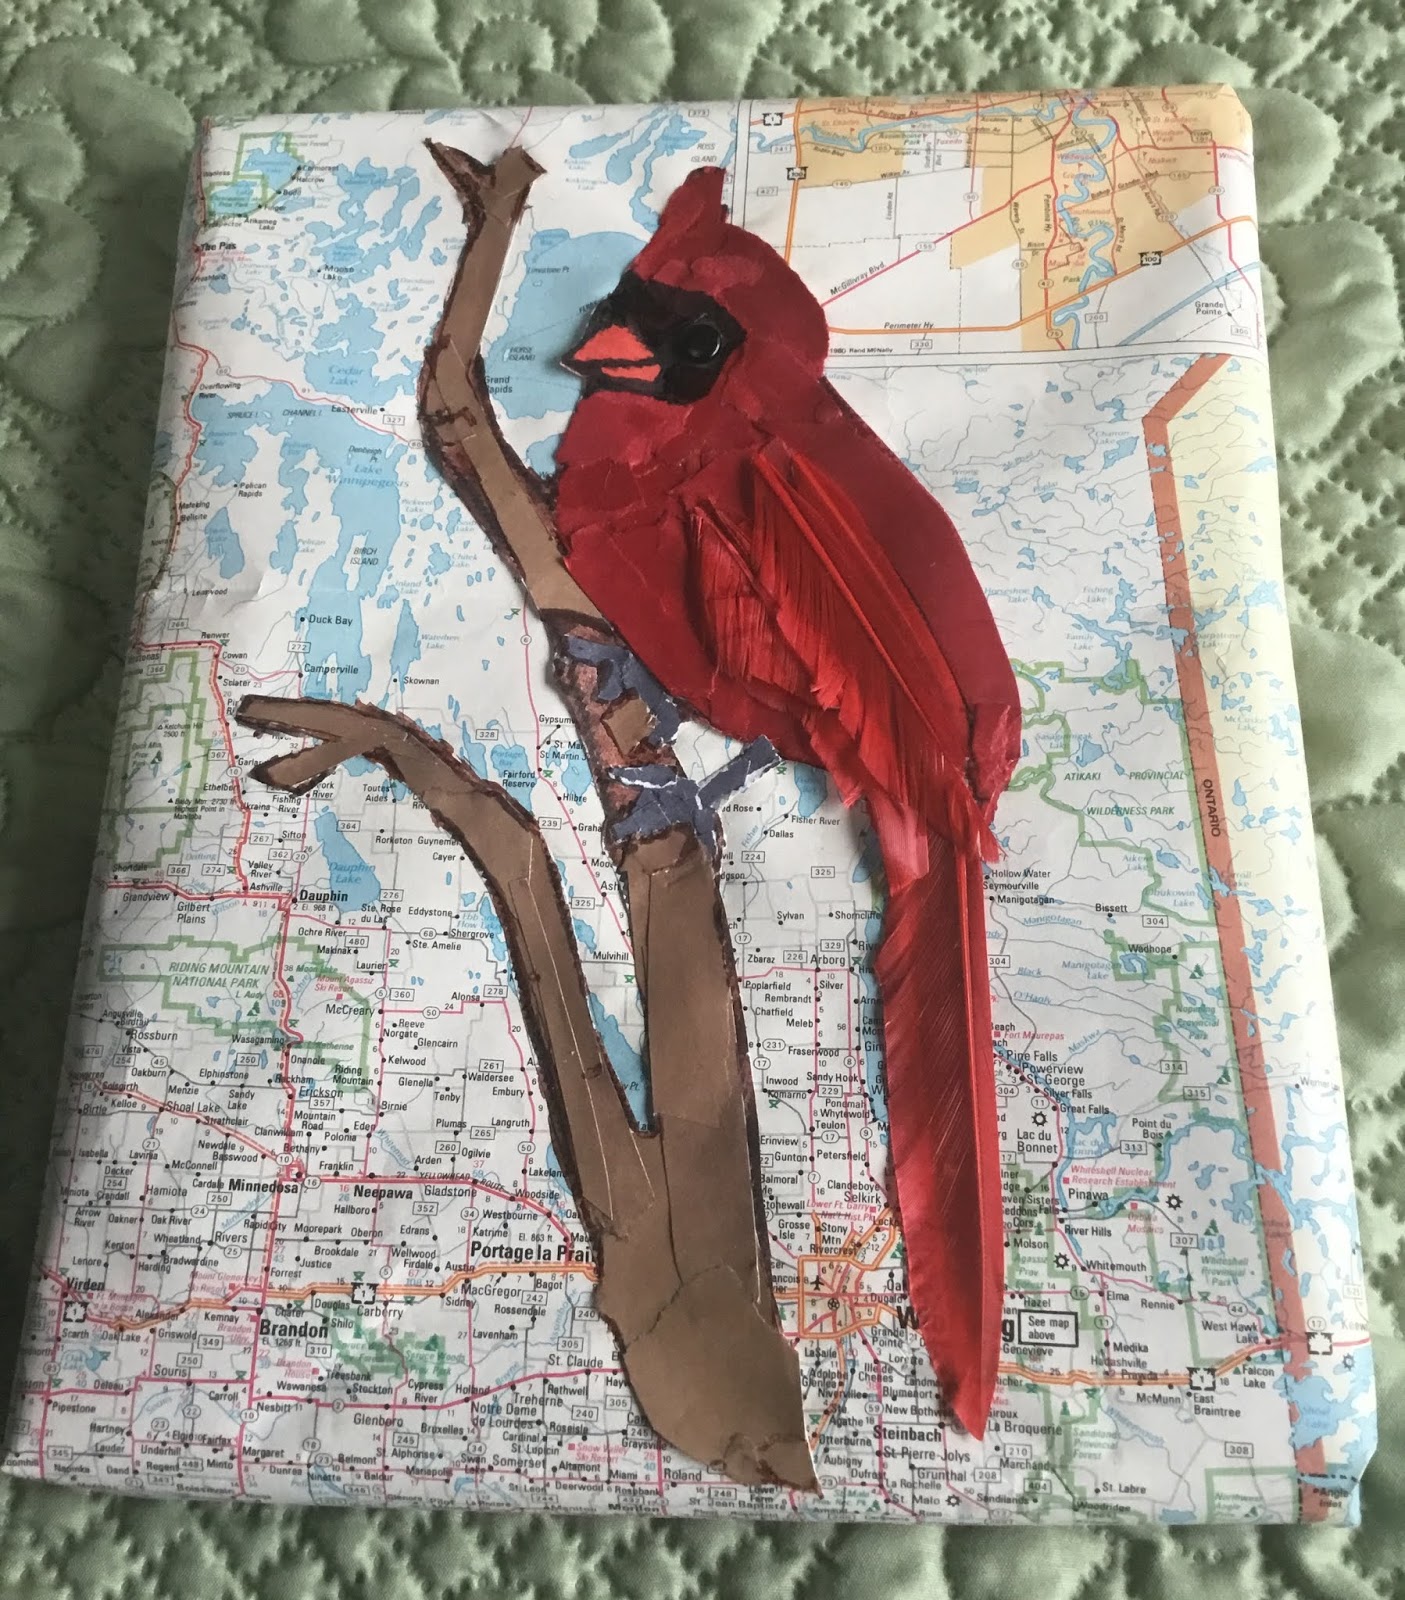
This is Matthew's creation...state bird of Indiana no less!  I love how he used real feathers for it's wing and tail and that background...LOVE IT!!


Mom chose a rooster on a fence....She calls it the Early Bird Gets the Worm. She used feather fibers for it's wing and various colors of washi tape for his tail. I just love it don't you? 


The sparkle of that tail is just awesome.  Check out the purple worm he's eating - LOL!! Isn't that great?

And here's mine...I was a bit late for Craft "Saturday" because I tried tearing  and I just couldn't make it look like I wanted it to so I just gave up. The right side of my brain wanted to create and the left side (and a bit OCD) just would not let it happen. The next day I decided I would switch to fussy cutting and I felt so much better about it... while it's not paper tearing it is a paper collage of a bird so I say it's close enough to qualify.


I call this my Steampunk Alarm Clock!!

Yes I made a rooster too - we didn't know we had both chosen the same bird until I showed mom while it was in the process and hers was already completed - LOL!!  Acutally, Morgan was going to make a rooster collage as well (which none of us knew) but she ended up working outside with Bob so she never was able to complete it.  Great minds you know!  

All of the paper is from Graphic 45 (except the peeling paint background) from Steampunk Spells, Debutante and Rare Oddities collections for the most part. Once I let my left brain have it's precise lines and edges I was finally able to break my creative block. It felt so good to finally do something creative.  I will share more about my process tomorrow...hope you'll stop back and check it out!

Maybe you could join us on our next Craft Saturday Challenge. We're going to try our hands at Rolodex - Memorydex cards!  I'll let you know more tomorrow :)


Monday, November 11, 2019

Scorch Markers & Christmas Ornaments

Hello Friends -

Have you seen the ads for the Scorch Markers on Facebook that are supposed to be an easier way to get the wood burned look?  Well I'm here to tell you they work!  I bought a set of 3 markers so Mom, Morgan and I could test them out and play.  Here are the results...


The most important things to keep in mind when using these markers are:

1. Prime the pen...you have to push the nib down on a piece of paper until the tip turns an orangish color...this is the medium soaking into the nib.

2. Use enough medium on your wood. The wood really soaks it up.

3. HEAT - you must use a very hot heat tool. I started off with my embossing gun but it was only 450 degrees. It did it but took forever. We switched to dh's heat gun set at around 650 +/- and it worked fairly quickly (about 1/4 the time it took for the embossing gun). 


Something else to think about is the longer you heat it the darker it gets. We played with heating some areas more, some less. I think they all turned out amazing!


We used stencils for most of them but we also free-handed a few.
Sorry I can't name all of the stencils/mfg...I have an envelope I put them in all together.

If you have a question about a particular stencil, JLMK and I'll see if I can figure out who made it.


We went on to embellish the Scorched sides as well as the backs so no matter where they were on the tree they would be beautiful.


All in all these pens were amazing and really did yield some pretty new ornaments for our trees this year.

Friday, September 20, 2019

Fall String Art

Hello Friends!

I wanted to share a Fall themed string art project I made recently...


Our local library hosts a Craft Therapy class each month and this was the class for September. They provided all of the materials and a variety of patterns. I choose the pickup truck because I just love them. 


I only had time to pound in all of the nails and string the window, tires and bumper at the library and brought the rest of it home to finish.

Now I have to admit this wasn't my first try at string art. I have done it in the past but have been underwhelmed by the results. I decided to do things a bit differently this time and put my own spin on it.


I decided that I was going to add depth and dimension by doing a few things different from what you normally see.  Most of the time the string is very high up on the nails resulting in a flat looking design. To help overcome this flat look I decided to string up specific areas and push them down about three quarters of the way down on the nails and build up which created depth where there normally wouldn't be any. You can see this in the grey rims which make the black tires stick out more. I also pushed the white window strings down about half way.


You can also see the depth on the pumpkin as I started off with the stem which was pushed 3/4 way down on the nails; next came the light orange body of the pumpkin. The final step for the pumpkin is another way chose to make this string art different. I took a darker orange and created an outline which helped to bring the design together, add another layer of depth and created a tidy finish for the design.


The third thing I did to set this string art design apart from traditional designs is to vary the amount of string I used for each portion of the design. I used heavier amounts of string on the fenders, less on the body of the truck. This helps to create different values of red from less intense (on the body) to really intense (on the fenders). By doing so this created another type of depth on the finished project.


The final difference which I explained on the pumpkin was adding the outline which helped give the overall project a polished finishing touch. You can see to help add definition I used a brown thread to define the fenders adding another layer to create depth and dimension.


The original project was supposed to be centered on the board but of course I don't often follow directions ;) LOL...  I knew I wanted to add some type of sentiment so I positioned my truck just a bit lower than center to allow space for whatever I decided to add to the finished plaque.  I die-cut the letters Welcome Fall from Ebony Starstruck Foiled Paper from Rinea. It gives it a bit of shimmer without detracting from the string art.

I am just thrilled with how it turned out and I hope you like it as well.


Friday, September 28, 2018

TP Advent Calendar?

Yep!  That's what I'm making today...an Advent Calendar by upcycling toilet paper rolls and they turned out pretty cool even if I do say so myself.


How did I make these goodies? 
You'll have to hop on over to the Imagine blog to find out :)
I'll give you a hint with the supply list though....

Supplies:
Imagine - irRESISTible Texture Spray - Lady Bug, Wedding Dress, Bamboo Stalk; Memento Dye Inks; VersaFine Clair - Nocturne
Rubber Stamp Tapestry - Candy Cane, Gingerbread Man, Holly, Stocking, Gift Peg Stamps
Club Scrap - Large Number Stamps
MFT - Circle & Scallop Circle Dies
Rinea - Ruby/Gold Glossy Foiled Paper; Emerald/Gold Glossy Foiled Paper
Seam Binding

Tuesday, May 22, 2018

Sparkles!

Hello Friends!!

I was sick this past weekend so I missed out on posting a link to a new card/technique that was posted on Saturday over on the Imagine blog. 


I am so excited to share this card with you...it contains one of my favorite craft supplies...GLITTER!!!  Yes I know, most of you think I'm nuts but I love glitter and this is a non-messy way to incorporate it into your projects.  It was mixed with Creative Medium to hold it fast.


It turned out really sparklie and bright IRL, so pretty and since I used glass glitter it also has a really nice texture to it as well.

You can find complete instructions and a supply list over on the Imagine blog here:


Have a lovely day friends!!!

Tuesday, March 13, 2018

Pigment Powder Glue Art

Today I wanted to share a fun idea...combining your pigment powders with glue.    I did this quite some time ago and paired the pigment powders with a clear gloss glue but decided to give my new Lindy's Magical Shakers a try with plain old white glue on canvas and here's how it turned out....


These turned out so pretty...I wish you could see the shimmer from the pigment powders IRL...they sparkle and shimmer like you wouldn't believe.


All I did was spread a layer of white glue over the canvas then sprinkle on the powders.  I left it to dry and the results are what you see.


I wasn't to show you the amazing texture of the surface of the canvas...it's really cool looking...


The speckles that show up really well in this photo are the bright shimmer of the powders...some areas the color is more prevalent, other places it's the shimmer.  Just such a nifty result.


This is another canvas I did but I misted the top of the glue with water before sprinkling on the powders.  I also took a tool and made circles in the glue right after I sprinkled the powder on.  You can see that (because of the water) the colors traveled more freely but the glue did hold some of the swirly designs.  

I think this is going to be a really fun technique to explore more in the future, more ideas rolling around that I want to try.

Wednesday, October 18, 2017

Creative Medium Faux Wood Grain

Hi friends - I hope you've all had a wonderful week so far.  I wanted to share a fun technique with you - Faux Wood Grain using Antique Creative Medium!


I used my vintage wood grain tools but you can find new tools at home improvement or paint stores, usually in the faux painting section. 

You can find a little video showing this technique on the Imagine blog here:


Hope you enjoy!

Friday, November 18, 2016

Fairy Tales... Club Scrap Artist Team Challenge

Each month the kind folks at Club Scrap challenges the Artist Team with a variety of themes.  This month they challenged us to use one or more images from the stamp sets Enchanted Forest or Girlfriends paired with one of my favorite embellishments the Sparkle Stickers from the Sunflower kit!
Well did I ever have fun! Why?  Well, I thought it would be fun to pair this challenge with the November Technique Challenge from the CS Blog as well!  What is the technique???  Smooshing colors - paints, inks, oil pastels, etc. onto cardstock using your acrylic block.  I LOVE this technique...you can achieve such pretty random patterns and it's different every single time!

Here's what I came up with....


My first card was made by pouncing ink onto my stamping block then spritzing with Shimmer Mist.  I stamped 2 different images onto the oval and stamped the magic wand on the card base using silver metallic ink.


This card background was made by spritzing Fireworks! shimmer spray onto my stamping block and stamping onto the cardstock.  I love how the "shimmer" in the spray created marbled lines through out the color.  It's hard to capture with a camera but you can see a bit about what I'm talking about in the blue area.  It's really pretty IRL.


My final card was made by applying Violet Crush, Parisian Pink, China Blue and Silver Extreme Glitter acrylic paint onto a stamping block.  Again I spritzed with Shimmer Spritz gave the paint a swirl then stamped it onto my cardstock.  You wouldn't think so but the texture left by the combination of the paint and silver glitter paint is amazing.  It doesn't show up in the photo but the white stamped frame has a piece of acetate that the sentiment is stamped on and raised off the surface of the actual card...almost like a shaker card without the shakie stuff.  The Sparkle Stickers are VERY dimensional so I need to raise the frame/sentiment off the card so it didn't interfere with the gems.


I hope you've enjoyed your visit here at Ink Stains.  
The next stop on the hop is...


If you get lost along the way the complete list can be found here:


Thanks for stopping by!

Supplies:

ClubScrap.com - Stamps, Sparkle Stickers, Cardstock
Imagine - Memento Dye Inks, Shimmer Spritz, Fireworks! Spray, VersaFine, StazOn Ink, Silver Delicata
Acrylic Paint, Acetate, Twine

Tuesday, May 31, 2016

Sentiment Saver Tip

Have you ever finished a card up and then stamped the sentiment only to mess it all up.  Well, the folks at Imagine Crafts asked us for our "fixes" for stamping accidents this month and I've had some experience with this before!  


Here is my screw up....I "thought" it would look cool for my sentiment to flow across the flower stems but I realized after I had stamped it that the "Y" gets lost among the stems.  Phooey!  I spent a long time coloring the flowers I sure didn't want to have to throw it away.

Stop over at the Imagine Crafts blog to see what I did to fix this card....


Monday, March 28, 2016

Cabin Fever Anyone? Zen Dot Rocks to the Rescue!

What are Zen Dot Rocks???

Check it out....


These are SOOOOOOO much fun to make, once I finished the front of the rocks, 


I flipped them over and played on the back too!

I made these Dot Rocks by using various colors of IMAGINE Crafts Pico Embellishers.  They have a very fine needle nose tip applicator that allows you to make teeny tiny dots to virtually any size you want.  I worked on 2 rocks at the same time.  The Pico Embellisher medium dries very quickly so while one rock was drying I dotted up the second and kept alternating between the two...until I ran out of room.

These rocks really are very zen when you're working on them.  You just start dotting away and the time just flies.  The best part is that you don't need any special tools, just a rock, Pico Embellishers and time.  

We don't have many flat smooth rocks like this around here so Santa brought me these two from southern Indiana...Yes, I got rocks in my stocking last year for Christmas and was thrilled! Everyone else looked at me like I was crazy.  I need to find more because these are too much fun to make.  I have so many ideas but alas no more rocks.  I even tried to order some from some place out west...never did hear back from them - they probably thought I was nuts too ;)  LOL!!  Oh well, that's going to be my mission this summer...smooth flat rocks!


Wednesday, August 26, 2015

Woven Strands Club Scrap Blog Hop!

Woo Hoo...I am so excited about this months Club Scrap Blog Hop - Woven Strands!!!  I knew exactly what I wanted to create when I saw the kit...the only question was would I actually be ABLE to make it.  This months kit is very Celtic in design with lots of beautiful Celtic knots and images.  The first thing that came to my mind was Gothic architecture...with led to Gothic arches and this months creation a Gothic arch clock!


And here it is!!!  I made it completely from scratch.  I used book board for the foundation of the clock then each piece was covered with papers from the Woven Strands kit, the embellishments on the face and side of the clock also come from the kit.    The front frame and embellishments inside were stamped and embossed with gold ep.

The only extra bits were the ink and embossing powders, the clock mechanism, a hinge for the back door and the acorn nuts I used for the clock feet. 


Here's a view of what the sides look like.... These blocks were cut from one of the pattern papers then matted with cardstock from the kit.


And this is the little door I put in the back of the clock so I could get to the clock mechanism to change the time/battery.


And finally the bottom - don't you love those wicked cool feet?   There's a story behind those for another day... I'll have a complete tutorial on how it was made tomorrow in case you're interested in building one for yourself.

Supplies: 
ClubScrap.com - Woven Strands Kit - papers, stamps, embellishments, book board
IMAGINE Crafts featuring Tsukineko - VersaMark, Gold EP, Memento Dye Ink, 
Clock Mechanism, Acorn Nuts, Hinge, acetate (recycled from packaging)

Your next stop on the hop is....


and if you get lost along the way, 
the complete list can be found here -


Have a wonderfully crafty day friends!

Friday, June 26, 2015

Fun Summer Watermelon Tank Top

I am so happy to share today's post... it is a summer tank top that I created using Memento Luxe inkers but the best part is that it is being modeled by my future DIL - Miss Morgan!


Isn't she darling :)  We love her so much!  My creation is featured over on the IMAGINE Crafts blog today and the instructions can be found in the "Make" section of the IMAGINE Crafts website - Juicy Watermelon Tank Top.   It is so easy and lots of fun to make!  Hope you stop on over and check it out.

Wednesday, May 27, 2015

The Blues - Club Scrap Blog Hop & Give-Away!

I've got The Blues today...because that's the awesome theme of this month's Club Scrap kit!!  I can't tell you how thrilled I was when I saw this month's kit....  Beautiful shades of BLUE!!!


Since blue is my absolute favorite color I decided that I wanted to make something for my craft room.  As luck would have it a couple months ago I ordered the Magnetic Messenger project so I decided to swap out the papers the project came with and use this kit instead!

Now as many of you know I'm not really a "by the book" kind of gal so I "sort of" followed the directions but not exactly.  Instructions are just suggestions right?  ;)  Anyway, it was lots of fun to make and it came together nicely.  It's approx. 14x14" finished without the ribbon.


Everything is from The Blues kit paper wise.  The bottle caps and round wood magnets were included in the Magnetic Messenger kit - I just added the papers.  The cloths pin magnets are something I made from stuff in my stash  (the pin & magnets) but the paper and guitars came from this kit as well.


The sentiment was from the embellishment pack as was the hanging ribbon.
Below is a closer look at the magnets....


The cloths pins make super magnets because you can hold several pieces of paper together or hang up a note pad or a piece of art.  Lots of fun and really easy to make.


I still need to fill the bottle caps but I wanted some blue glitter and beads which I didn't have at the time.  Once I get them I'm going to fill it with Crystal Lacquer and the beads.  

GIVE-AWAY ALERT!!!

Now I can't part with my "Blues" messenger board BUT I did happen to order an extra 8x8" Magnetic Messenger project (complete with papers, metal sheet board and magnet pieces) to give away!!

All you need to do to be entered is leave a comment or send me an e-mail.  You have until 6-17 to enter for your chance to win!

Your next stop on the hop is - 

Remember if you get lost along the way you can find the complete list here - 

Thanks for Stopin' By!

Friday, November 28, 2014

Star Mini Album Tutorial

Hope you all had a wonderful Thanksgiving!  If you recall, Wednesday I shared my finished Star Album with you during the Club Scrap blog hop.  Today I am back to show you how to make one of your own!  These albums are the perfect vehicle for displaying favorite collections of pattern paper or colors.  When the album is displayed fully open as a star the papers become the center of attraction with your story coming to life along the outside edge (the lo's in the album).

Just to refresh, here is the album....


and this is what it looks like once it has been completely opened up.


So, let's make one!

Supplies:

8-10 sheets of 12x12 Cardstock  I used Club Scrap Lake Kit for the example but any cardstock will work.
Double Stick Heavy Duty Tape 
Chipboard (for cover)
Ribbon 
Bone Folder

Instructions:

1. Determine how many points/pages you would like in your star album.  I chose 7 but you could use 8 or 9.   If you use 7 pages when the book is completely open each of the pages will be fully open and the second and third layers of paper will be displayed nicely.  The individual pages won't lay flat when opening the pages one by one though.  With each additional page you add the individual pages will be closer to laying flat when viewing like a conventional book but when displayed like a star they won't be as full as the 7 page lay-out.


2. Once you decide how many pages you want to use cut each sheet into 3 pieces -

4" x 12"
4" x 10"
4" x 8"

Keep the cut off pieces - those will make great embellishment pieces for the actual lo's.


3. Fold and score each of the pieces in half.

4" x 12" - score @ 6"
4" x 10" - score @ 5"
4" x 8" - score @ 4"


4. Separate the individual folded sheets into 7, 8 or 9 piles (depending on how many pages/points your album will have).  I know some of my piles look funky (with two greens in each pile) but a few of them are patterned inside.


5. Take a pile of pages and apply really sticky adhesive tape on one end as shown on the 12" and 10" pages.  Remove the tape from the 12" piece and secure the 10" page directly over the 12" page.  Remove the tape from the 10" piece and adhere the 8" piece on the stack and set aside.  Repeat this process for each stack of pages.


6. You should now have 7 (8 or 9) sets of pages for your album.  Since the pages in your book don't lay down flat like a conventional book once assembled I have found it is easier to embellish, stamp, and ink your lay-outs at this time.  This is what I have done above.


7. After you have finished decorating your pages it's time to finish assembling the book.  Apply a strip of the really sticky tape to the 12" and 10" pages on each stack.  Peel off the backing on the 12" page and adhere the 10" page.  Peel off the backing from the strip of adhesive on the 10" page and stick down the 8" page.  Repeat with each of the remaining stacks of paper.


8. You will now have 7 (8 or 9) nifty little 3 layer pages as shown above...


9.   Arrange your pages in the desired order.


10. Flip the first 3 piece page set off the stack of pages.  Apply strips of double stick tape (I ran out of the red so I'm using the kind with white paper backing now) as shown to the 2nd set of pages.  Remove the backing paper and adhere to the first set of pages.  

Next, flip those two sets of pages over and add strips of sticky tape to the 3rd set of pages; remove the backing paper from the tape and stick it to the first two sets of pages.  

Repeat this process until all of the page sets have been stuck together forming the body of your mini star album.


Here is what my stack of page sets looks like once I finished step #10.


11. Time to create the cover pages.  Cut 2 pieces of chipboard 4.25" x 6.25"; cut the last piece of cardstock in half.


12. Adhere the chipboard to the back of the cardstock; miter the corners as shown.


13. Crease and fold each side flap, apply a strong adhesive and secure.


This is one of the covers - repeat steps 12 & 13 to create the second cover piece.


14. Wrap and tie the ribbon around your bundle of pages.


15.  Adhere strips of the stick tape to each of the cover pieces, remove backing paper and stick over the ribbon to the front and back pages of the bundle of pages.  Press to ensure proper adhesion...


16.  Embellish the front cover as desired and you're done!


To display the album as a star, open the book completely so the covers meet and tie the ribbon in a bow to hold it open as shown above.  Once you add photos you'll have a beautiful display piece to keep or give as a cherished gift.