Volume Controller Rejects Skeumorphism, Embraces The Physical

The volume slider on our virtual desktops is a skeuomorphic callback to the volume sliders on professional audio equipment on actual, physical desktops. [Maker Vibe] decided that this skeuomorphism was so last century, and made himself a physical audio control box for his PC.

Since he has three audio outputs he needs to consider, the peripheral he creates could conceivably be called a fader. It certainly has that look, anyway: each output is controlled by a volume slider — connected to a linear potentiometer — and a mute button. Seeing a linear potentiometer used for volume control threw us for a second, until we remembered this was for the computer’s volume control, not an actual volume control circuit. The computer’s volume slider already does the logarithmic conversion. A Seeed Studio Xiao ESP32S3 lives at the heart of this thing, emulating a Bluetooth gamepad using a library by LemmingDev. A trio of LEDs round out the electronics to provide an indicator for which audio channels are muted or active.

Those Bluetooth signals are interpreted by a Python script feeding a software called Voicmeeter Banana, because [Maker Vibe] uses Windows, and Redmond’s finest operating system doesn’t expose audio controls in an easily-accessible way. Voicmeeter Banana (and its attendant Python script) takes care of telling Windows what to do. 

The whole setup lives on [Maker Vibe]’s desk in a handsome 3D printed box. He used a Circuit vinyl cutter to cut out masks so he could airbrush different colours onto the print after sanding down the layer lines. That’s another one for the archive of how to make front panels.

If volume sliders aren’t doing it for you, perhaps you’d prefer to control your audio with a conductor’s baton. 

Continue reading “Volume Controller Rejects Skeumorphism, Embraces The Physical”

Terminal DAW Does It In Style

As any Linux chat room or forum will tell you, the most powerful tool to any Linux user is a terminal emulator. Just about every program under the sun has a command line alternative, be it CAD, note taking, or web browsing. Likewise, the digital audio workstation (DAW) is the single most important tool to anyone making music. Therefore, [unspeaker] decided the two should, at last, be combined with a terminal based DAW called Tek.

Tek functions similarly to other DAWs, albeit with keyboard only input. For anyone used to working in Vim or Emacs (we ask you keep the inevitable text editor comment war civil), Tek will be very intuitive. Currently, the feature set is fairly spartan, but plans exist to add keybinds for save/load, help, and more. The program features several modes including a multi-track sequencer/sampler called the “arranger.” Each track in the arranger is color coded with a gradient of colors generated randomly at start for a fresh look every time.

Modern audio workflows often span across numerous programs, and Tek was built with this in mind. It can take MIDI input and output from the JACK Audio Connection Kit, and plans also exist to create a plugin server so Tek could be used with other DAWs like Ardor or Zrythm. Moreover, being a terminal program opens possibilities for complicated shell scripting and other such Linux-fu.

Maybe a terminal DAW is not your thing, so make sure to check out this physical one instead!

This is the Rockbox logo banner.

Rockbox 4.0 Released

It’s traditional to launch new software on April Fool’s Day, which is when we heard that Rockbox 4.0 has been released. But, in this case, the venerable MP3 firmware actually did update after a long absence. It’s great to see that good old Rockbox is still kicking along. We first mentioned Rockbox here at Hackaday approaching 20 years ago. How time flies. There used to be a whole ‘scene’ around hacking Personal Media Players (PMPs), also known as “MP3 Players”.

We tracked down Rockbox contributor [Solomon Peachy] to ask for some simple advice: If someone wants to install Rockbox on a personal media player today, what hardware should they buy? [Solomon] referred us to the AIGO EROS Q / EROS K, which is the only compatible hardware still being manufactured and sold. Beyond that, if you want to buy compatible hardware, you’ll need to find some secondhand somewhere, such as eBay. See the Rockbox Wiki for supported hardware.

Smartphones and streaming services have subsumed the single-purpose personal media player. Will you put the new Rockbox on something? Let us know in the comments.

DIY Programmable Guitar Pedal Rocks The Studio & Stage

Ever wondered how to approach making your own digital guitar effects pedal? [Steven Hazel] and a friend have done exactly that, using an Adafruit Feather M4 Express board and a Teensy Audio Adapter board together to create a DIY programmable digital unit that looks ready to drop into an enclosure and get put right to work in the studio or on the stage.

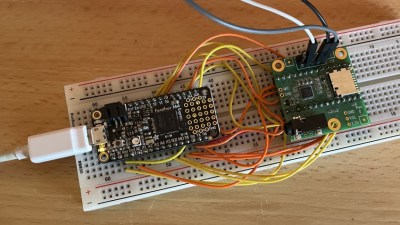
The bulk of the work is done with two parts, and can be prototyped easily on a breadboard.

[Steven] also made a custom PCB to mount everything, including all the right connectors, but the device can be up and running with not much more than the two main parts and a breadboard.

On the inside, the Adafruit Feather M4 Express board works with the audio board over I2S, a standard for sending serial digital audio between chips. Working with the audio itself is done with the Teensy Audio Library, providing a fantastic array of easy-to-use functions for processing and manipulating digital audio streams.

Together, all the right pieces are in place and [Steven] provides the code for a simple tremolo effect as a glimpse of what’s possible with the unit. Interested in going a bit further? [Steven] shares additional details about what’s involved in writing a custom effect from scratch using the Teensy Audio Library.

As mentioned, I2S is where it’s at when it comes to working with digital audio at the chip level, and our own Jenny List can tell you everything you need to know about I2S, a useful protocol that has actually been around since 1982!

Reading Data From A CD, With A Microscope

There was a time when electronic engineering students studied the audio CD, for all its real-world examples of error correction and control systems. There’s something to be found in the system still for young and old though, and thus we were intrigued when we saw [Peter Monta] reading the data from a CD using a microscope.

CDs encode data as so-called pits and lands in a spiral track across a metalised surface, with a transition from pit to land signifying a logic 1 and a missing transition signifying a 0. Reading a section of the raw data is achieved in the first part of his write-up, but in the next installment he goes further into retrieving more data through stitching together microscope pictures and writing some code to retrieve data frames. He’s not quite at the audio playback stage, but he’s planning in the future to spiral-track a full image to rip an entire disc.

There are plenty of CD drives around to read audio the conventional way, but the techniques here still find a use where less ubiquitous media has to be read. In the last decade for example there was an effort to read the BBC Domesday Project from the 1980s, as it became clear that few of the original readers survived in working order.

Audio Old And New Meet In Perfect Harmony

There’s an uneasy meeting in the world of audio between digital and analogue. Traditional analogue audio reached a level of very high quality, but as old-style media-based audio sources have fallen out of favor there’s a need to replace them with ones that reflect a new digital audio world. To do this there are several options involving all-in-one Hi-Fi separates at a hefty price, a cheaper range of dongles and boxes for each digital input, or to do what [Keri Szafir] has done and build that all-in-one box for yourself.

The result is a 1U 19″ rack unit that contains an Orange Pi for connectivity and streaming, a hard drive to give it audio NAS capability, plus power switching circuitry to bring all the older equipment under automation. Good quality audio is dealt with by using a Behringer USB audio card, on which in a demonstration of how even some digital audio is now becoming outdated, she ignores the TOSlink connector.

The rear panel has all the connectors for power, USB, network, and audio laid out, while the front has an array of status lights and switches. We particularly like the hand-written lettering, which complements this as a homebrew unit. It certainly makes the Bluetooth dongle dangling at the back of our amplifier seem strangely inadequate.

If audio is your thing, we had a look at some fundamentals of digital audio as part of our Know Audio series.