Showing posts with label tutorials. Show all posts

Saturday, May 2, 2026

Rainbow Scrap Challenge Update and a Free Quilt Pattern

This was not the plan, but I have a Rainbow Scrap Challenge quilt finish with the first three months’ colours!

I’m actually quite pleased with it. January was dark blue, and I did a couple of medium and medium/dark blue 9-patch blocks. February was dark green, and I added in some muddy ones. March was red, which was when I realized my original thinking of a rainbow of 9-patches that finish at 7.5” wasn’t going to work the way I had envisioned; it would be a humongous quilt.

Friday, January 17, 2025

Rainbow Scrap Challenge Project 1

I really enjoyed making my Scrappy Stars in 2023, and last year had a glimmer (yup, one of those moments) when I thought I might be able to do a churn dash block using the same idea—crumbs and strips in the colour of the month to make the main components of the block. Once I had Cradled finished and blogged, I got out my graph paper, fired up my math brain, and created a 15" block.

I love it! I plan to make nine for a quilt which I intend to give to the Windsor Sexual Assault Centre as I do each year for a child. The tutorial is below if you’d like to make this scrap-(sort of)-busting block.

Friday, October 13, 2023

Scrappy Rainbow Stars Quilt

It's amazing what a little pressure or incentive, or both can do to get a quilt done! This is one of three of my RSC 2023 quilts, yet another attempt to put a dent in the strings (it didn't). The free tutorial to make the 16" blocks is here.

As you can see, I had a good time quilting it.

Friday, May 5, 2023

Strippy Slab Star Quilt Free Pattern

As you know, I’ve inadvertently started a third RSC project this year. This is a great block to use up strips and scraps. In an effort to use up my crumbs and make a dent in my strips (don’t ask how the strips dent is going), I hit upon this lovely large 16” finished Evening Star block. Here is my orange one complete.


I do love looking at these each time I finish one, thinking that I saved all of those bits from the landfill, and I will help keep someone snuggly and warm under the forthcoming quilt.
How do I make these? Let me show you!

Monday, November 21, 2022

Binding a Quilt Using the Backing

My last finish was Soar, and in the making of it, I had a bit of an epiphany when I realized that the backing would make the most perfect multi-colour bright binding. I had enough to actual cut binding strips, but it was late, and I was tired, so I knew enough to tell myself I'd trim the quilt and cut the binding in the morning when I'd be fresh.


Well my brain chugged along through the night and early morning like the little train that could, and I ended up having a lightbulb moment when I thought, 'why not try binding the quilt as I do some placemats, by carefully (that is key!) trimming the batting only, with scissors, and then trimming the backing beyond the edges of the quilt, folding it under twice and topstitching it down onto the front! I've never done a big quilt this way, though I've used the technique on several placemats. I couldn't for the life of me remember how to get the mitred corners, but eventually, it all came back.

So here, for future reference of placemats, minis, wallhangings, or quilts, is what I did.

Monday, September 19, 2022

Mason Jar Cover Tutorial - A Gift for You For My Blog's 9th Anniversary

Happy anniversary to mmmquilts!

I cannot believe: A. That my first post on this blog was nine years ago, September 18, 2013, at the beginning of my second year of retirement, and B. that I've been retired from the teaching profession for ten years! (C. and that I'm now 62 - egad, feel more like 42.) Thank you for finding me, and reading my posts, for coming back, again and again, for following me however you follow me, for participating in blog activities, and for taking time to write such kind and wonderful comments over the years. I've met so many good people, many of whom I consider good friends, several of whom I've met up with in person, many with whom I've shared email letters, FaceTimed, texted, all wonderful ways to connect with other humans. 

Sidenote, in true SandraJaneQuilts, aka mmmquilts, fashion, I want to let you know that we have Nasir Ahmed to thank for the technology that has allowed us to FaceTime, Zoom and other video-calling apps, as well as given us high-def TV. Yes, I learned about his work on an episode I recently watched in Season 5 of This Is Us. 😊 I have been making sure to tell people his name whenever I get the chance.

So I have two gifts for you, dear readers, today. The first is a tutorial for the Mason jar holder that could even be a pencil/tools/makeup pencils and mascara, etc. holder. The second is for my readers, a discount code for 25% off patterns in my Etsy shop, SandraJaneQuilts. Thank you for your ongoing support of my blog activities and of my Etsy shop! I won't be advertising this on Instagram, just here on the blog, for you! Aaaand, I may have another small surprise up my sleeve later this week just for my followers.

Without further ado, here is an easy little project that can use up a few more of those pesky pervasive strips! It came about because of a request from my daughter, Dayna, who uses a Mason jar for her morning smoothie. It sweats, and even with a coaster underneath, the sides are still wet, so she asked if I could make some sort of coffee cozy-type affair with a built-in coaster. No problem! 
Here it is in use at Dayna's.

Sunday, April 10, 2022

English Garden and Whirling Petals for Hands2Help

When it comes to making comfort quilts, for me they are often Rainbow Scrap Challenge quilts that I make all year according to the colour of the month as set by Angela at soscrappy. Sometimes it's a DrEAMi (Drop Everything And Make it!) moment where I've seen a fun fast pattern that I just HAVE to make, and make now. So, fast and fun are often a key for comfort quilts, along with using scraps. When Mari of The Academic Quilter, who is hosting H2H this year for Sarah, asked if I would write up a tutorial for her this year I said no problem! With fast, fun, and scraps in mind, here is the first of two comfort quilts for you today.

This first one is English Garden, and it is, as my mum's garden was, rather a riot of floral crazy. It was born of a need to use up (haha) allll my floral scraps and pieces from when I was into colour wash quilting. I don't know about you, but I have an embarrassment of floral fabrics. Often these are the trimmed off strips from quilt backings, a ton are .25 and .3 metre cuts for colour wash quilts, some were scraps from a feature fabric around which I built a quilt, still others are leftovers from making bags or even (head hanging in shame) scraps from clothes I made my girls and myself, even scraps from balloon shades I made for our bedroom in the 90s (the mostly white one with scattered blue and pink flowers on it)!

Saturday, December 18, 2021

Small Sewing

I've been busy sewing up a storm of little projects, some secret, some not so secret. The majority of them have been bags.
Some of the above are gifts, some are in my Etsy shop. Here are a few details, with a link to a tutorial I wrote four years ago for the mug rugs.

Tuesday, December 15, 2020

Mug Cosies Pattern

There was quite the love on my previous post showing the little mug cosies I made. In the time of the Yeti, they may not be as necessary, but at Christmastime when lots of us like to use our Christmas mugs, they certainly do come in handy. I've been really impressed with how well mine has worked, whether it be over a morning cup of coffee or afternoon tea.

I made a couple more on the weekend, and wrote out what I did.

These have been sent off as little gifts to a couple of special people.

Sunday, August 16, 2020

Blogger and Purple

As promised a while back, here is the post on how to do some things in the new Blogger format. Let me know in the comments if you have questions, and/or if you have figured out something I may not have mentioned. Here is a little purple and quilty goodness to start you off in a good frame of mind, before we get to some of the annoying stuff.


These are my ten purple blocks for one of two RSC 2020 projects. I mostly do not pay attention to where they land as I take them out of my 2.5" tray in their stack. Purple is a colour I sure noticed went down after using up 57 squares! The first one in the bottom row on the left uses three patches 2.5" x less than 2.5", which is on purpose, so the rows will not line up above each other in the quilt. That meant I looked in my purple scrap basket to find three scraps to fit the bill. I'm working on making 12 black and white 9-patches for the other purple project. I mainly do these as leaders/enders, but once in awhile, it feels good, as it did here, to just pull out my 2.5" squares and sew some together without pressure or deadlines or must-do. I'd just mailed off a quilt for an upcoming ezine, so that's exactly what I did here.

Monday, April 20, 2020

Smooches Tutorial

I made the original Smooches quilt as my entry for Project Quilting 11.3 Put a Heart On It. All along, I planned for this quilt to go to the Windsor Sexual Assault Centre. For four years now, I have donated one or two quilts as part of my H2H commitment, specified for kids who, sadly, need to go there.

The quilt consists of twelve heart blocks that finish at 12", and four rectangles of background fabric. Sashing separates the blocks and rows, and there are just two borders, top and bottom. This is a great quilt to make use of scraps! It goes together in a snap, and with directions for nesting your seams, you will have lovely crisp points.

Sunday, April 12, 2020

Guest Blogger Appearance!

I am tickled, honoured, and pleased to announce that I am the guest blogger for today's slot on Confessons of a Fabric Addict. One of the obligations we have this year as ambassadors for Island Batik is to make two guest posts on big blogs, and I thought of Sarah, who has guests write posts on her blog on Sundays with a tutorial for a potential comfort quilt for Hands2 Help.

This was my entry for Project Quilting 11.3 challenge, Put a Heart On It. I planned all along to donate it to the Windsor Sexual Assault Centre, destined, as I have done for four years now, sadly, wish it weren't so, for a kid. They just love getting my quilts, and the kids love them, and get to keep them.


Thursday, December 19, 2019

HRT Tutorial - No rulers! Not paper-pieced!

The quilt top I've just finished requires a few HRTs, also known as Half Rectangle Triangles. These differ from HSTs (Half Square Triangles) in that they are not square. Duh, I know, but think about it: both have a right angle formed by their perpendicular two sides, let's say the base and the left side, but then the diagonal line on an HST is more of a gentle slope, a 45° one to be exact, whereas the HRT has a much sharper slope. This can give you some lovely icicle-like pointy points!

The downside is that that require a little more work in the prep stage to make them. I know there are lots of rulers out there to make the 'little more work', much less, but here is a tutorial I wrote for the size I needed in my current quilt, which is 2X4" finished.

I would first like to credit Kirsty at Bonjour Quilts whose HRT tutorial popped up when I searched for a handy-dandy chart, and she has just such a handy-dandy chart for both HRTs and HSTs, so pop over and check it out, download it and then come back. I will wait, as they say...

Wednesday, July 3, 2019

More Cat Mats and a Wee Tutorial

One of my Q2FAL goals was to make two more cat mats, and on the last weekend in June, I completed the goal. My Q2 list is here.

These will go to the Leamington Kittenaide Program which is an organization of foster homes for cats and kittens in Essex County.

Thursday, February 21, 2019

A Return, A Comment Fix, and A Favourite Tutorial

Things have been pretty quiet, for me anyhow, in my corner of QBL. If you follow me on Instagram @mmmquilts you'll know that I've been madly sewing and quilting away on a project I can't show until summer. Yes it's for a magazine, and I'm super excited about it, though super-exhausted by how much work it took around a multitude of interruptions ranging from daughter and grandson visit, to the two weeks in Mexico, to a 7-month-old-tomorrow puppy...
who's rambunctious as hell in the mornings, who isn't much interested in any kind of food (but fish he quite likes, oh,  and cottage cheese) so that is alarming as he is underweight to start with, and who has claimed MacGyver's IKEA poäng chair from time to time in the evenings, so hilarious, and he snores so loud in it because already he doesn't exactly fit...
Like how in the world is that comfortable?!

Tuesday, October 9, 2018

Free Motion Motif Tutorial

As promised, here is a quick tutorial for a fast, fun and easy all-over meander. It's easy to do on either a domestic or a longarm. I first saw it in a long-ago issue of American Patchwork & Quilting on a quilt, back when "Quilt as desired" was all you'd get for quilting suggestions, and maybe, just maybe, you could figure out some of the motif from photos.

As Angela says, "Let's get started!" (btw did you see her new QAL, 'Glorious Dawn'? So pretty in any one of the three colourways... on bluprint? (affiliate link) You can watch for free during their 'Get Started With Bluprint' Event, on now through Oct. 12. I'm finding I watch more because I signed up for the year subscription, and I'm not worrying so much if I'm sewing while 'watching', something I never do because I can't do both of those things well at the same time. However, now I listen and look up once in awhile, and if it's something I'm really interested in, right within the app it remembers where you'd left off, just like Netflix, so, when I am not sewing, I can go back, rewind a bit and pay proper attention!

Okay, tutorial for this FMQ meander which I used on my Throwback Thursday quilt post, Sunny Days:

Wednesday, January 17, 2018

Kitty Mat Tutorial #2

I've completed almost half of my January OMG, to make two cat mats for the Humane Society. Here is a tutorial for this fun and quick make.  This is what we are making, in the RSC2018 colour of the month, pale blue. It measures about 18" wide by 12" high. You could use this same pattern to make placemats.

1. Choose your fabrics.  Cut:

  • For the large squares, cut 12 squares @ 3.5"
  • for the 4-patches, cut two strips @ 2" wide of two different fabrics for a total of 4 strips. You will have extra. You actually only need one WOF strip and another about 10-12" long from each of the two fabrics, if working with scraps.

2. Piecing 4-patches

  • Sew two strips of the 2" contrasting fabrics together along the long edge of the strip.
  • Press to the darker fabric. This will help 'nest' the seams (making a nice match at the centre).
  • Repeat with the second two strips.
  • Cut 24 @ 2" wide segments from these strips.
  • Pair these, nesting the seams at the centre of each 4-patch, to make 12 4-patch blocks. They should measure 3.5" square.


3. Layout

  • Arrange in alternating fashion to make a 6 X 4 block rectangle as shown below.

Double-check (clearly I didn't; see the error?!) your design.
4. Piece the rectangle.

  • Visualize these 6 columns as 3 sets of 2.  Pair the blocks in the first column and chain sew them together.
  • Repeat with the middle set, and finally with the third set.

I piece the majority of my quilts this way, in columns, a method I call "Book it!" which is in more detail here. I learned it many years ago in a colourwash class, where it was invaluable in keeping a few hundred 2" squares in exact order as you'd arranged on your design wall!


  • Press in alternating directions. I've turned the columns sideways to fit on my small pressing board. Putting the 3.5" squares on top, alternating down the column, as you see in the bottom of the picture, ensures the pairs get pressed to those 3.5" squares. The alternating pressing scheme again will help nest all your seams.


  • Sew the top pair to the pair below it, and so on down the column until you have the entire column (a 2 block by 4 block column) pieced. Repeat with the other two columns.
  • Press columns 1 and 3 seams down, and column 2 seams up.


Nope, still hadn't noticed the error....
Sew all three columns together, and press! And THAT was when I noticed... Sigh. But as you see from the top photo, I unpicked and fixed it. Can't have a kitty bum on a mat with an error!  I have to quilt it up yet, but I'll show you when I have the other one all done, which needs to happen by January 31.

Bella tried it out for size, with some coaxing...😼 any other time she's all over something I'm trying to photograph!


I have been told that cats tend to get adopted out more quickly if they have a homey mat to sit on in their crate while they wait for their forever home. These two mats will most likely go to the Englewood Humane Society in Florida since I will be there in less than a week! 😎

All right, lots to do before we leave, in the sewing loft that is. Ha! Priorities. Not much else to worry about, all quick and easy.

  • Job one is Wayward Transparency; it is done but for the binding.
  • Job two is planning and drafting and test piecing for another Benartex blog hop at the end of the month. This fabric--!! Just wait until you see it, well, what the heck, here's a sneak peek of the fabrics now that they have arrived since I did my Q1FAL list:

DROOLING


  • Job three is writing up a finish post for another quilt coming out in Benartex's Modern By the Yard magazine which goes live on Friday. EEEP!


Lots of stuff going on!

Update:
Purr-fect backing, pale blue for January's RSC colour, and the big cats: lions!  Pillow turn method, bits of fabric and thread and batting I used to throw away for stuffing...

Ta-da! Poofy kitty mat #1 done and Bella-tested
I just quilt, slowly, because it's very thick, two lines, so the mat is divided into three sections. Then one more lengthwise down the centre. More detail when I get the other one done.

Linking up
Sew Fresh Quilts
soscrappy

Wednesday, October 18, 2017

"Winter Games" Blog Hop

I was super-excited to get to work with Amanda Murphy's fabric line "Meadow Dance" last month (heard in her newsletter today that it is sold out and being reprinted!) and then... to get to work with her next line, 'Winter Games' in my new favourite Christmas colours?  Over the moon!

Isn't that such a perfect winter print? There was no question that that was one I'd pick for using in my mug rug. Mittens with strings, how I always wanted a pair, thought it was so cool that you could just let them dangle, and even toques, which, as I said on Sew In Love With Fabric blog, rhymes with 'Luke' and is Canadian for a woolen hat just like those on the fabric.

Here is what I made:

The technique used will yield two mug rugs,  that you can whip up in a few hours. I like that!

First of all, I got the idea for the mug rug from the cover of Amanda's book, Modern Holiday. I've wanted to make that quilt for EVER. This book turned me onto fresh Christmas colours.

I've made free-form cut triangles before, along with several other shapes, thanks to Karla Alexander's Stack a New Deck book, so I figured I could do this without any paper-piecing or templates.
So let the games begin, shall we?

Leaning Tree Mug Rugs

Yield: 2 mug rugs 6.5" x 9.5"

Fabric Requirements
8 fat quarters in coordinating colours, or scraps, but note that the scraps need to be about 8.5" square for the large tree block.


Mini Trees
1. Cut four rectangles approximately 4.5" wide by 3.5" tall.
**Note that you will make four tree parts at once by stacking these four squares and making two slices with your rotary cutter. If that worries you, then you may do two trees at a time, but you will need to keep the partners together since this is freely cut without templates.

2. Place your ruler at a tree angle you like and slice through all four layers at once.
**Don't make these angles too sharp, or you will not have enough fabric to square to 3.5" in the end.

3. Now make a second slice to form the tree shape. Be sure to allow at least a 1/2" from the side edges.

4. Take the top tree and place it on the bottom of the tree stack. This shuffles the fabrics.

Piecing
1. First sew the left side of the tree to the background. Note that things won't line up perfectly; trim the extra bit of fabric as shown below, so you have a straight edge. Press to the background.

2. Now sew the background piece to the right side of the tree. Press to the background. Trim the bottom edge straight. Square this unit to approximately 3" tall by 3.5" wide.
**Tip: ensure you have 0.5" or more about the tree top. Make four.


3. Sew a 1" x 1.25" rectangle of tree trunk fabric between two 1.25" x 1.75" rectangles of background fabric. Press to the background fabric. Make four. You now have this:
Note that the tree section wasn't trimmed when I took this photo.
4. Sew the trunk unit to the tree unit. Press the seam open or to one side. Square the mini tree blocks to 3.5". Set aside.

Large trees
1. Cut a 7.5" x 6" rectangle of background fabric and the same of tree fabric. Place the tree fabric atop the background having the 7.5" width at the lower edge. Cut a tree triangle shape as you did for the mini trees.

2.  Stitch and press as you did for the mini trees. Trim the bottom edge straight. Square the large tree unit to approximately 5.5" tall by 6.5" wide. Make two.

3. Sew a 1.75" x 1.25" trunk piece between two 1.75" x 3.25" rectangles of background fabric. Make two of these units. This unit will measure 6.75" x 1.75"; you will trim it to fit the tree unit after joining.

4. Join the tree unit to the trunk unit. Trim so that it measures 6.5" square.

You now have the following:

Assembly
Arrange these so that you have one large tree with two mini trees on one side as in the first photo of this post. Sew the two mini trees together, one above the other. Then sew this unit to the side of the large tree block. Square to 6.5" x 9.5".

Layer with batting (great to use up scraps) and a backing piece cut approximately 7" x 10". Quilt. I had fun with my metallic threads, Holoshimmer by Sulky, and the most perfect variegated Sulky rayon. I also used Aurifil 2600 in the white/grey areas, and pieced everything on my 1947 Featherweight with pale blue Gütermann.

Both were quilted on my Bernina. I did swirls, echoes, pebbles, dot to dot, a loops and snowflakes meander, and flowing lines. Fun!


When done quilting, square it up and bind. I did a single-fold binding, cut at 1.25" wide, applied to the back, and then top-stitched down to the front.

Here's the back:
My impatiens are hanging onto summer as much as I am!
I used the mittens and toques fabric on one, and the pale green fabric I used for the tree trunks on the other.

I got my Angela Walters cup out (fitting because I pulled out her Shape By Shape 2 for inspiration) to see how it went with these:
I'd say pretty fine! Turquoise is such a beautiful colour.
How would you like to win a few fat quarters of these fabrics for yourself? Maybe make this mug rug or one of the others on the hop this week? If you'd like to see all the fabrics (there are 25!) in Amanda's collection, and read about her designs, click here.

Tuesday: The Benartex Blog Design Team - they used the games fabric to create two mug rugs in motion!
Wednesday: me! at mmm! quilts
Thursday: Debby Kratovil Quilts

To keep costs down, Benartex is sending to US residents only please. Just answer this question: have you ever made a mug rug and do you use it? Followers, new ones welcome, can get a second entry if you tell me how you follow me. See the top of my sidebar for where to find me beneath my profile. Due to the large volume of comments during giveaways, I won't be responding to comments. Be sure to leave your address in your comment if you are a no-reply blogger, like this:  ephdra (at) gmail (dot) com.  Thank you for your understanding while I work my way through comments on the last two posts; things have been pretty hectic and stressful at my house this past 10 days. My previous post explains why.
Good luck!

The giveaway is open through Friday, Oct. 20 11:59 EDT. I'll announce the winner on my blog on Saturday. GIVEAWAY HAS NOW CLOSED.

Sunday! (just been rather preoccupied with a very ill doggie, sorry): The winner is #70, Abbigail, and she has been contacted. She uses mug rugs all the time. ☕

Thank you to all who entered, and commented, and welcome to new followers. I've been using one of my mug rugs all week! I find they are perfect for the morning coffee or afternoon tea when I am having something small to eat. If you make one of these, please send me a photo and with your permission, I'd love to post it on my blog.

Linking up in lots of places!
Free Motion By the River
Sew Fresh Quilts
Quilt Fabrication
My Quilt Infatuation

Friday, October 13, 2017

Meadow Dance Blog Hop - Baby Quilt Tutorial

A few weeks ago I was part of a blog hop for Amanda Murphy's new line of fabric, Meadow Dance on Benartex's blog, Sew In Love With Fabric. This fabric is so pretty that  I couldn't choose just a few, so, because I'd made this quilt twice already, and had requests for a pattern, I thought it would be the perfect occasion to show off all the fabrics in the line as well as make me write up a pattern. Now that the hop is over, I can share the tutorial right here on my blog.

I was super-excited to be asked to take part in the hop for Meadow Dance. I have been a fan of Amanda's designs and her quilting for some time, and I own her book, Modern Holiday, but this is the first time I've worked with her fabric. And what a line!  Love! The various prints work so beautifully together.  Here is the quilt, Ribbon Stars, on a farmer's fence, in a meadow! Get it?

Thursday, October 12, 2017

A Couple of Blogging Tips

Here are two tutorials; the first is the tutorial for how to find out some stats on your blog. Normally I rarely pay attention to these, but during giveaways, it's nice to determine whether the person picked actually does follow you if they are getting an extra entry for doing so, right? You know how you can subscribe to favourite blogs by email so you never miss a post; well, as a blogger, how do you find that list of subscribers to your blog? I use blogger, so I do not know if this applies to Wordpress or other blog formats. Disclaimer: I am no tech savvy person! All I know is from Googling stuff or trial and error.

1. First of all, go to feedburner.google.com. You may have to sign in to your Google account. Once you do, you should get a screen like this:
2.  Click on your blog name. It will take you to the Feed Stats Dashboard where there are four tabs. You will automatically be in the Analyze tab (I love Troubleshootize - they have a bit of a sense of humour no? Look at the phrase after 'My Feeds' in the photo above!
Click on the Subscribers tab on the left side of the page.
3. Scroll down (under the green circle) to Feedburner Email Subscriptions and click on it. You will see 'Manage Your Email Subscriber List' pop up. Click on it. The page looks like this (I've scrolled down part way, but cut off the first actual email address to protect that person's privacy):

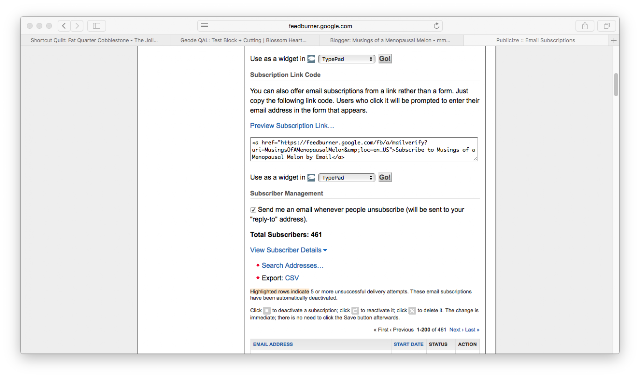
Note that you can get to this page by clicking the Publicize tab and going to the left menu and clicking on 'Subscription Management' if you prefer. You will see that I have 461 subscribers, but on the first page it shows 385. I believe that is because some of the subscribers never complete the subscription process. You sign up, and then you get an email to confirm your subscription, right? I think some people never confirm it. I'm pretty sure that in the status column beside the subscriber's email address 'unverified' means that the person did not confirm. Feel free to correct me in the comments below if I don't have this right.  Note that you have the power to both delete a subscriber, and to deactivate delivery of your posts to a subscriber. 😮😳

It is pretty easy to scroll through the list to confirm a winner's subscription. You can click 'Email Address' to sort alphabetically, or 'Start Date' to sort by date.

Hope this helps!
To find your followers on bloglovin', go to your profile and click on Followers. Easy! However, there doesn't seem to be a list format, or a sort feature...

picmonkey woes

The day I had to send my tutorial for Let Your Star Shine for publication on Sew In Love With Fabric, Tish texted me to say picmonkey was apparently no longer free.  wtf was my response and panic ensued.  Once I calmed down, and no more bad words were flying around, my thoughts went like this:

There is a way to edit photos on my laptop...😼 ...sigh, but I still have to bring them in from iCloud...

or...can I do it right in iCloud?🔮...

... or wait, could I do it on my iPhone?🙌🙏💪

A quick Google and yip-yip-yippee I could. Yay!!🎉🎊 Now I don't have to rely on a third party, be at their whim as to them suddenly charging me for their service like picmonkey, or suddenly removing the ability to embed a link on a button I make, like photobucket, grrr.

Here is the second tutorial for today's post.

If you are like me, and take your quilt photos with your iPhone, simply do this:
1. Bring up the photo on your phone.  Tap 'Edit'.
2. To enhance the photo, tap the wand icon in the top right. It turns golden.
3. Tap the little circle with 3 dots in it, aka apparently a hamburger. Then tap the felt pen 'Markup' icon.
4. To watermark your photo, tap the +. Tap 'Text' where you will get a textbox in which to write.
5. If you want a different font, tap the AA where you can choose, and you can use the slider to resize it. Tapping the black circle (not a good colour on a black background, right) will allow you to choose the font colour. To write in the box, tap it, and tap 'edit' which will have your keyboard pop up.
6. To move the textbox, simply drag it where you want. Note that you need to touch the textbox to get the little side circles or 'handles' to appear if they have disappeared (ask me how I know) so that you can drag it to where you want it.

You can crop your photos too, very easily. Tap 'Edit'.
1. Now tap the crop/rotate icon at the bottom beside the word 'Cancel'. You can rotate, yes, but if you 'grab' as in put your finger on, one of the four corner frame thingies (great term, remember I'm no tech guru) you can pull in the corners to crop your photo. You can move the crop area wherever you want it by simply dragging it to the part of the photo you desire to keep.

Voilà! (French for 'there or here you go!' or 'here you are!' - I can hear my mother correcting my Canadian English to British English) just please don't write 'Viola!' thinking you've written a French word, because you haven't, that's either a member of the violin family or a flower, take your pick. 😁


One quick fabric tip (enough of the tech stuff!): did you know Connecting Threads (affiliate link) doesn't just sell their own line of fabrics? However, Emma and Myrtle by Amanda Jean of crazymomquilts and Glacier Peak, two new ones I particularly love, keep calling me. Just sayin'... A few months ago, I snagged several lines in the clearance section which I keep forgetting to show you:
As you can see from the one selvage I was sure to show, these are five pieces from 'Hazel' by Allison Harris. Under $5/yard, yes please and thank you!

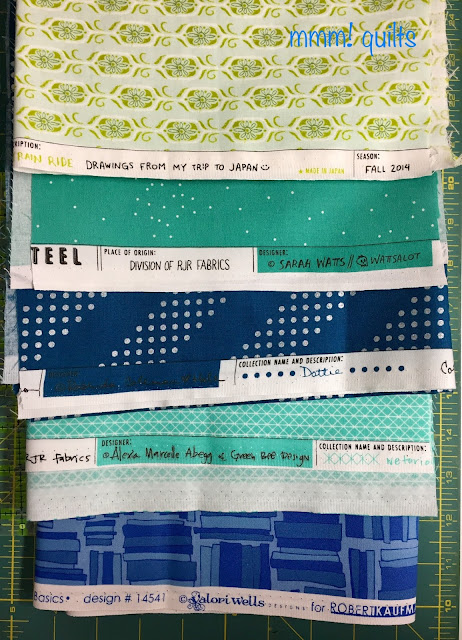
Here are four pieces of various C&S as well as a Valori Wells, whose fabric I really like, although I don't own very much, hmmm...but this--?! Books! Blue! Into my cart it went in a flash. All under $5/yard.

Always pays (yourself, right?!) to check the sale or clearance section in quilt shops, be they online or IRL. What I particularly like about Connecting Threads is that they ship to Canada, Australia and the United Kingdom free if you spend $75. That's pretty darn sweet.