Thursday, April 24, 2025
Glowing Hearts - Tutorial for Lower Heart Section
Wednesday, August 31, 2022
Two Tuesday Tips
Sunday, August 16, 2020
Blogger and Purple
As promised a while back, here is the post on how to do some things in the new Blogger format. Let me know in the comments if you have questions, and/or if you have figured out something I may not have mentioned. Here is a little purple and quilty goodness to start you off in a good frame of mind, before we get to some of the annoying stuff.
These are my ten purple blocks for one of two RSC 2020 projects. I mostly do not pay attention to where they land as I take them out of my 2.5" tray in their stack. Purple is a colour I sure noticed went down after using up 57 squares! The first one in the bottom row on the left uses three patches 2.5" x less than 2.5", which is on purpose, so the rows will not line up above each other in the quilt. That meant I looked in my purple scrap basket to find three scraps to fit the bill. I'm working on making 12 black and white 9-patches for the other purple project. I mainly do these as leaders/enders, but once in awhile, it feels good, as it did here, to just pull out my 2.5" squares and sew some together without pressure or deadlines or must-do. I'd just mailed off a quilt for an upcoming ezine, so that's exactly what I did here.
Thursday, January 9, 2020
Pink and Grey Placemats and Two Great Tips
Dayna originally fell in love with the Opal Silk placemats I made for Brianne, asking for those colours. And then, in keeping with her Demando Dayna nickname bestowed upon her by my friend Rose of something rosemade, who has a Demando son, and recognized this quality in my daughter, Dayna said, "Well, I'd like the turquoise ones for my outside table, and I'd like four more for my inside table, but in pink instead of the turquoise." All right then! She opted for a soft pink and I like the look. In all honesty, I am most happy to oblige these quilty requests. The mending or altering requests, not so happy to oblige...
Monday, May 20, 2019
Sweet Star Progress
Thursday, February 21, 2019
A Return, A Comment Fix, and A Favourite Tutorial
Friday, June 15, 2018
Postcard from Sweden Tips for Success
Wednesday, March 14, 2018
Postcard from Sweden Step 3
We interrupt this blog post to say, "GO Corbin Watson!" He's the goalie for Team Canada's hockey team in the Paralympics and is from Kingsville! They've won all three of their games so far and play again tomorrow. I'm so happy that the Paralympics is getting more attention these days; IMHO these athletes have more heart and determination than 'regular' athletes. 💖😍
Ideally, if this is the halfway point, I should have 10 of the 20 rows sewn together. Well, I have not quite half that amount...what a good example am I? I have been rather busy of late! Here is my progress so far and I am loving it:
Here are a couple of tips that I have discovered helpful:
1. I label the HST pairs with a fine tipped marker within the seam allowance.
This way when I press them, I don't have to worry about pressing painter's tape, or a self-adhesive label, or having it fall off. Trust me, I've done this on many many quilts over the past 20 years, marking within the seam allowance, with never an issue.
2. I press to the side, 'the dark side' to quote Angela Walters and Jenny Doan, lol, and this ensures all these seams nest beautifully. Pinning has been minimal. If you spin the seams, as in unpick a stitch or two within the seam allowance where the seams join, something Carrie Nelson (think Moda's blog and Schnibbles) is well-known for, then you can press them all in the same direction, and the bulk is reduced by half.
![]() |
| Love those cute teeny pinwheels that form! |
Okay there's my HSTs sewn together step NOT complete, but I'm going to keep plugging away between my other projects, 😉 and eventually I will have a quilt top. Let's see what your stitched HSTs look like by linking up your quilt progress below.
For the Postcard from Sweden schedule, click here. Remember there is its own page under the tab Quilt Alongs at the top of my blog page.
Modern Plus Sign Quilts - Cat-Eye-doscope
When I first heard that Cheryl had a book coming out with Paige, I right away emailed Cheryl, asking if she was considering doing a book release hop, could I be a part of it. I've been a fan of Cheryl's designs for some time. She won my very first giveaway on my blog a few years ago. 😊 Of course she said, "Of course!" I wasn't the only one who wanted to be a part of the hop; there are 40 of us; that's love for you!
Sunday, November 19, 2017
Singer Featherweight Love #2
Wow, back in June when I wrote the Featherweight Love #1 post, I did not envision it being this long before I wrote about my second machine purchase. You may recall that in finally actively pursuing a long-held dream of owning a Featherweight, I became the owner of two within one weekend! This girl was the first one I spied on kijiji, a buy/sell site, when I decided to 'just see' if there were any available in my area. There was just this one, in Belle River, which is where I got my first teaching job when we moved here in the 80s.
Here she is on her first sewing job, on May 4. Yup, the thread is not being fed through the cone thread guide in this photo, but I always always do, as these machines were not made for the cross-wound style of threads we have nowadays.
Just look at her tension and be amazed when you find out her background:
![]() |
| Right side is top thread, left side is bobbin thread. Pretty darn fantastic, no? |
What's with the tractor?
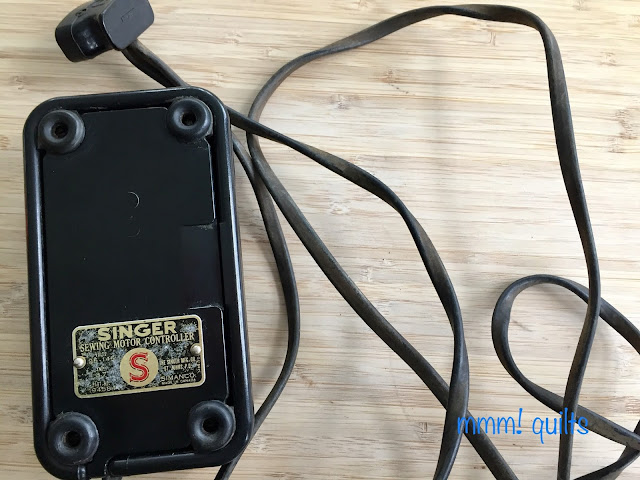
Like I said, this was the first one I emailed about. The person selling her did not respond for two days. She had no case, and no cord, and hadn't sold, so the price was reduced to $90. I checked with my good friend Danielle, who owns two Featherweights, and had rekindled my flame to own one. She said they normally sell for around $300 here. So this one must've had something seriously wrong with her. When the guy still hadn't responded after a few days, I looked a little further afield which is when I found Mathilda, aka Tillie up in Tillsonburg.
Then he responded, on a Friday. Someone else was supposed to take a look the next day, and he'd let me know if it was still available. However, the next day, Saturday, we'd arranged to take the trip to Tillsonburg. As you know, we bought Tillie. I wasn't sure what kind of state the Belle River machine was in, nor whether she'd still be available. Well. That very evening, Belle River emailed back and said I could come Sunday and see her. Did I really need another Featherweight? No. But she was the first. She's American; Tillie is Scottish. She was an incredible price, and well, I'd bought a spare case from Tillie's seller just in case I acquired her... She could share Tillie's foot control. It's only 25 minutes' drive away.... I had a déjà vu sort of feeling about her...
Well, we arrived, and when the garage door opened, I saw not one little dusty Featherweight but many, many Singer sewing machines, various models, in various states of disrepair and pieces. Yep. Pieces. And then. I saw a little tractor, the tractor motor housing and steering wheel being a Singer machine, modified (noooo) to look like a tractor. Painted. Apparently the guy's dad who was deceased, used to collect old Singers and turn them into display tractors (that link will show you). The machine I had come to see actually did work though. He showed us. She was a little rougher than Tillie, but still purred along. No case. No foot. No attachments, had sat for who knows how long....would he consider $75? He certainly would. Sold.
And then, he said, "I might have a foot cord you can take that will work with the machine. You might have to replace the wiring. As you see, my dad collected all kinds of old machines, and repurposed them into tractors."
![]() |
| Had to wipe off some layers of grime! |
Now, what to name this new girl? I was super-duper-excited to have scored her for this price! I cleaned and oiled and greased her up at the same time I was doing Mathilda. Hmm, Belle? She certainly was a little beauty as I shined her up, working over the course of many a spa session on the tape residue on her bed. She came from Belle River...no, Belle is too close to Bella. It took some time, but she is just Billie. Close to Belle, rhymes with Tillie. She's feisty. She escaped becoming a John Deere. She waited for me to bring her back to life. She's built the same year as our house, 1947. She actually sews quieter and smoother than 1951 Tillie! And, well, the other Billie I know is Billie Halliday, a pretty fine, smooth-voiced singer....😍 My grandmother's treadle machine, which I inherited, is Millie, my grandmother's name. A good trio. (ya ya, I do have two other vintage Singers, not Featherweights, but their names do not rhyme. I will write about them as well, don't worry.)
So I take turns on the Featherweight girls. I sewed most of the summer on Tillie, but this Fall, pulled out Billie and have been using her a lot. The more I use her, the smoother she sews. My one and only concern is the elusive 1/4" seam. At first, I would switch out Tillie's throat plate that her seller had had engraved with the seam allowances. That was okay but the 1/4" marking was a tad healthy.
Long story short, I decided to buy the acrylic seam guide from Nova (not an affiliate link). I sewed for the months of September and October using this seam guide.
I like the unobtrusive screws you use to hold the acrylic in place. You can get it to exactly a scant 1/4" (note my little ruler to the right for this purpose). However, there were a few issues. The first was despite being flat on the bed, threads did occasionally find their way between the acrylic and the bed of the machine, and the fabric would sometimes slide under it slightly. She suggests removing the front screw of the throat plate to get it as flat as possible on the bed, but that is the original screw, though not the original throat plate (it's Mathilda's) and so it did lie very flat. I was not a fan of removing that screw anyhow (gotta find a safe place for it); what about when I don't need the acrylic, then I need to put that screw back in, and remove the guide to clean under the throat plate when I oil her. I also found it a bit of a pain ensuring the guide was exactly perpendicular as well, holding it in place while I finger-tightened the screws, adjusting again as it invariably wiggled (think smooth acrylic on smooth machine bed).
Second, pinning, which I don't do a lot of, but at intersections I almost always do, was a learning curve. Because of the thickness of the acrylic, about 3/16", if you pin with the pin sticking out on the right side of the fabric, the pin hits the guide, and you have to remove it. So I made sure to pin so that the pin is sticking out to the left, and the tip didn't stick out past the 1/4" seam. A bit of a pain, especially if I'm dropping in pins as I go. I'm right-handed, so I'd be either awkwardly trying to pin on top of the fabric with my left hand, or lifting up the fabric and pinning with my right hand but underneath the fabric layers. Ugh.
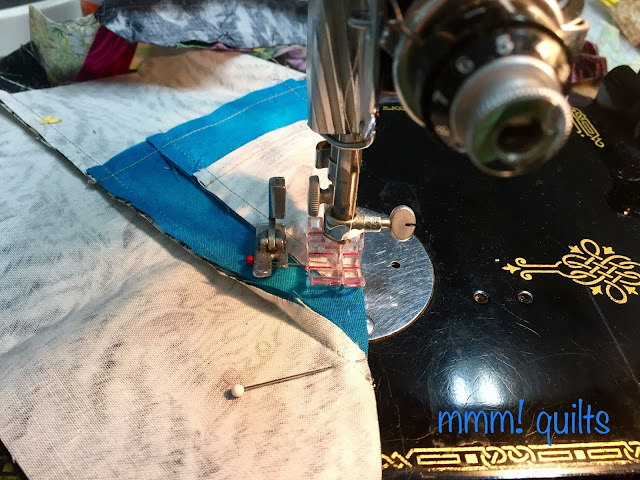
Finally, the worst and not fixable issue is sewing on either side of a marked line. With a seam guide resting on the bed of your machine, the fabric will not lie flat. See below where you see me trying to do the corner connector method to make Lorna's Dog Gone Cute dog blocks for Karen at kaholly.
So ix-nay Corner Connector method, No-Waste Flying Geese, HSTs, as well as joining binding ends, unless you cut the 1/4" seams before stitching. I'd go back to my Bernina for any of these techniques. Not the end of the world when I have both machines as you see in the first photo, on either side of my sewing table. However, were I to be sewing at a friend's house, or at a retreat, I'd not be packing along two machines!
I wrote to Nova before I posted this, to see if there was a solution or suggestion to my concerns. I let her know I'd be writing about this on my blog, and that a few readers had asked my thoughts on the seam guide. I told her that had I realized the third issue, I'd have probably put my money towards a 1/4" foot instead. Well, she was not the best at customer service, let's just say that. Wow. I was pretty surprised at the tone of her response. I will say that she has added a sentence in the product description about the geese and HST issue. She was most definitely not very understanding, devoting an entire paragraph to the much better benefits of her guide, by being able to adjust seam guides from 1/4" to 1" and beyond... Not too many quilters I know of who require anything other than 1/4" for the vast majority of their quilting.
So. What did I do? Well I had a generic 1/4" foot I bought 20 years ago or more for my Elna. It fit on the Featherweight and I sewed with it for a bit. Then I decided you know what? After 20 years of use, I do think I could buy a new 1/4" foot that is known to be terrific, and works fabulously with Featherweights. So I ordered the Little Foot from Sewing Machines Plus. I have been sewing with it for the past week and I love love love it. Yup. Three loves. It has a little beef, or muscle, meaning more than my generic 1/4" foot for my Elna. It actually sews better than my Bernina 1/4" foot made for Berninas! Sadly, my Bernina has always annoyed me going over any bulky seams; it chokes a bit and the stitches go very tiny, and often I have to help her by tugging gently on the fabric as it is trying to get out from under the foot. Not so with the Little Foot and little Billie. She chugs along merrily and smoothly as can be. See for yourself:
Here is a photo to compare the original Singer foot with the new Little Foot.
![]() |
| Ha! Nesting seams means sometimes you find you've pressed them the wrong way when you line up intersections. A little re-pressing once this is sewn and Bob's yer uncle! |
One of Nova's arguments for her seam guide was being able to adjust it to exactly a scant 1/4", whereas with the 1/4" foot one is relegated to the manufacturer's idea of a 1/4". Well, I measured. Pressed my seams to one side as you see. Lined up just-sewn pieces with the next piece and all is very very well.
So in my honest opinion, if you are wanting a tool that helps you get that perfect scant 1/4", I would recommend the Little Foot. The acrylic guide that Nova sells is also a great tool, and sure does adjust sideways to whatever width seam you may require, but it is limited where certain quilting methods are concerned.
One other thing to note about my sweet Billie is her bed. See how shiny it is?! Look back at the first photo, taken May 4, and see the gummy and hard residue from previous sewists using tape to mark the seam guides. With lots of spa sessions, gentle massage (lol) rubbing with machine oil, gentle scraping with fingernails, I've been able to get it pretty much completely all off. I am also getting totally comfortable with oiling her and even gave her a little grease on her gears the other day. I did order Nova's motor lubricant, which I haven't used yet, but plan to shortly. It doesn't need doing like the regular oiling does.
Something else I ordered from Nova is a set of four rubber bed cushions. Billie's were either not there at all, or so compacted and eroded that even MacGyver had a bit of a time digging them out. But we persevered, and she now has four new feet! You can soften them up with a bit of kerosene, apparently, but we got them out okay.
Just a note on my 150 Canadian Women quilt. My OMG for November is getting it to flimsy form.
Here are half the blocks, 75 of them, with side sashing sewn on. I am finally using this gorgeous leaves low volume fabric from Benartex, 'Nature Studies', that I've had for eons, and that I love. It was the lining and featured in several blocks of a lightweight jacket I made about a decade ago! Anyhow, for the Canadian Women quilt, I was unsure what I was doing, two quilts, or one, sashing or not, so I didn't sew these on as I went. I've been doing it as a leader/ender project. I am not quite half way on the next 75. And I have now realized I need to do 6 more blocks since I'm doing just one big quilt, so that it will be 12X13 blocks, = 156. I'd figured all along it would be 10X15 blocks, a rather long narrow quilt... Anyhow, stay tuned for further developments on it, progress on my Splash of Colour, which you see one of the blocks of in the second last photo, and more on my other Singers.
A note that next weekend is the last one in November, and therefore a DrEAMi! party opens on Saturday. In case you may have been sidetracked by a squirrel... Oh and I'm sure some sales will be sidetracking your wallet too, no doubt! Remember to check your email from Connecting Threads for whatever fabulous deal they are going to offer on Monday. I don't even know!
Linking up
Cooking Up Quilts
Monday, July 24, 2017
A Quilting Motif and A Longarm Technique
"What the heck?" you're probably thinking, or maybe, "Ooh, love that fabric," or even, as Tish said when I sent her the yellow cow all quilted, "Those swirls are awesome!"
Here is how you quilt this block in one pass, ditch stitching and all! AND this can be done on either a longarm or a domestic machine! Use a ruler or your walking foot.
1. Start here. ('well duh')
2. Stitch to point 2 (probably still, 'well, duh,' but just in case...) the centre of the inner 'box'
3. Stitch a square in the centre of the purple rectangles, which in my case, for this 12" block, is 1" in from the seam line. Go all the way around until you wind up back at point 2.
4. Stitch out to point 4.
5. From point 4 stitch another elongated 'v' shape (we're doing dot to dot à la Angela Walters in case you haven't noticed) ending at point 5. Which is really point 1. 😉
6. Stitch in the ditch (aka SID) over to point 6. Note my attempt at dotted lines to indicate SID!
7. Stitch in to point 7, which is the top right corner of the box you stitched in step 3. Repeat from step 4 for all four corners of the block, ending back at point 1!
Then I SID along a floral seam line to an inside corner, stitched in the ditch all the way around the inner square, and did the swirl filler in there, then went back out again and continued the swirl filler for the background around the outside. I'm using Superior Threads So Fine colour 403 which blends nicely with both background and all the churn dash blocks.
A LongarmTechnique for Continuous Quilting
About a year, maybe more, ago, a reader asked if I could explain how I advance, then back up, then advance a quilt on the longarm. This was when I was doing Dayna's quilt, Shoot for the Moon, and trying to get as long a pass as I could at some of the intricate designs on her quilt. I found myself doing this for the outer border design for this quilt. I am self-taught, other than watching online videos and Craftsy classes by Leah Day, Angela Walters, and Natalia Bonner, oh and Jamie Wallen Youtube too, and none of them talk about this, so it's just me. If you think that "GASP! This is just not done!" well, I do it, and it works fine. 😁For the top section of border, it was easy to start on the left side of the quilt, about 15" down from the top left corner, quilt up to the corner, across the top border, and down to the same starting point on the right side of the quilt. I did the border after I'd quilted the first row of cows and churn dash blocks, so I advanced the quilt and continued down the border for another 15" or so (I have an 18" Avanté). This meant I could quilt longer without breaking thread.
1. So now I am at the point where I have quilted two more rows of cows and churn dashes and I want to do more of the border. First stitch in the ditch between the border and the background of the quilt. Also stitch 1/4" in from the outside.
2. Next, advance the quilt, and SID as you just did. You can see I was able to stitch all along the red churn dash and about half way into the barn block. Do this SID on the border on the opposite side of the quilt as well.
3. Then, back up to where you started the ditch stitching (first pic). At first when I wound the quilt backwards, I freaked because the quilt sandwich, in its entirety: top, batting and now backing, got wound up on the belly bar!
Yikes! I thought something bad would happen...but it didn't! So starting at the point where I was in photo 1, I switch now to my mauve thread, and continue the border motif over the course of that length of the border, advance the quilt to photo 2 spot, and continue doing the border up to being level with the barn. I'll stop there.
4. Then I go over to the opposite side, in this case the left, back up the quilt again to the photo 1 spot, but on the left side of the quilt, and pick up where I'd left off on that border, quilting down until I'm level with the barn block.
The barn block is in the bottom right corner, so once I've finished quilting the last two rows of the quilt, I'll be able to pick up the border motif about the level of the bottom of the barn roof, quilt down to the bottom right corner and across the bottom, and back up to meet where I left off on the left side of the quilt!
It's not as wonderful as doing the border in one continuous pass like you can with a DSM or sit-down quilt machine, but you can get fairly lengthy passes. And it is wonderful not to have the weight of the quilt to manipulate through the machine.
Having a dedicated quilting machine means I can still piece if I feel the urge...
Linking Up
Cooking Up Quilts
Free Motion by the River
Sunday, April 23, 2017
Red & White For Days
Here are the next three sets of blocks for 150 Canadian Women QAL at Next Step Quilt Designs, with a couple of tips in case you haven't made these yet, or for future reference.
Tuesday, February 28, 2017
Paper-Piecing Without Sewing Through Paper
The worst parts of pp, for me have always been cutting the pieces of fabric big enough to cover the section I'm working on, (read waste), and then not so much though, the tearing off of the paper, because that is kind of satisfying in a way, much like popping the bubbles on bubblewrap! However, picking out all the little bits trapped in the stitches? Not a fan.😣
This method gets rids of both of those issues, and allows you to reuse multiple times the paper template. You can use freezer paper if you like, as Joanne does, because a touch of the iron will adhere it to your fabric. Alternately, you can use graph paper as I did, and use a dab of a gluestick to hold the first piece of fabric to the back of the graph paper. I've done both; the only difference is that with graph paper/gluestick, there is a wee bit of gluestick residue on your fabric, but less is more remember, and a spritz of water will remove anything if you ensure you use washable glue.
Friday, January 13, 2017
Two Tips: Twirling Seams and Cutting Backwards
![]() |
| This is SUCH a pretty block! |
![]() |
| We had to make 4 of those and 8 of the others. I am loving the fabrics and colours I chose. |
![]() |
| A few of the 25 blocks arranged...so many possibilities! |
Twirling Seams
I like to press my seams to one side. I like to stitch in the ditch to stabilize a quilt before doing FMQ or ruler work on it, whether I am on my Bernina or my Avanté. With seams pressed open, there is no ditch, and the stabilizing stitches sink between the seams. I guess one could say you are stitching the batting to the backing then, but the point of ditching is to stabilize all three layers of the quilt.Problems arise when there are multiple intersecting seams. A needle can get broken when hitting a lump like this. You can get a nice a flat intersection, just as you would had you pressed seams open, by doing this cool little trick. I first saw it on Alex Anderson's "Simply Quilts" show on HGTV, and then later in Carrie Nelson's Another Bite of Schnibbles book.
Here is what it looks like on the back, and on the front, nice and flat. All you do is gently push the seams in opposite directions right at the intersection. Sometimes I push them in both opposite directions, one way and then the other. This will make a stitch or two loosen and open and you can then lie the opposing seams flat. You will get a little 4-patch if you have just sewn straight seams, little pinwheels if you have sewn any HSTs together at the intersection. Too cute!
Here's a great YouTube video by Edyta Sitar of Laundry Basket Quilts that shows you how to do this. I didn't spin the 4-patches in this block, but easily could have. Something Edyta says in this video was a lightbulb moment for me: "Whatever direction your first two seams are pressed in, twirl the just-sewn seams that same direction." Like a pinwheel! Snap!
Cutting Backwards
I've talked about this on the blog before, but it's worth mentioning again, another cool trick I saw years ago on "Simply Quilts". Actually, this is two tips in one.First of all you can cut two segments at a time for 4-patches by simply laying two strips sets atop each other with the centre seams opposing.
![]() |
| Here I've cut two 10" segments off my strip, destined to become 2.5" segments for 4-patches. |
![]() |
| Cut |
![]() |
| Cut once more. |
Make the final cut on the 2.5" mark.
![]() |
| Voilà! Four pairs ready to sew into 4-patches. If you do not separate them as I have here for photo purposes, you can take them directly to your machine and piece since the seams are nicely abutted. |
![]() |
| Happy, full, colourful design wall. Happy me. |
This month was a strawberry block from Bec at Skyberries Handmade and a Starflower block by Jennifer at Ellison Lane Handmade.
One of my goals for 2017 is to make a quilt of entirely solids. I made all solids placemats for practising FMQ in a class with Angela Walters a while back, but never an entire quilt top. So this bee is a great place to challenge myself to do that. Unfortunately, I did not bring very many solids with me, just a few for working on The City Sampler 6" blocks, not a stitch done there yet, so my first fabric pull of a mere 5 solids did not lend themselves very well to the January blocks, drat! After yoga one day I had to make a pit stop at a big JoAnn's in Sarasota, where I found two more greens (might've got a third because I wanted to be sure they would work with my pale green), and a pale pink. I am pretty sure I have Baby Pink at home, but alas, I didn't bring it with me. So I picked up a half yard of these four and well, four others kind of jumped onto the pile. So I now have some Kona black, Primrose, Buttercup Yellow and Turquoise joined Baby Pink, Chartreuse, Grass Green and Basil Green.
![]() |
| Did I mention these were 40% off? |
And then...
In the remnants, which I always check (thank you Preeti, for this terrific tip!) I found this:
![]() |
| Remember remnants are half price so this was $9.44 |
I nearly left it when I saw the price and what? 108" wide? I don't need a wideback in this colour. But then I thought, wait, I do need grey. Outside of Kona Silver, I have no grey Kona. But it seemed expensive. However, with the help of the calculator on my iPhone, because my menopausal melon is not so reliable these days for math in a hurry, I determined that the price per yard, when converted to 43" wide fabric, worked out to be $3.71!! Score! Sold!
Three quick reminders:
1. If you are thinking about taking a Craftsy class, or like me, put them on your Wishlist, now might be a good time to buy it as they are BOGO. Buy one, get one free! With all that's going on, I still haven't finished watching Natalia Bonner's "Free Motion Motifs for Classic Blocks" but as soon as I do I will write a review. So far it's very good. (affiliate links)
2. If you are part of our 30 Quilt Designs Challenge 2017 or #30quiltdesignschallenge2017 on Instagram, be sure to get a design in today for another chance at three prizes. I will be drawing this evening for the first bi-weekly winner in our Challenge! There is a $15 gift certificate to The Red Hen Shop, and two prizes, one each from me and from Lisa. If you aren't on Instagram, consider joining us! It's a great and quick way (unless you get sucked into the vortex) of seeing what people are up to throughout the day. Also you do not have to be on Instagram to look at stuff there; that's a clickable link with some very cool designs. 😉
3. You might want to hop on over to Sew Fresh Quilts to check out her newest free QAL! Lorna is getting a jumpstart on helping everyone have a lovely Christmas quilt for this year's Christmas! 🎄
Linking Up:
Confessions of a Fabric Addict
Sew Fresh Quilts
Thursday, December 22, 2016
Thursday Thoughts
Tuesday, December 6, 2016
Some Blocks and A Quiche
![]() |
| Isn't it a fabulous design? And how about the Moda Grunge as a fabulous ice fabric?? Who knew... |
This hasn't been stitched down yet, but there's no lifting going on. I thought the embossed flowers white fabric that has the palest of mauves mottled here and there on it would effectively replicate the blue-whites and mauve/pinky-whites of real snow as well as provide a contrast to the white of the ice. I'd like to say I planned that white 'blob' area to land there to evoke the glare of the sun on ice, but nope, a happy accident! This is an example of what Lara calls the need to back-coat some fabrics; see how the snow fabric became sort of opaque or see-through where it overlapped the mountain fabric? I was really pleased with how well the brown fabric did work for the mountain. I had chosen another grey/black denim-look fabric but then thought, hmm, I wonder if the white blotches here and there might evoke thoughts of snow... Yep! Goes to show to try fabrics you would think would not work when doing appliqué. This fabric has sketched-in-black flower shapes with bleached-out-looking areas and even has glitter on it!
I've also started a quilt along called 150 Canadian Women...150 blocks to be made which finish at 6". Hope I can do better than I have been doing with Tula Pink's City Sampler blocks (gulp). I need to do blocks 1-3 yet, but here are blocks 4-6:
The Next Step, a quilt shop in Calgary, Alberta. I first saw it on a blog belonging to another Sandra, Quilting at the Cro's Nest and was intrigued by the symbolism and educational component (shocker, I know).
Tip Time!
I've mentioned this method before, but when I showed Beth and David at our retreat at Julie's in October, they hadn't seen it, and thought it a cool method for cutting your HST squaring up time in half. So here it is again. Two at a time! Note that this method means you're going 'to the dark side' as Angela Walters does... one more day until her show, squeal! In other words it requires pressing your seams to one side, the darker of the two.
1. Lie two HSTs atop each other, nudging the seams together so they nest. Peel back the top HST if you want to check, but you will soon develop a feel for the nesting with your fingetips. You don't have to, but in order to not touch the nested pair, set them on a small rotary cutting mat which is on top of your larger one, or on a revolving rotary mat too if you have one.
2. Lay the 45-degree line along the seam, leaving a little wiggle room to eventually cut all the way around the HSTs. I'm going for 2.5" squares, but you can see I have my left and bottom marks at about 2 3/8". Cut the first two sides, as I have done if you are right-handed. It will be the opposite two if you are left-handed. Rotate the mat.
3. Now line the 2.5" marks on the ruler with the just-cut two sides, and the 45-degree line again along the seam. Trim both sides as before.
4. Lift off the top HST and voilà! (not viola, that'a a flower, or a musical instrument) you have two 2.5" HSTs.
The other day I had a hankering for quiche and decided to use a tried and true recipe that I've had and used for decades. It was a hit, and I am very glad I doubled the recipe and made two!
![]() |
| Yum! Enjoying another year's use out of my Snowman placemats. ⛄ |
Below is the recipe in case you'd like to make one! Now I cheat and just buy a pie crust (sorry Mum!) as I can't be bothered to make that part from scratch. I omitted the bacon, making mine with cauliflower and broccoli. We had a Caesar salad on the side.
Linking up with
Freemotion by the River
and woo hoo! Beth still has Main Crush Monday open at Cooking Up Quilts
Quilting Jet Girl for Tips and Tutorials Tuesday
May be frozen. Line 36 muffin cups with pie pastry or a 9x9“ pie plate.
Thursday, May 26, 2016
Binding Tip
The first seemingly tricky part is turning the corner to get a nice mitre. First stitch to within 1/4" from the next edge. I have wonderful lines on my walking foot to help me stop at the correct spot. I like to sew off the edge at a 45-degree angle. I don't backstitch or break threads; once you stitch down the next side you will cross over your stitching, so that effectively locks it.
![]() |
| I don't usually pull the threads out this far! It was just to get a good photo. |
![]() |
| Try to get it so the raw edges all run straight; ahem, mine are going off at a bit of a slant! |
Align the fold with the top raw edges, and the raw edges of the binding with the other raw edges of the next side of the quilt down which you are about to sew. I still haven't cut threads you can see. In the photo below, you can see how these folds create a little 3D double triangle.
Here you can see what it looks like after you've sewed down that next side.
and flipping it to the back so you see how the rather odd-looking corner turns into this little beauty.
All this is well and good and I had it down easy on my first quilt. Having the final ends finished nicely did not get done very well until several years later when I took a sewing machine cover class at my LQS. That instructor taught us how to do the clean method I have used ever since. You end up with a mitred end that looks exactly like all your joined and mitred binding strips.
Lay the just-finished sewing end of binding on top of the 6-8" tail you left when you first started sewing. Overlap the ends by the same width as your binding. In my case, it's 2 1/4". Because it is hard to see in the photo, I dropped a pin to mark the original cut at 90-degree angle binding edge.
Draw a line with a chalk marker a hair's breadth less than 2 1/4"; this makes for a snug final fit. I sometimes use scissors to cut that chalk-marked line, but I usually use a little 6X8 Olfa mat between the edge needing to be cut and the rest of the quilt and cut with a rotary cutter for a nice crisp edge.
I usually just align the two cut ends as I do for joining the binding strips, but for this little tutorial, I marked the 45-degree with a ruler and my trusty Pentel fabric gel pen. Thus, you can see how you are going to align these two ends...
I tried to show here how the just-cut binding stays horizontal, and the beginning end of the binding lies on top of and perpendicular to it.
Sew along the 45 angle.... lay it down before trimming your seams to check that it will fit...
Presto! Again, you cannot see the seam very well, which is a great thing in real life, but not for this tutorial purposes, so I drew an arrow on the photo to help you find that seam. Isn't that slick? I do have another full tutorial on this under the Tips and Tutorials tab as well.
From here you'd turn your binding to the back of the quilt and hand or machine-stitch it down. I prefer to hand-stitch it down, but I'm loving the speed of machine-stitching a binding down, but I'm not exactly loving the look....still working on it. About a year ago, Judy of Quilt Paradigm sent me to Sharon Schamber's terrific binding tutorial using GLUE!! Yes!!! Try it, and be a convert like I am! There are a couple parts to it, all worth watching.
Also, Tish of Tish's Adventures in Wonderland showed me another fantastic binding method which I have used twice now (didn't even think to use it on this quilt, duh!). It is by Aunt Marti, and called Susie's Magic Binding. Here is the video. I personally found the blog version better. She and I are going to have a conversation about the final step of applying binding. I'm hoping she can provide some insight into a better machine-stitched down version.
Speaking of Tish! Her adorable husband, David, is busy building (a more manly verb for piecing) Blue Skies but in a rectangle like Sunny Days:
| Photo courtesy of Tish; he's so intense! |
I am pinching myself to think that someone is making a pattern I designed! Hope to release it this weekend! Wiggle wiggle happy dance fist punch the air, say, "Yeah, baby!" And if Brady is around, he'll either laugh, or most likely, as he does when his mother dances, roll his eyes and go, "Oh MAN! Nanaaaa! Stop!"
Speaking of original designs and independent designers, I still have another May is for Makers post in the works. Stay tuned all you wonderful wimmin' (my friend Linda's joyful turn of phrase) and men!


