

A POST request in Postman allows you to submit data to an API for creating new records or performing server-side operations. It provides an easy way to send request payloads, verify responses, and ensure the API behaves as expected during testing.
- Used to create new resources or submit data to an API.
- Allows sending data in formats such as JSON, XML, and form-data.
- Enables quick validation of API requests and server responses without writing code.
Prerequisites
Before sending a POST request, ensure you have:
- Postman installed.
- A valid API endpoint.
- Required authentication credentials (if needed).
- Request payload (JSON, XML, or form data).
- Required request headers.
- Basic HTTP concepts
POST Request Body Types
Postman supports multiple request body formats to meet different API requirements. Choosing the correct body type ensures the server receives and processes the data correctly.
- raw: Used to send structured data such as JSON, XML, or plain text. It is the most commonly used body type for REST APIs.
- form-data: Used to submit form fields and upload files. It is commonly used in file upload APIs.
- x-www-form-urlencoded: Used to send form data as key-value pairs without file attachments. It is commonly used for HTML form submissions.
- binary: Used to upload a single file as raw binary data without additional form fields.
- GraphQL: Used to send GraphQL queries and mutations to GraphQL APIs along with any required variables.
Steps to Create and Send a POST Request
Step 1: Open Postman
Launch the Postman application to start creating API requests. You can also create a new collection to keep related requests organized.
- Open the Postman application.
- Create a new collection (optional).

Step 2: Add a New Request
Create a request inside the collection and assign a meaningful name so it can be identified and reused later.
- Click the three-dot (⋮) menu.
- Select Add Request.

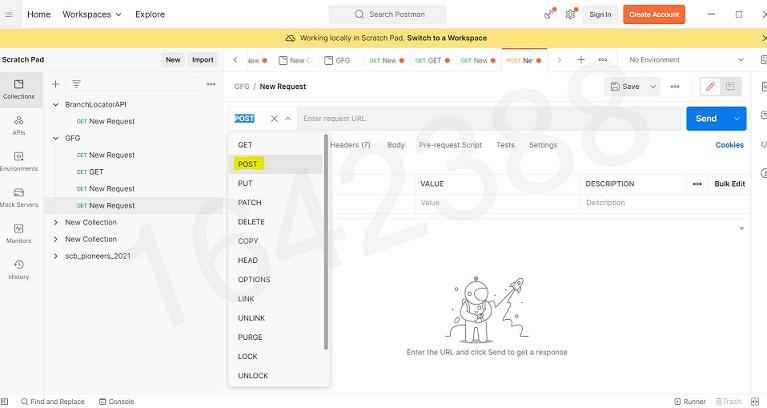
Step 3: Select the POST Method
Choose the appropriate HTTP method and specify the API endpoint that will receive the request.
- Select POST.
- Enter the API endpoint URL.
Step 4: Configure Authorization and Headers
Set up authentication and request headers required by the API before sending the request.
- Configure Authorization (if required).
- Add required headers (for example, Content-Type: application/json).
Step 5: Enter the Request Body
Provide the data that will be sent to the server in the required format, such as JSON.
- Open Body -> raw -> JSON.
- Enter the request payload.

Step 6: Send the Request and Review the Response
Click the Send button to submit the POST request to the API. After execution, verify the response to ensure the request was processed successfully.
- Click Send to execute the POST request.
- Review the status code, response body, headers, and response time.
Common Errors and Troubleshooting
POST requests may fail due to incorrect request configuration, authentication issues, or invalid data. Identifying these common errors helps ensure successful API communication.
- 400 Bad Request: Verify the request body format and ensure all required fields are provided.
- 401 Unauthorized: Check that the authentication token or API credentials are valid.
- 403 Forbidden: Confirm that you have permission to access the requested resource.
- 404 Not Found: Ensure the API endpoint URL is correct.
- 415 Unsupported Media Type: Set the correct Content-Type header (for example, application/json).
- 500 Internal Server Error: The issue is on the server side; retry later or contact the API provider.
Example
Suppose you want to create a new user using the following API endpoint:
https://jsonplaceholder.typicode.com/users
Request Body (JSON)
{
"name": "Nikita",
"username": "nikitamehrotra99",
"email": "nikz@gfg.com",
"address": {
"city": "Noida",
"zipcode": "300005"
},
"phone": "1234567890",
"website": "https://www.geeksforgeeks.org/user/nikitamehrotra99/"
}
Output