

MySQL Workbench is a graphical tool used to interact with MySQL databases through a user-friendly interface.
- It supports data modeling and database design.
- It provides server configuration and user management features.
Prerequisites
- Windows 10 or Windows 11 (64-bit)
- Microsoft Visual C++ Redistributable 2019 or later
- .NET Framework 4.5.2 or later
- Approximately 500 MB of free disk space
Method 1: Install via MySQL Installer
This method uses the official MySQL Installer to automatically download and install MySQL Workbench along with any required components on your Windows system.
Step 1: Open your preferred web browser and navigate to the official MySQL website official MySQL Website.

Step 2: Scroll down to MySQL Community (GPL) Downloads, select MySQL Workbench and click Download for Windows to download the installer.

Step 3: On the MySQL Workbench download page, click the first Download link to download the MySQL Installer for Windows.


Step 4: On the next page, click No thanks, just start my download to begin downloading the installer.

- After the download is complete, locate the MySQL Installer file (usually in your Downloads folder).
- Double-click the installer file to start the installation process.
Step 5: The MySQL Installer window will open. Click on Custom to select individual components.

Step 6: In the Select Products and Features section, locate MySQL Workbench and then expand MySQL Server 8.0.

Step 7: Then double click on the latest version & click on the drag button.

Step 8: Then expand Applications & Then expand MySQL Workbench 8.0

Step 9: Then double click on the latest version & click on the drag button.

Step 10: Then expand MySQL Shell & then expand MySQL Shell 8.0
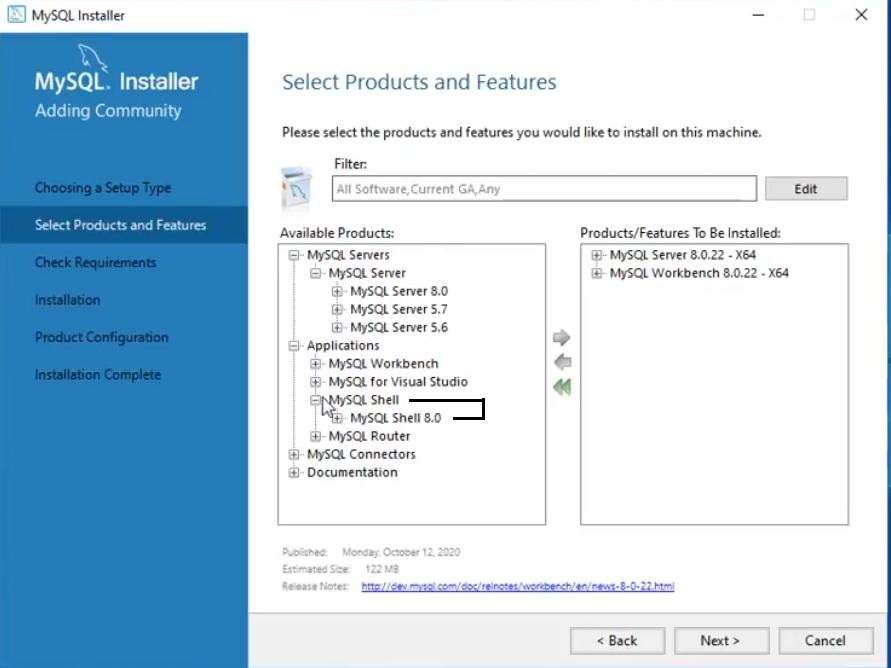
Step 11: Then double click on the latest version & click on the drag button.

Step 12: Click on Next.

Step 13: After selecting all components, click Execute to begin the installation.

Step 14: After selecting all components, click Execute to begin the installation. MySQL Installer will begin downloading and installing the selected components. This may take a few minutes, depending on your internet speed.

Step 15: Once the installation is complete, click Next.

Step 16: Click on Next.

Step 17: Click on Next

Step 18: Click on Next.

Step 19: In the configuration step, you will be prompted to configure the MySQL server. Set up a root password for your MySQL installation. Make sure to choose a strong password and remember it

Step 20: Click on Next.

Step 21: Click on Execute.

Step 22: Click Finish to complete the MySQL Workbench installation.

Step 23: Click on Next.

Step 24: Click on Finish.

Step 25: After the installation is complete, MySQL Workbench will automatically launch. If it doesn’t open automatically, you can find it in the Start Menu by searching for “MySQL Workbench.”

Hence, Your installation is successful.
Method 2: Install Using the Standalone MSI
- Visit the MySQL Workbench download page.
- Download the mysql-workbench-community-8.0.x-winx64.msi file.
- Double-click the downloaded file to start the installation.
- Follow the setup wizard: Welcome → License Agreement → Complete Setup → Install.
- Accept any User Account Control (UAC) prompts and finish the installation.
Common Troubleshooting Tips
- Connection issues: Ensure MySQL Server is running and your login credentials are correct.
- Missing components: Install any required components through the MySQL Installer.
- Installation errors: Restart your computer and run the installer as Administrator.
- System requirements: Verify that your system meets the minimum requirements for MySQL Workbench.