

RadioButton is a UI component in Android that allows users to select one option from multiple choices. Multiple RadioButtons are placed inside a RadioGroup, which ensures that only one option can be selected at a time. RadioButtons are commonly used in forms, quizzes, settings, and selection-based interfaces.
- Allows users to select only one option at a time.
- RadioButtons are grouped together using RadioGroup.
- Helps create user-friendly and organized selection interfaces.
Example:

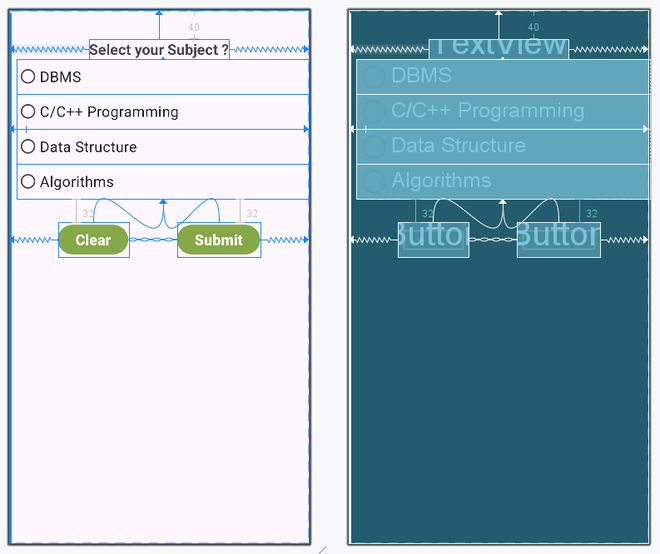
This image shows 4 options of the subjects for a question. In this, each mentioned subject is a Radio Button and all the 4 subjects together are enclosed in a Radio Group.
How to Create an Android App to Use Radio Buttons?
This example demonstrates how to create an Android application using RadioButtons and RadioGroup.
Step 1: Create a New Android Project
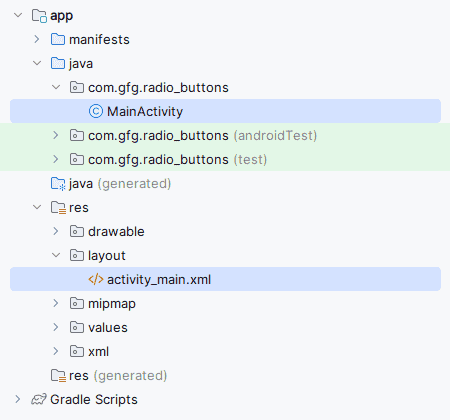
Create a new Android project in Android Studio. This will automatically generate:
activity_main.xmlMainActivity.java
Step 2: Add UI Components in activity_main.xml
Open the activity_main.xml file and add the following components inside a ConstraintLayout.
Components Used
- TextView for displaying the question
- RadioGroup to hold RadioButtons
- Four RadioButtons for options
- Submit Button
- Clear Button
activity_main.xml: (Using Constraint Layout)
<?xml version="1.0" encoding="utf-8"?>
<androidx.constraintlayout.widget.ConstraintLayout
    xmlns:android="http://schemas.android.com/apk/res/android"
    xmlns:app="http://schemas.android.com/apk/res-auto"
    xmlns:tools="http://schemas.android.com/tools"
    android:layout_width="match_parent"
    android:layout_height="match_parent"
    tools:context=".MainActivity">

    <TextView
        android:id="@+id/text_view1"
        android:layout_width="wrap_content"
        android:layout_height="wrap_content"
        android:text="Select your Subject?"
        android:textSize="20sp"
        android:textStyle="bold"
        android:layout_marginTop="40dp"
        app:layout_constraintTop_toTopOf="parent"
        app:layout_constraintStart_toStartOf="parent"
        app:layout_constraintEnd_toEndOf="parent" />

    <RadioGroup
        android:id="@+id/groupradio"
        android:layout_width="0dp"
        android:layout_height="wrap_content"
        android:layout_margin="16dp"
        android:orientation="vertical"
        app:layout_constraintTop_toBottomOf="@id/text_view1"
        app:layout_constraintStart_toStartOf="parent"
        app:layout_constraintEnd_toEndOf="parent">

        <RadioButton
            android:id="@+id/radia_id1"
            android:layout_width="match_parent"
            android:layout_height="wrap_content"
            android:text="DBMS"
            android:textSize="18sp" />

        <RadioButton
            android:id="@+id/radia_id2"
            android:layout_width="match_parent"
            android:layout_height="wrap_content"
            android:text="C/C++ Programming"
            android:textSize="18sp" />

        <RadioButton
            android:id="@+id/radia_id3"
            android:layout_width="match_parent"
            android:layout_height="wrap_content"
            android:text="Data Structure"
            android:textSize="18sp" />

        <RadioButton
            android:id="@+id/radia_id4"
            android:layout_width="match_parent"
            android:layout_height="wrap_content"
            android:text="Algorithms"
            android:textSize="18sp" />

    </RadioGroup>

    <Button
        android:id="@+id/submit"
        android:layout_width="wrap_content"
        android:layout_height="wrap_content"
        android:text="Submit"
        app:layout_constraintTop_toBottomOf="@id/groupradio"
        app:layout_constraintStart_toStartOf="parent"
        app:layout_constraintEnd_toStartOf="@id/clear"
        app:layout_constraintHorizontal_bias="0.5" />

    <Button
        android:id="@+id/clear"
        android:layout_width="wrap_content"
        android:layout_height="wrap_content"
        android:text="Clear"
        app:layout_constraintTop_toBottomOf="@id/groupradio"
        app:layout_constraintStart_toEndOf="@id/submit"
        app:layout_constraintEnd_toEndOf="parent"
        app:layout_constraintHorizontal_bias="0.5" />

</androidx.constraintlayout.widget.ConstraintLayout>
Step 3: Create Backend Logic in MainActivity.java

Open the MainActivity.java file and initialize the components using findViewById().

MainActivity.java
package com.gfg.radio_buttons;

import android.os.Bundle;
import android.widget.Button;
import android.widget.RadioButton;
import android.widget.RadioGroup;
import android.widget.Toast;

import androidx.appcompat.app.AppCompatActivity;

public class MainActivity extends AppCompatActivity {

    private RadioGroup radioGroup;
    Button submit, clear;

    @Override
    protected void onCreate(Bundle savedInstanceState) {
        super.onCreate(savedInstanceState);
        setContentView(R.layout.activity_main);

        submit = findViewById(R.id.submit);
        clear = findViewById(R.id.clear);
        radioGroup = findViewById(R.id.groupradio);

        // Reset RadioButtons initially
        radioGroup.clearCheck();

        // RadioGroup Listener
        radioGroup.setOnCheckedChangeListener(
                (group, checkedId) -> {

                    RadioButton radioButton =
                            group.findViewById(checkedId);
                });

        // Submit Button Listener
        submit.setOnClickListener(v -> {

            int selectedId =
                    radioGroup.getCheckedRadioButtonId();

            if (selectedId == -1) {

                Toast.makeText(
                        MainActivity.this,
                        "Please select an option",
                        Toast.LENGTH_SHORT
                ).show();

            } else {

                RadioButton radioButton =
                        findViewById(selectedId);

                Toast.makeText(
                        MainActivity.this,
                        "Selected: " + radioButton.getText(),
                        Toast.LENGTH_SHORT
                ).show();
            }
        });

        // Clear Button Listener
        clear.setOnClickListener(v ->
                radioGroup.clearCheck()
        );
    }
}
Layout:
Step 3: Create Backend Logic in MainActivity.java
Open the MainActivity.java file and initialize the components using findViewById().
package com.gfg.radio_buttons;

import android.os.Bundle;
import android.widget.RadioButton;
import android.widget.Toast;

import androidx.appcompat.app.AppCompatActivity;

import com.gfg.radio_buttons.databinding.ActivityMainBinding;

public class MainActivity extends AppCompatActivity {

    private ActivityMainBinding binding;

    @Override
    protected void onCreate(Bundle savedInstanceState) {
        super.onCreate(savedInstanceState);

        binding = ActivityMainBinding.inflate(getLayoutInflater());
        setContentView(binding.getRoot());

        // Reset radio buttons initially
        binding.groupradio.clearCheck();

        // Submit Button
        binding.submit.setOnClickListener(v -> {

            int selectedId =
                    binding.groupradio.getCheckedRadioButtonId();

            if (selectedId == -1) {

                Toast.makeText(
                        MainActivity.this,
                        "Please select an option",
                        Toast.LENGTH_SHORT
                ).show();

            } else {

                RadioButton radioButton =
                        findViewById(selectedId);

                Toast.makeText(
                        MainActivity.this,
                        "Selected: " + radioButton.getText(),
                        Toast.LENGTH_SHORT
                ).show();
            }
        });

        // Clear Button
        binding.clear.setOnClickListener(v ->
                binding.groupradio.clearCheck()
        );
    }
}
Step 4: Add Functionality
- Use radioGroup.clearCheck() to reset all RadioButtons initially.
- Add OnCheckedChangeListener to detect the selected RadioButton.
- Add OnClickListener on the Submit button to display the selected option using Toast.
- Add OnClickListener on the Clear button to reset all RadioButtons.
Output:
- The app displays four subject options.
- Users can select one option at a time.
- The selected option is displayed when Submit is clicked.
- All options are cleared when Clear is clicked.

Working of the Application
- The application displays multiple RadioButtons inside a RadioGroup.
- Only one RadioButton can be selected at a time.
- Clicking the Submit button displays the selected option using Toast.
- Clicking the Clear button resets all RadioButtons.
Advantages of RadioButton
- Allows single-option selection from multiple choices.
- Improves user interaction and form handling.
- Easy to implement using RadioGroup.
- Commonly used in quizzes, surveys, and settings.
- Provides a clean and organized UI.