wordsfromanneli

Thoughts, ideas, photos, and stories.


34 Comments

Cottage Cheesecake

One night not too long ago we made pizzas at home. I hope to do another blog post about that in a few days, but for today I want to focus on the cake in the foreground.

One of my cousins made a cake like this for a birthday party several years ago and I liked it so much I’ve been making it ever since. Not all the time, but whenever I get a craving for something really tasty that isn’t nearly as full of calories as it looks.

First, yes, it’s a cherry cheesecake, but it’s not made with fatty cream cheese. It’s made with cottage cheese, and that makes a huge difference.

Here’s what to do:

For the “crust” I use grated Graham wafers. I put them through my food processor and the wafers turn to crumbs in seconds. In the days before I had a food processor, I used to crush the wafers with a rolling pin.

You’ll need one cup of the crushed crumbs. Add a quarter cup of melted butter and a sprinkle of cinnamon. Toss the mixture with a fork and pour it into a pie plate or a springform cake tin with a flat bottom. Press the crumbs down to make a crust.

This is what it looks like when it’s baked in a glass pie plate with the cottage cheese mixture already in it.

Here are the ingredients for the crust:

1 cup Graham wafer crumbs

1/4 cup melted butter

2 Tablespoons of sugar

sprinkle of cinnamon


Preheat the oven to 325 degrees.

Then in the rinsed out food processor, put in all of the ingredients listed below and mix them with the processor until the mixture is smooth and creamy. Pour the mixture into the prepared crust.

At this point, if you are going to use cherries, use pitted ones, or scoop some out of the can of cherry pie filling and drop a few here and there into the creamy cake filling.

Then put the cake into the oven for one hour.

Here are the ingredients for the filling:

2 cups cottage cheese

1/2 cup of milk

2 eggs

3 Tbsp. all-purpose flour

2 Tbsp. lemon juice

1 tsp. vanilla extract

2/3 cup (or a bit less) white sugar

1/4 tsp. salt


When the cake is done and the center is no longer liquid, take the cake out of the oven and set aside to cool, and possibly even put it in the fridge once it’s cool enough.

When the cake is chilled, pour the rest of the cherry pie filling on top and spread it around nearly to the edge of the cake.

Whip  some cream. I probably use about a cup and a half of whipping cream. To keep the whipping cream from going runny, when it is nearly thick enough with only about 15 to 30 seconds of whipping left to do, I add a teaspoon of powdered sugar, half a tsp. of vanilla, and a scant 1/4 cup of warm water that has about a tsp. of gelatin dissolved in it. It has no flavour, is good for you, but is not noticeable in the whipped cream. That gelatin will help the cream keep its shape on the cake rather than running down all over the cake in a milky water.

I use a tablespoon to put blobs of whipped cream all around the edge of the cake. Then I grate a bit of chocolate onto the whipped cream.

Here is the cake with a pineapple filling on top.


You can use other fruit instead of the cherry pie filling. I’ve used canned cherries and used the juice to make a sauce with a bit of sugar and cornstarch, boiled for a few minutes. Pour the cooled sauce over the cherries and then proceed with putting the whipped cream and chocolate on.

I’ve tried it with crushed pineapple, and I’d like to try it with peaches and cream.

This one that I made today has pineapple topping, whipped cream, a few cherries cut up on top, and some chocolate sprinkles. That’s it. A low-cal cheesecake that is delicious.

I’ll add the pineapple filling recipe here in case you want to use it sometime (made with canned pineapple):

Pineapple Filling

1/2 cup sugar

2 Tbsp. cornstarch

1/4 tsp. salt

1/2 cup orange juice

1/2 cup pineapple juice

2/3 cup crushed pineapple

2 Tbsp. lemon juice

2 Tbsp. butter

1/2 cup coconut

In a saucepan mix sugar and cornstarch; add salt and orange juice and pineapple juice. Cook 5 minutes, stirring constantly. Add crushed pineapple and lemon juice. Cook 2 minutes longer. Remove from heat. Stir in butter and coconut. Chill.

*****

What I like best about this dessert is that you don’t come away from the table feeling like you’ve been gut-bombed.

(I guess that’s not very ladylike, but who said I was a lady?)

28 Comments

Cinnamon Rolls

Sometimes they are called “Sticky Buns.”

Make your easy bread dough with small variations. I doubled the recipe and added a bit more butter and two eggs to the dough. That seems to make it lighter. I’ll put the recipe at the end.

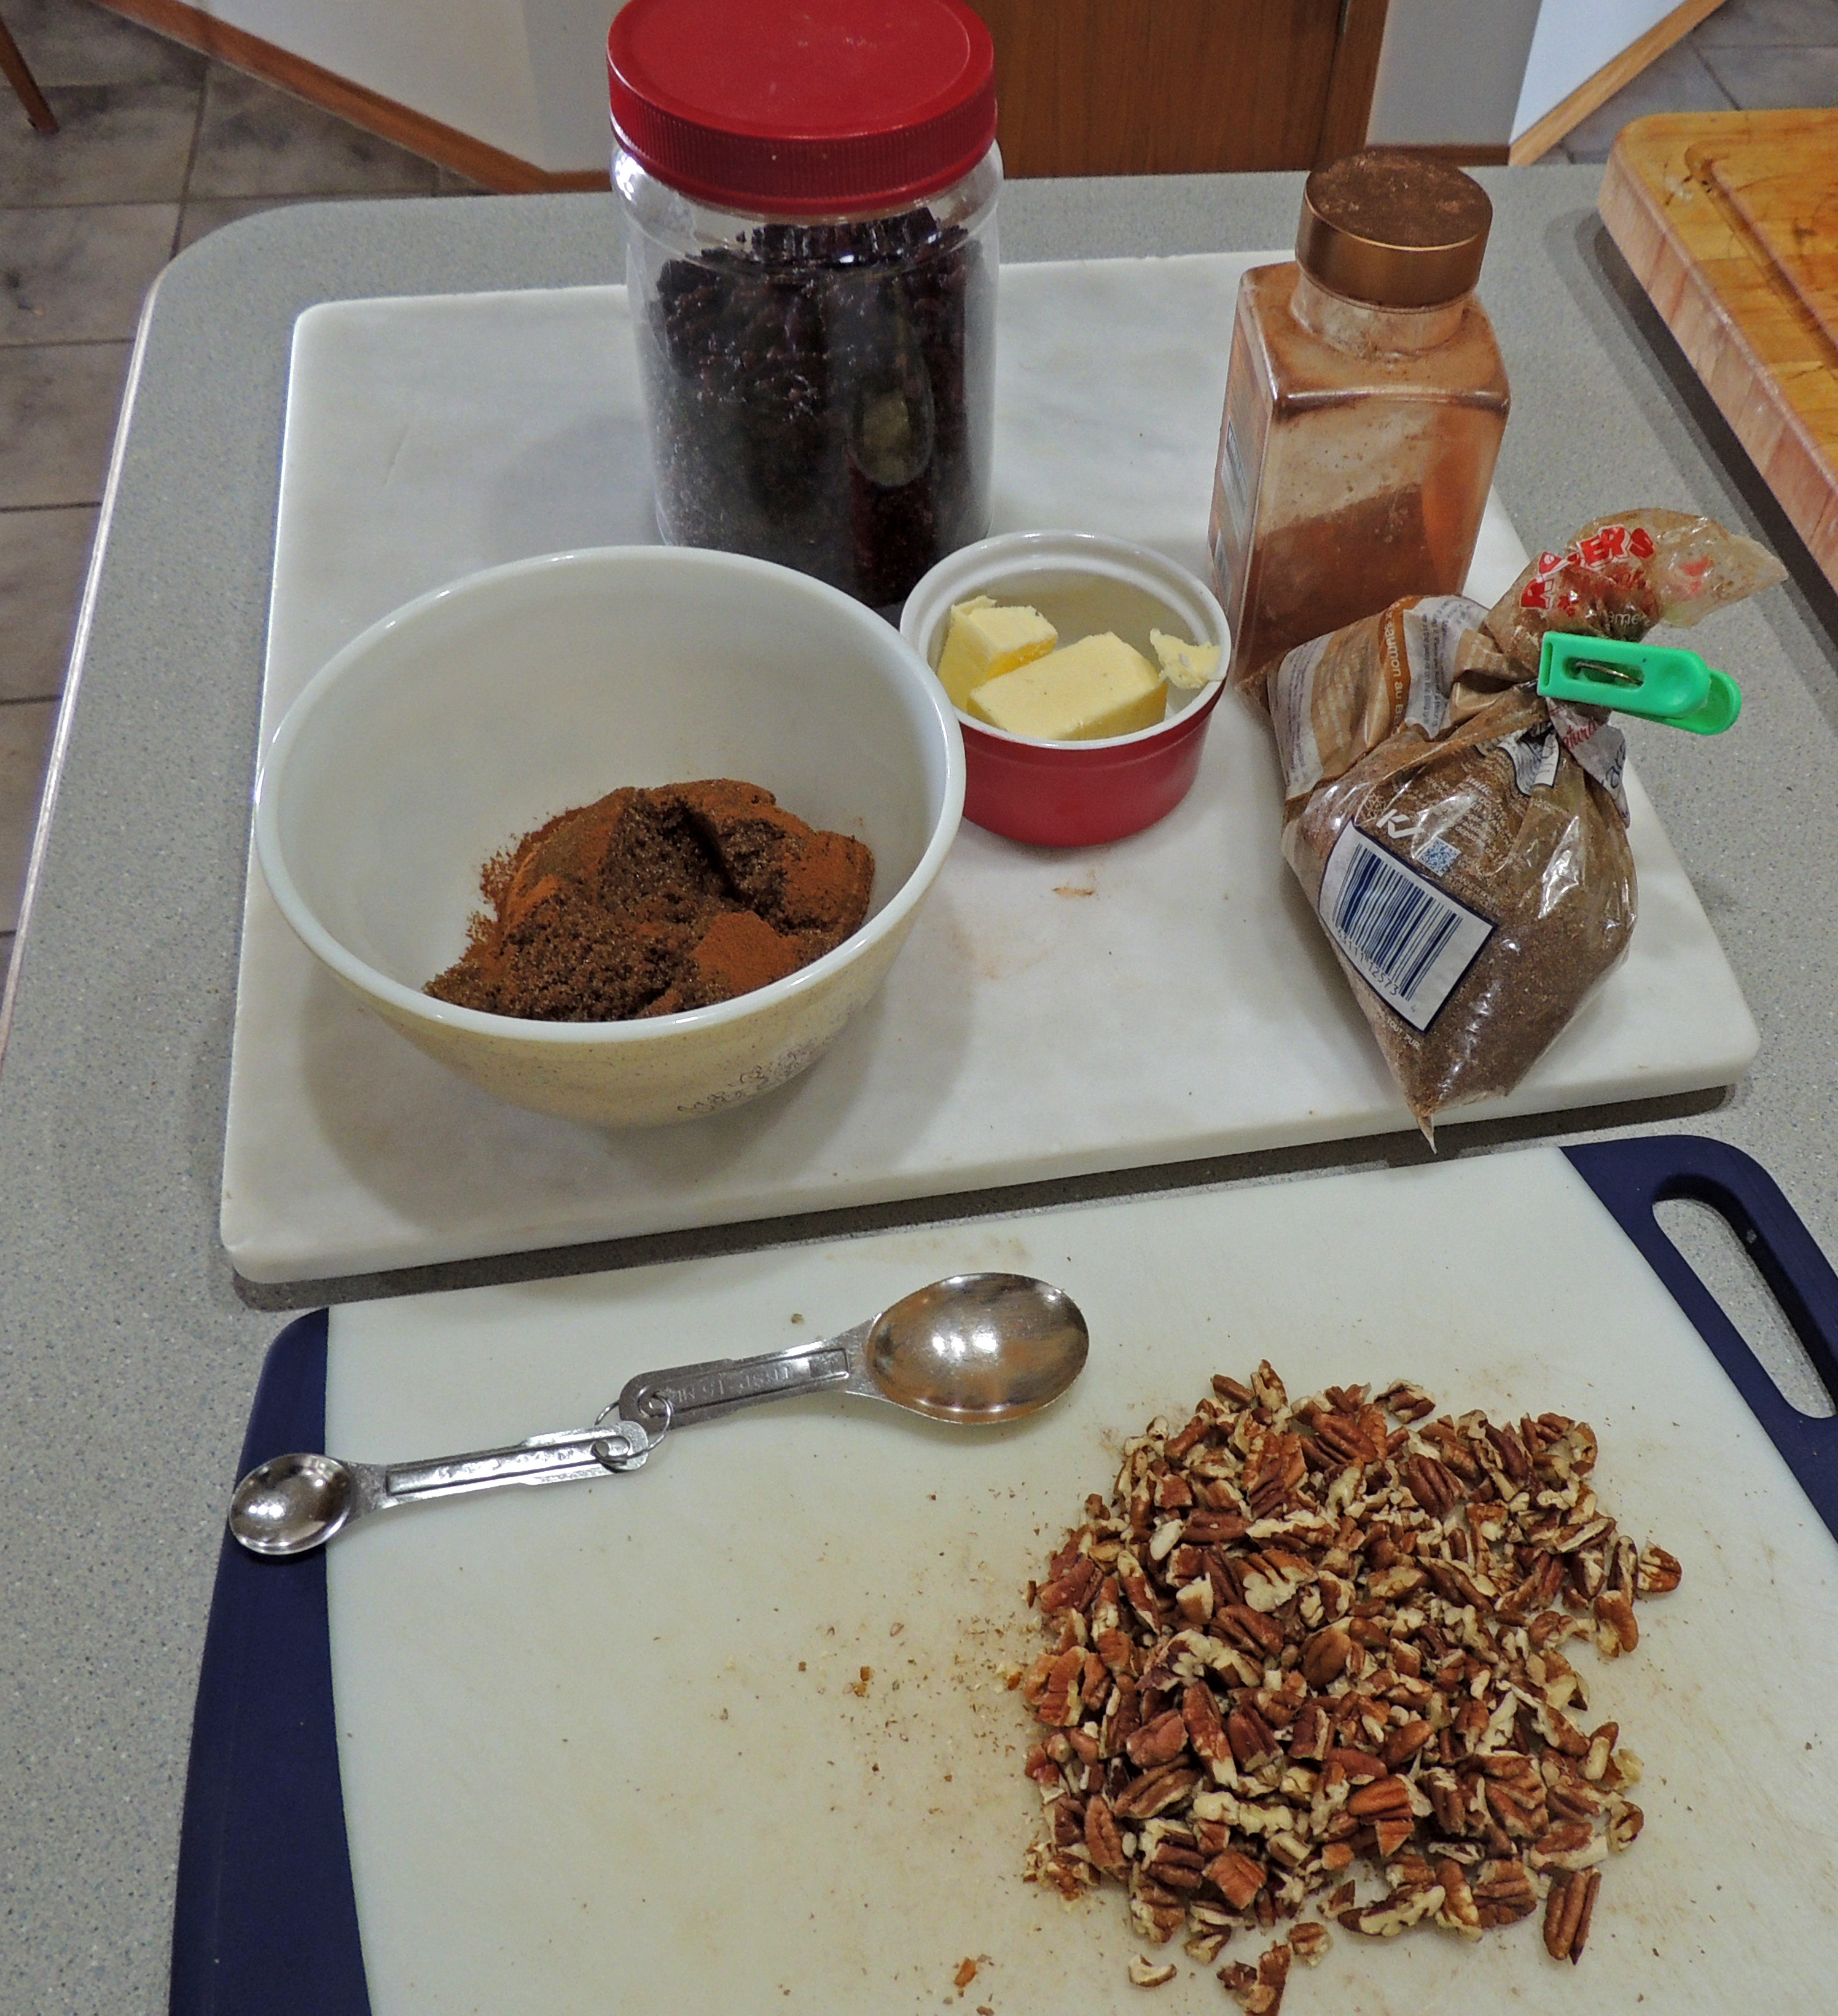
You’ll need the ingredients shown in the photo below:

Cinnamon, butter, brown sugar, raisins (or currants), pecans (or walnuts).

After letting the dough rise in a big bowl in a barely warm oven, cut it in half and roll out each half (one at a time).

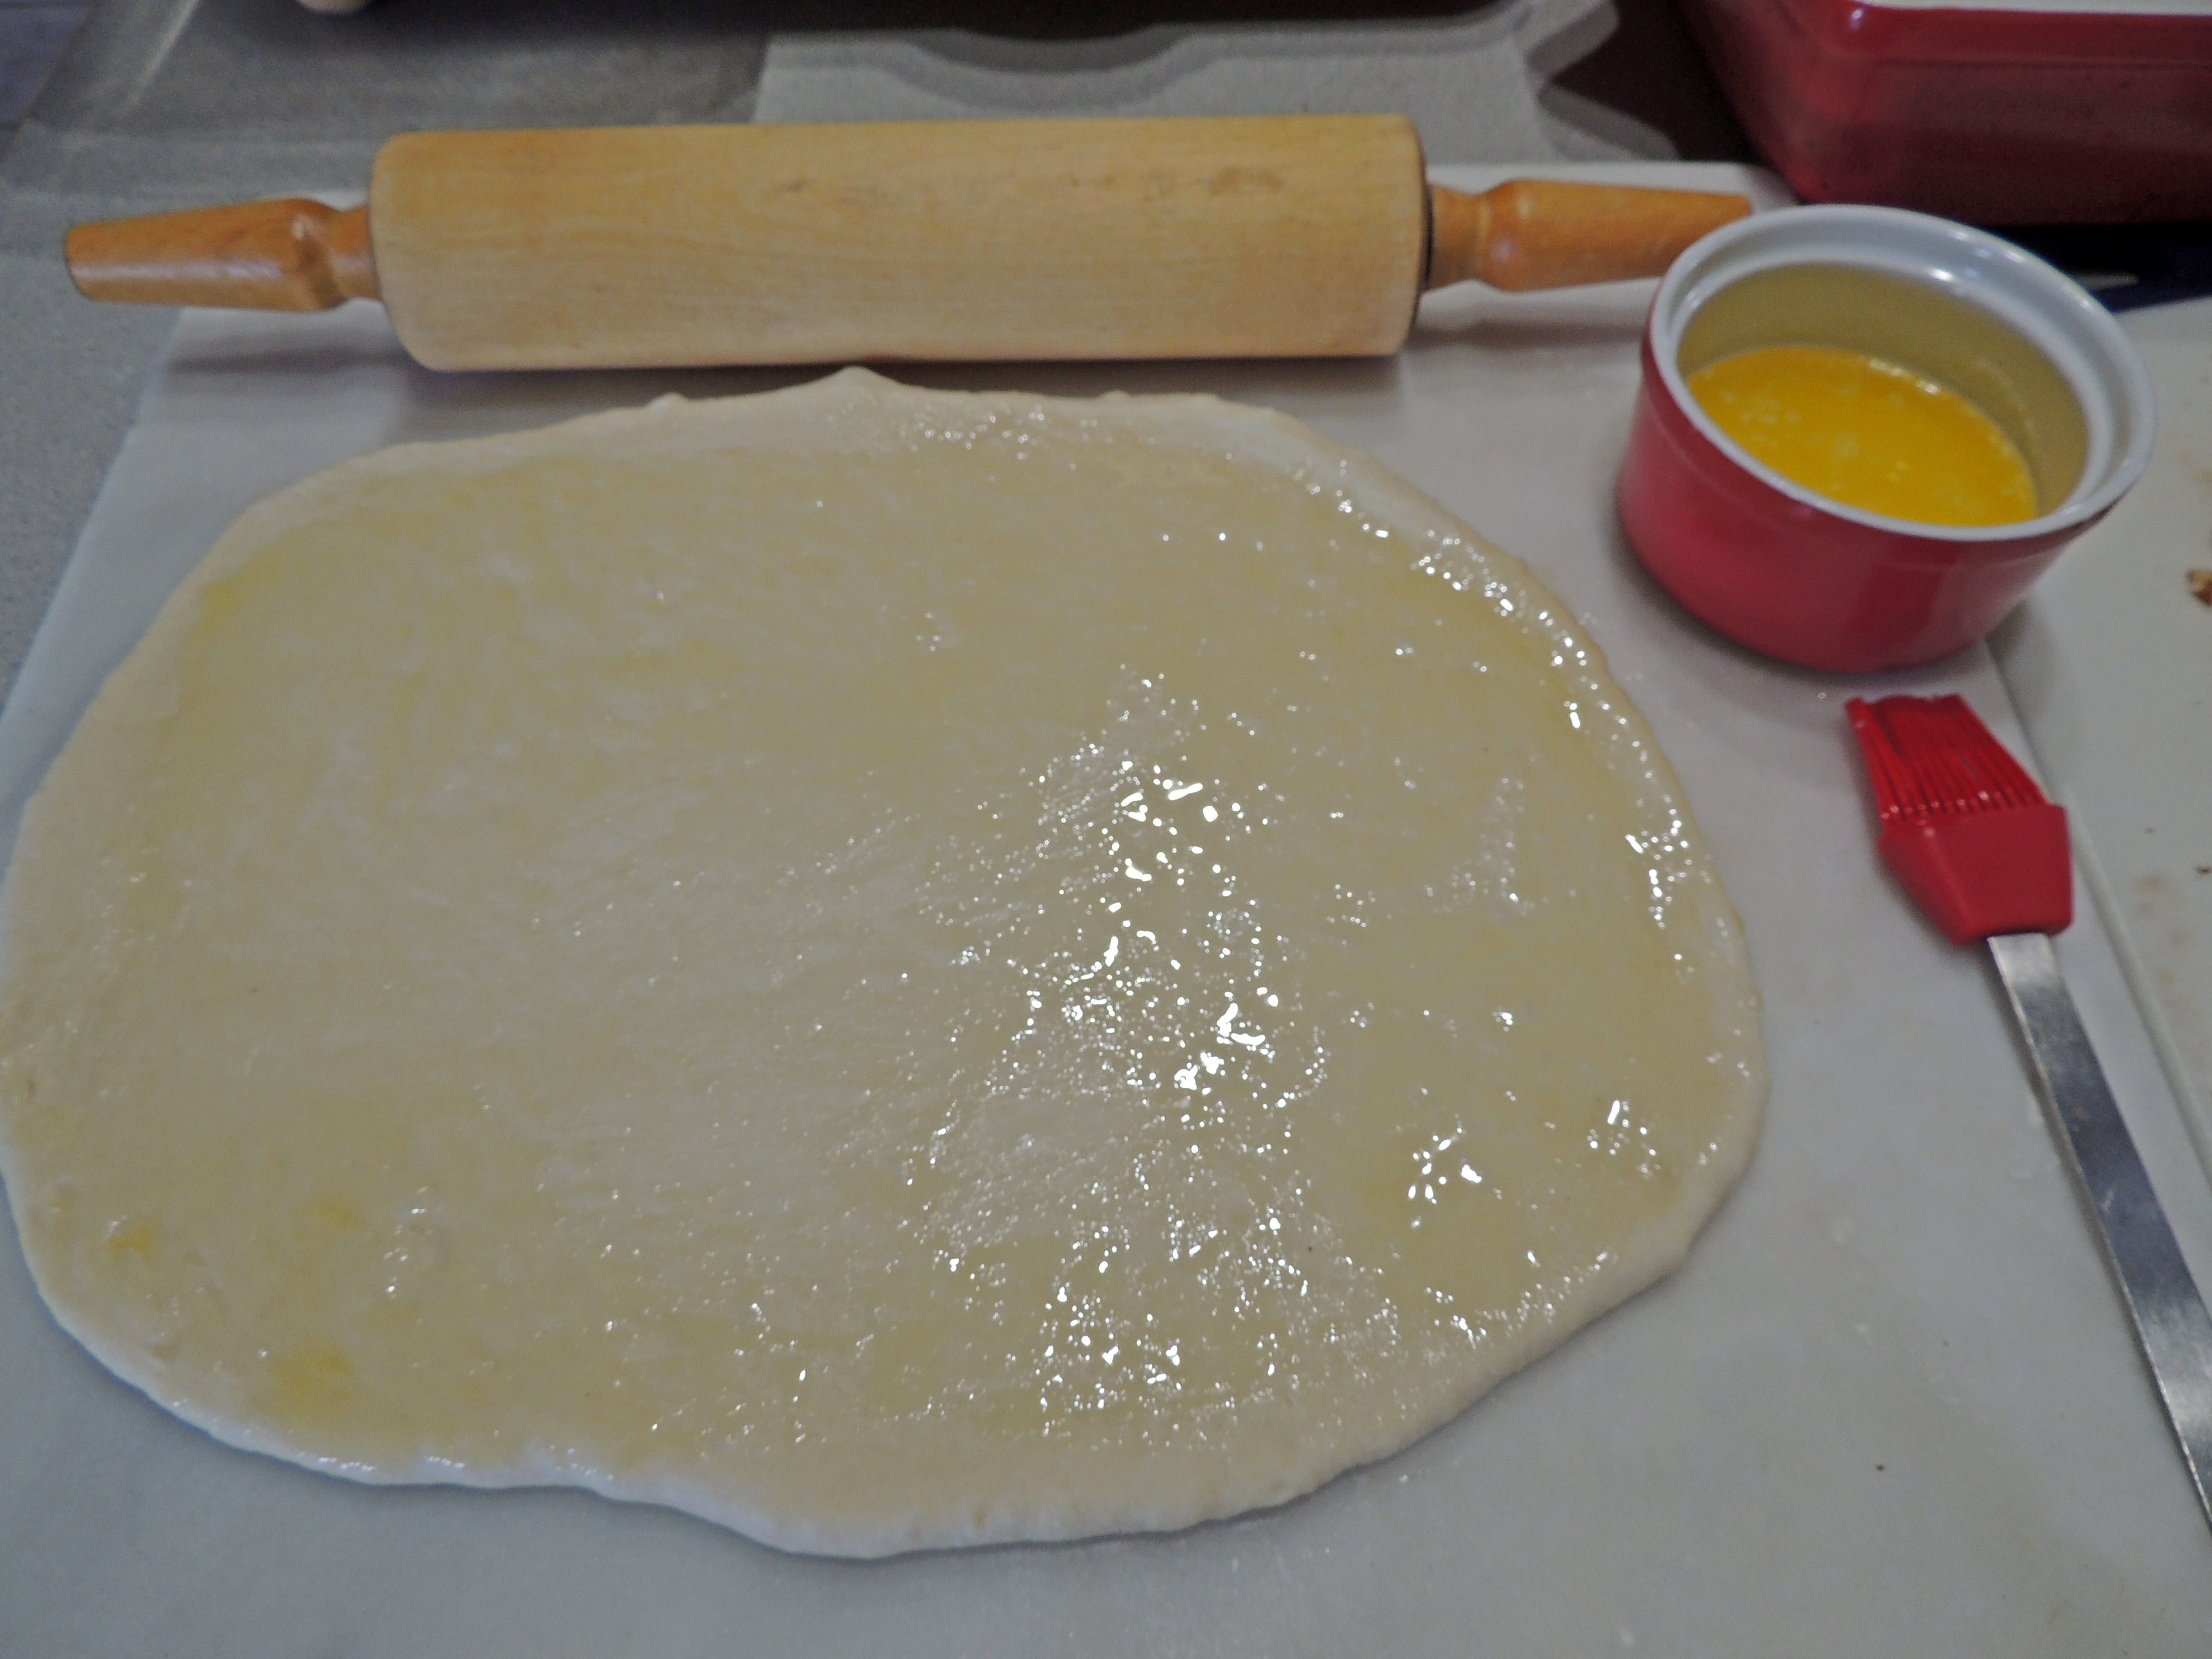
Spread melted butter on the rolled out dough.

Sprinkle with brown sugar (maybe not as much as what is shown in this photo), cinnamon, currants, and pecans.

Roll up the dough and cut the roll into 12 pieces. I usually cut it in half, and then cut the halves in half, and then those four pieces are cut into three pieces, making twelve pieces in all.

Butter the 9″ x 13″ baking dishes, especially buttering the sides well, and place the twelve pieces in each dish. They will rise in a warm place and grow together as they rise.

In this photo, I don’t have anything in the bottom of the baking dishes except butter. These will be regular cinnamon buns.

If you want sticky buns, for two baking dishes (two dozen rolls) put 1/2 cup of butter, 1 and 1/3 cups brown sugar, and 1/3 cup water in a saucepan and bring it to a boil for about a minute. Then pour that syrupy mixture into the prepared baking dish and sprinkle some pecan halves in the bottom of the dish before putting the rolled up dough pieces in the dish.

When the buns have risen so they are touching each other, preheat oven and bake at 375 degrees for 35 minutes.

In this batch I put the sticky syrup in the bottom of each dish so when I inverted the buns, they have the melted brown sugar and pecans on the top.

A little tip for inverting the very hot baking dishes — wear oven mitts, and make sure to loosen the sides (why you did the good buttering job). Place a platter over the buns. Flip the whole baking dish with the platter on top so that platter is now on the bottom. Then loosen and remove the baking dish.

The basic dough recipe (for the two pans of cinnamon rolls, I doubled the recipe below, so 4 cups of milk, 4 tbsp. butter, etc.):


2 cups of  lukewarm milk

2 tbsp. butter

2 tbsp. honey (or sugar)

2 tsp. salt

1 egg (if you want it)

5 cups flour (adjust as needed)

2 tsp. fast acting  (instant) yeast

*****

What I do:

I pour the milk into a big measuring cup and put it in the microwave for two minutes.

Pour the warm milk into the bread pan in the bread machine (if you’re using a bread machine on the dough setting) or into the bowl of your Kitchen Aid mixer.

  • I just remembered that in a bread machine you might only be able to do a single batch of dough. In the mixer, or by hand, you can double the recipe.

Add the butter, salt, and honey.

Then, add some of the flour. I added a couple of cups of flour and then added an egg or two if doubling (the flour having cooled the mixture a little so I don’t end up with bits of cooked egg). Then I add the instant yeast and the rest of the flour.

Mix and knead as necessary. Put into a big bowl in a barely warm oven to rise.

*****


12 Comments

Almond Squares

This post is a repeat of one from June of 2018 but I’m still baking these almond squares because they’re so quick and easy to do. It works well if you have company coming, any time of year, or if you just feel you want to indulge yourself.

Here it is again. You can use hazelnuts or pecans instead of almonds. Also, I added some shredded coconut in the batter and on top. Sometimes I just put coconut on the top.

This is a very easy recipe (ingredients listed at the end), but I have to warn you, it is really sweet. I cut back on some of the sugar and it is still sweet.

*** You can easily use half the sugar or less and it will still be good. I’ve tried it.

Preheat the oven to 350 degrees.

Crust:

First, put into your food processor, 2 cups of white flour, 1/2 cup of icing sugar, and a cup of butter. Pulse it a few times to cut the butter into the flour mixture so it is evenly mixed and is the texture of soft sand.

Put the mixture into a 9 by 13 baking dish (I like my glass one), and gently but firmly press the mixture down to flatten it. This will be the crust which will resemble shortbread. No need to grease the pan.

Topping:

While the crust is in the oven baking for 10 to 15 minutes (until it is just turning a pale golden brown), chop one cup of almonds (or you can use already sliced almonds).

For the liquid ingredients, you can do this right in the food processor or do it in a bowl with a whisk.

Break four eggs into the processor. Add 1 cup of sugar, 1/3 cup of corn syrup (you could probably use honey, but I haven’t tried it), 1/2 cup of melted butter, 2 tablespoons flour, and 1/2 teaspoon almond extract (or vanilla or lemon or whatever you want). Give it a few pulses. Add the cup of chopped almonds. Mix again.

 Then check on your crust to see if it is golden brown yet.

Take the baking pan out of the oven and be ready to pour the egg and almond mixture onto the hot crust.


As soon as you have the liquid mixture poured onto the crust, you can sprinkle shredded coconut on top at this point (if you like coconut). Then put the baking dish back in the oven, still on 350, and bake for another 25 to 28 minutes.


When the time is up, the topping should be a rich golden brown and be slightly puffy. This will collapse in a few minutes as it cools, and that’s fine. It’s what you want it to do.


As soon as you can no longer stand to wait, pour yourself a cup of coffee (or tea), and cut some squares from the pan of almond bars. They are even better if chilled.


Enjoy!

Ingredients:

Crust –

2 cups flour

1/2 cup powdered sugar (icing sugar)

1 cup butter

Topping –

2 cups sugar (I think it’s way too much… I only use 1 cup)

1 cup chopped almonds

4 eggs, slightly beaten

1/2 cup melted butter

1/3 cup corn syrup (or honey?)

2 tablespoons flour

1/2 teaspoon almond extract


The finished squares freeze well on a paper plate inside a ziploc freezer bag. Funny thing is though, they disappear quickly no matter where you store them.

  • Remember, you can use any kind of nut substitutions you want. I recently used pecans instead of almonds and it worked really well.
  • LESS sugar!!!


30 Comments

Before and After and After

Earlier this spring, I was bragging about how many blossoms were on our transparent apple tree.

Later, many of these blossoms turned into apples. If you’re not familiar with transparent apples, you might think it would be great to just take a big chomp of one of these apples and enjoy the juicy freshness. You would be disappointed. It would be juicy and fresh, but it would be mouth-puckering sour. The very ripe ones are okay for eating, but the best are the just barely ripe ones that are crying out to be turned into a pie.

Notice that the apples weigh a lot more than those pretty white fluffy flowers. We had to prop up the branches so they wouldn’t break under the weight of the apples and the tree is already leaning from the load.

I picked a bunch of the apples to lighten the load. In the house, I peeled and cut them and put them into a bowl with a mixture of brown sugar, cinnamon and a couple of tablespoons of flour.

Then the food processor made the job of making a pie crust easy, and as they say the rest is history. Well, the pie was, anyway. I was lucky to get this photo before it all disappeared.  Funny how apple pie just seems to evaporate whenever there’s a cup of tea or coffee around.

Apple blossoms, apples high,

Up on branches to the sky,

Pick them, peel them, apples all,

No sense waiting ’til they fall.


Long awaited, now they’re ripe,

Just be patient and don’t gripe,

Apple pieces in the pie,

Taste so lovely, my, oh, my!


60 Comments

Scones – So Easy!


I have copied two recipes here. I have ended up combining them and making small changes. I’ve put my own (easier) version at the end of this post, but feel free to try out these recipes straight from the book. Beware of the ingredient list saying to use lard and/or margarine. I didn’t notice that it says that on the recipe until a commenter pointed it out. I always use butter, even though it has fat problems of its own. But margarine makes me shudder (sorry, if you’re a margarine fan) and lard is probably a quicker path to a heart attack than butter is, but that’s just my humble opinion.

The scones are very easy to make if you have a food processor to mix the butter with the flour. The old pastry blender method is just too much work.

Some changes to the recipe?

I only use the baking soda if I add a squeeze of lemon (and I usually do add lemon).

I use two eggs if I have them to spare, rather than only one. One time I completely forgot to put the eggs in and they still turned out okay. The biscuit is very forgiving that way.

You can add grated cheese instead of currants. Probably there are a lot of things you could add if you wanted (chopped nuts, dried cranberries, raisins), but preferably not all in one batch.

One thing you don’t want to do is handle the dough too much. It makes the biscuits tougher if you do.

Here is my version of the recipe. You can substitute and change things without fear of doing too much damage.  I like to use a lot of sour cream and less milk, but it depends what’s in the fridge that day.

Scones

All the dry ingredients go into the food processor:

3 cups flour

1/2 tsp. salt

3 tsp. baking powder

1 tsp. baking soda (if using a squeeze of lemon for flavour)

3 Tbsp. sugar (optional)

Then add about 3/4 cup (or up to 1 cup) of butter and pulse the food processor until the butter is cut into the flour mixture evenly.

Pour the dry mixture that now has the butter in it, into a large bowl.

Add the currants or whatever additive you’ve decided on (dates, dried cranberries, nuts, or cheese) and stir them into the flour mixture.

Next step:

In a large measuring cup, stir an egg (or two if you like) with a whisk, reserving some of the egg mixture for a wash on top of the batter before putting it in the oven.  Add enough milk to make a cup. At this point I also add, as part of that one cup of liquid, whatever I have on hand (yogurt or sour cream) and a generous squeeze of lemon or lime – just to get the baking soda working well. You may have to add a drop more liquid if you use sour cream or yogurt. Mix the liquid well with a whisk.

Pour the liquid into the large bowl with the dry ingredients and mix gently (more like folding it in).

Pat the dough together and flatten it on a buttered cookie sheet. Use your lightly floured hands to press it out into a rectangle about half to three-quarters of an inch, and paint with the egg wash. Cut the batter into about 15 squares (two lengthwise cuts and four crosswise cuts). Put into the preheated oven at 400 for 25 to 30 minutes until they are golden brown.

Make yourself a cup of tea or coffee and enjoy.


50 Comments

Apple Time

It’s apple time again.  If you’re lucky enough to have an apple tree, it’s practically your duty to make a pie or two.

Here we go:

Peel and cut up the apples into a big bowl. Save your peelings for the compost.

In a small bowl, mix up some brown sugar (maybe two to four tablespoons – depends on how sour the apples are), two tablespoons of flour, and a generous sprinkle of cinnamon.

Add the sugar/cinnamon mixture to the apples and stir to coat the apples.

In a food processor, put two cups of flour, a cup of butter, a pinch of salt, and a quarter cup of sugar. Pulse it a few times to blend.

In a measuring cup put one egg yolk and add cold water to make about 3/4 of a cup.

Mix the egg yolk and water with a fork and add to the food processor. Pulse it just a few times to mix it and then put the dough onto a board for rolling out.

Put the egg white in a dish and add a dash of half and half cream for brushing the top of the crust before baking (so save that for a bit later when the pies are almost ready to put in the oven).

Handling the dough as little as possible, press it into a big lump. Cut it in two (for two pies) and cut each piece in two once more (for the bottom and top of each pie – so, four pieces).

Roll out the pieces of dough, doing the bottom layer first so you can put half of the apples in each pie dish. I’ve found that an easy way to move the dough from the board to the pie plate is to fold it in half, lay it on half the dish, and then unfold it.  Don’t worry if the rolled out dough has rough edges. Those will be trimmed off after the “lid” is put on.

Brush the top of the pies with the egg white mixture. Cut some slits into the pie crust to allow steam to escape while it’s baking.  Have the oven preheated to 450. Bake for 12-15 minutes until the top crust begins to brown. Turn the oven down to 350 and bake for another 30-35 minutes, until you see juice bubbling as it tries to get out of the crust.

It’s best to let the pie cool a bit before trying to cut it and putting it on a plate, but once it has cooled slightly, it will hold together better. That’s the time to serve it up and enjoy!


35 Comments

Bran Muffins Plus

I’ve made these muffins a few times now, and  find they are very forgiving, so I get braver each time.

This time I’ve added cranberries, coconut, pecans, and dates to the main recipe, but you don’t have to do that. You probably could add a lot of other things instead, if you felt adventurous. If you have a nut allergy, of course you would leave out the nuts. Just put in what you feel like adding.

The bottom line is, they are very easy to make and taste great.

The basic recipe is at the bottom of the page.

The loaf tin has hardly anything in it, but that’s where I always put the extra batter I have left over. Nothing is ever wasted.

Bran Muffins (Basic Recipe)

Preheat oven to 350 degrees.

In a big bowl, mix:

2 cups flour

2 cups bran

1 and 1/4 tsp. baking soda

1/4 tsp. salt

3/4 cup shredded unsweetened coconut (optional)

1 cup chopped nuts (optional)

1 cup raisins (optional)

I add the cranberries and dates to the measuring cup with the wet ingredients (below), mainly so the flour doesn’t stick to them and make white lumps in the batter.

1 cup cranberries (optional –  I use frozen cranberries that I thawed out in a small measuring cup with hot water – drain the water, of course)

1 cup chopped dates (optional, but really good)

In a big measuring cup:

2 cups milk with the juice of half a lemon

1 egg (lightly beaten and added to milk)

1/2 cup molasses

About 3 Tbsp. melted butter (use it to brush the muffin tin and the loaf tin and add the rest of the butter to the liquid.

***

Add liquid ingredients to dry ones in the bowl and mix as much as you need to, the less the better.

Fill muffin tin to about the top of each “cup” and pour the leftover batter into the loaf tin. The batter will be a bit on the runny side.

Bake at 350 degrees for 25 minutes.

** The muffins will get higher if you add fewer of the optional ingredients, but the texture still came out good even with all the heavy things I added.

If you don’t have molasses in the house, you could probably substitute a half cup of brown sugar and put it into the bowl with the dry ingredients.

Best enjoyed with a friend visiting, but tastes great all alone too.


35 Comments

The Egg Family

Father, Mother, and Junior have egged me on to do this post about them. My ideas were a bit scrambled and I didn’t know eggzactly what to do, but I poached this idea from a long eggo post.

The sunny side up about this whole thing is that the yolk is on them because I’m the one having the fun.

You may notice that the big daddy of all eggs is green with envy. He wanted to be like the others, but his wife, the mother egg, got browned off with all his complaining.  Her baby is browned off too, but as it turned out later, he was all bluster on the outside and runny guts on the inside. Father Egg always said Junior was coddled too much, but he still gave him his benedict – shun.

“Remember that we’re all the same on the inside. Our outer shell may be different but, for better or worse, we’re all whites on the inside,” Father Egg said.
“Yeah and a bit of yellow belly. That comes from being destined to be a chicken,” Mother Egg said.

Father Egg said, “I know I should never have left Denver and the other omelettes. You are the most deviled egg I’ve ever met. I know you think that was a wise crack you made, but in the end that crack will be your demise.”

“Fiddle faddle,” said Mother Egg. “Trying to be so hard boiled. You really are just a shell of a man.”

“Be careful, Mother,” said Father Egg. “You think I’m just over easy, but I know egg-I who was too eggcitable, and was always foaming at the mouth until his people had the idea of whipping him up into a lemon meringue pie.”

“That won’t happen to me,” said Mother Egg. “I’m just going to set here and write my memoirs. Someday omeletters will be in the museum archives and I’ll be famous. Junior can help me.”

“Oh no,” clucked Junior. “I’m too much of a chicken.”

“All right,” said Father Egg, “It’s time for some more yolks. Did you hear the one about the guy who went into the restaurant and asked what the specials were. The waiter said, “I recommend the cold tongue sandwich.”

“What?!” the guy said. “Me? Eat something that someone else has had in their mouth?”

“Oh, pardon me,” said the waiter. “Well, let’s see. How about an egg then?”

And so it went until they all cracked up and took a flying leap into the frying pan.

It turned out that big daddy turned out to be twice the man anyone thought he was. Here he is in the bowl. He had an eggstra yolk to tell, but we never got to hear it.