Altenew Class

A couple of months ago I signed up for a class with the stamp company called Altenew.  This is a great stamp company that offers a lot of fun products that all coordinate with each other.  One of my favorite things they have are stencils to go with their stamp sets and dies.  I have never been very good at coloring and stencils make it so much easier.  You can’t mess up a stencil very easily.

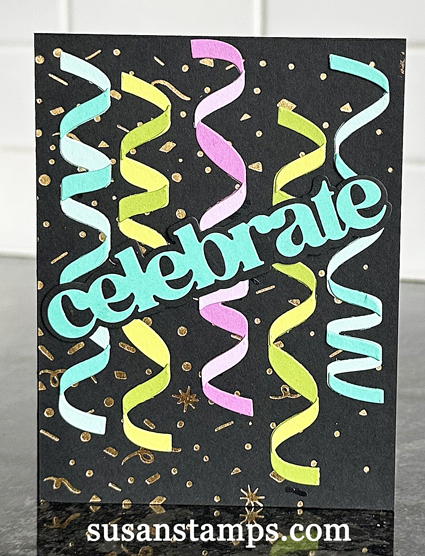
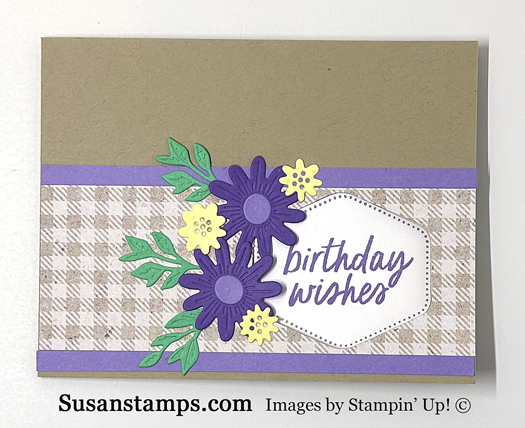
Here are some of the cards we made at this class:

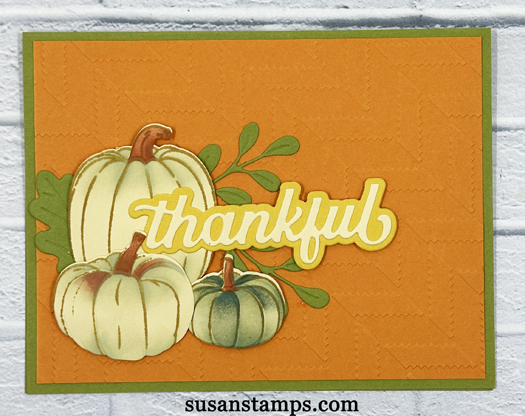
To make the cards you first stamp the pumpkins (which is one very large stamp) onto cardstock.  Then you use the four stencils to add the colors and depth.  This particular set is called Sweet Pumpkins.  The stamp set has the one pumpkin stamp as well as twelve sentiments.  The stencils let you color the pumpkins and the leaves.  Then there embossing folder which embosses the pumpkins and the die cuts everything out at once.  There are also smaller dies that cut out some of the sentiments and a background for the sentiments such as in the “thankful” sentiment above.

If you haven’t tried stencils with coordinating stamps you really should!


A New Era

Hello everyone.

I know it has been a long time since I have posted anything.  Life just kind of got in the way.

Keeping up a blog is a lot of work and takes a lot of time.  First of all, you have to have a reason to blog.  Of course, my main reason was to share my love of stamping and Stampin’ Up!®.  Therefore, I would sit for long periods of time to come up with an idea for a card and then make it.  Then, once you create something you have to photograph it, edit it, and then post it.  Then you have to write about it.  All of this takes a lot of time and a lot of sitting.

One day, I realized that I had gained a lot of weight from so much sitting and I needed to do something about it.  So I took a break, started to exercise, eat healthier and take better care of myself.  It was hard work, but I did it and I feel so much better.  I ended up loosing 60+ pounds (see photo below).

The next big decision I made was to resign from being a Stampin’ Up!®  demonstrator.  Stampin’ Up!®  is a great company and I love their products but they have gone in a new direction that doesn’t work well for me.  Their catalogs and products are mostly aimed for the new stamper and I guess I outgrew them.  I have been taking a lot of classes from other companies and people who are not affiliated with SU, learning new things and using different products that Stampin’ Up!®  doesn’t offer.  I discovered a whole new world out there.

I am not sure how much I will post.  I might just put up something I made without the long explanation on how I made it but just list the names of the products.  We will see how it goes.

Thanks for all of your support over the years.  We will see you soon!

Susan

The old me and the new me.

timestampe=1682519157

Birthday Celebrations

Pinkfresh Celebration Streamers

I know it has been a while since I past posted but life has gotten in the way of my stamping.  We moved to the cottage a couple of weeks ago but to do that, there was a lot of prep work to be done.  We had to close up the house for the summer as well as pack what we needed at the cottage (including my stamp supplies).  Then we got up one morning at 2 AM!!! in order to get on the road and drive 14 hours in one day.  Then, of course, there was the unpacking and opening up the cottage to live in.  In any case, we are here and loving every minute of it.

I made this card using some products from The Greetery called Celebration Streamers.  I saw them online and knew I had to have them.  I cut the streamers out using various Stampin’ Up!®  colors (which are listed below).  Each streamers has 5 or 6 pieces to it that are cut out by one die.  They were very simple to put together.  After making the streamers I decided to put them on black card stock for a wow look.  I used the Ticker Tape Hot Foil Plate for the background with Gold Foil.  The sentiment is from an Altenew stamp and die set called Timeless Sentiments 2.  I love how it cuts out the letters as well as the background.

;


Frames & Flowers

Stampin Up Frames & Flowers

Stampin’ Up!®  has some fun new products in the 2024-2025 Annual Catalog.  Besides stamp sets and dies, they also have added Ephemera Packs to the line up.  There are four different ones plus one set of Designer Series Paper packs that includes some.  Ephemera Packs are precut images and sentiments that you can use to make quick and easy, but beautiful cards with.

I decided to use the Frames & Flowers Designer Series Paper pack which includes DSP (of course) and Ephemera images of wreaths, leaves and flowers.  I cut a 4″ x 5.25″ piece of the Frames & Flowers DSP and adhered it to a Pretty Peacock card base.  Next, I stamped the sentiment from the stamp set called Unbound Love onto a piece of Basic White card stock and punched it out using a 2 1/2″ Circle Punch.  I glued this behind the wreath and then onto the card.  Lastly I added one of the flowers with a Glitter Enamel Dot (retired) to the center using a Dimensional.  It took me longer to figure out where I wanted to place the flower than making the whole card.


Product List


Thoughtful Journey

Stampin Up Thoughtful Journey, Stampin Up Spotlight On Nature Dies

If you ever need to make a quick and easy card, Stampin’ Up!’s® Designer Series Paper is perfect for that!  It seems like every catalog that comes out includes this kind of paper that is just gorgeous and can be used to make a beautiful card.  Thoughtful Journey is one of them.  The designs are hand painted and just beautiful.

To make this card I used a 3.75″ x 5″ piece of this Thoughtful Journey DSP.  I colored a piece of Petal Pink and White 1/4″ Diagonal Combo Pack ribbon using a Dark Mossy Meadow Blends and then tied it around the DSP.  Then,  I adhered it to a 4″ x 5.25″ piece of Mossy Meadow and a Basic White card base.  I stamped the sentiment from the stamp set called Simply Said on Basic White card stock and cut it out using the Spotlight Of Nature Dies.  I adhered it to the card using Dimensionals.

It is so easy to make this kind of card and very beautiful.

Product List


Round We Go

Stampin Up Round We Go

Round We Go is a fun new bundle that Stampin’ Up!®  has in the 2025-2025 Annual Catalog.  The bundle includes a stamp set and some dies.  I like it because it is something different and has lots of birthday sentiments included with it.

The colors I used for this card are Peach Pie, Lemon Lolly and Lemon Lime Twist.  The first thing I did was make the rosette.  I used the new 2024-2026 InColor Designer Series Paper for this.  You have to use the die twice to make one rosette and then you glue each end together.  Now if you look closely, you will see how I messed it up but decided to use it anyway.  Here is a close up of what NOT to do:

Stampin Up Round We Go

As you can see in the photo one side has pointed ends and one side and rounded ends.  Oops. I didn’t notice it until I had already made it.  I figured no one would look too closely to notice and if they did, hopefully they will laugh.

After making the rosette, I stamped and cut out the rest of the circles and all the parts that go with them.  It was kind of fun to mix and match all the colors.  I stamped the sentiment in Peach Pie.

Product List


Leaf Collection Color Techniques

As most of you know, Buffy Cooper is my best Stampin’  buddy.  We have been friends for as long as I have been a Stampin’ Up!®  demonstrator (which is 16 years).  Buffy is very talented and has so many great ideas and techniques she uses with her cards.  These cards show a couple of techniques I learned from her.

This card technique is called Joseph’s Coat.  It is pretty simple to do but adds a real pop of color.

Stampin Up Leaf Collection, Joseph's Coat

To make the card above, I first add some color to a piece of Basic White card stock using Blending Brushes.  The colors I chose were Daffodil Delight, Granny Apple Green and a new InColor called Peach Pie.  I randomly added this ink until the entire piece of white cardstock was covered in color.

Next, I used the background stamp called Leaf Collection which is a new stamp in the Annual Catalog.  I inked it with Versamark Ink and them heat embossed it using clear embossing powder.  Next, I took a Memento Black ink pad and wiped black ink over the top.  The ink just sticks to the card stock that did not have an embossed image on it.  When you are done, then you just wipe off the black ink from the embossed leaves.

The sentiment I used was from the stamp set called Simply Said.  I cut it out using two dies from a new die set called Unbound Love.  I love how the two dies fit together.  I added some Daffodil Delight Ribbon (retired) and adhered it to a piece of Daffodil Delight card stock and a Granny Apple Green card base.

This next card, I did the opposite of the first card.  I stamped the leaves in Versamark Ink and embossed them with clear embossing powder on a piece of Basic White card stock.  Then I added Bubble Bath, Petunia Pop and Berry Burst ink using Blending Brushes over the top.  Doing it this way, left the leaves white.  I am sure there is a name for this but I don’t know what it is.

The sentiment is from the stamp set called Unbound Love which I cut out using the coordinating die set.  I added a piece of 1/4″ Diagonal Trim Combo Pack ribbon in white.

Which technique do you like best?

Product List

Celebration Streamers

The Greetery Celebration Streamers

This morning I was going for my daily walk.  I have to cut through a field to get to the neighborhood where I walk.  I looked down (because you have to when walking through this field since a lot of people walk their dogs there) and saw this tiny little baby bird just sitting there.

I figured it fell out of the nest.  I picked him up (which I probably should not have but couldn’t help it) and he sat on my fingers for quite a while.  I was looking in the tree to see if I could see the nest and if it was reachable but I didn’t see anything.  I thought about bringing him home since we have multiple bird feeders in our yard but our neighbors have cats so I was afraid to do that.  I started to put him down to see what he would do and off he flew!  He was pretty cute though!

I made this card using some new products from The Greetery called Celebration Streamers.  It is a bundle and includes stamps, stencils, dies, and hot foil plates.  I stamped the streamers with Bubble Bath ink and then used the two stencils with Berry Burst ink.  Then I added the confetti using a hot foil plate and Gold Foil. I stamped the sentiment in Versamark Ink and heat set gold embossing powder.

Around The Bend Fun Fold

Stampin Up Around The Bend

You know I always love a fun fold card and the other day I saw one by Cindy Lee Bee Designs that I thought was very cute and clever so I decided to try it for myself.  This card is a fun fold because when you open it, the punched out sentiment is attached to the inside of the card.

Stampin Up Around The Bend, Stampin Up Heartfelt Hexagon

I used a 11″ x 4.25″ piece of Crumb Cake card stock and folded it in half for the outside of the card.  The inside is a 9.5″ x 4″ piece of Basic White card stock that is scored at 5.25″ and 7 3/8″.  I adhered the white piece inside of the card base in order to get the positioning of the punched sentiment.

For the outside of the card, I first cut a 2″ x 5.5″ piece of Perennial Lavender Designer Series Paper on a Crumb Cake card base.  Then I added 2 1/4″ strip of Highland Heather card stock to each side of the DSP.  I estimated where the punched out sentiment will attach to the inside piece and used the Heartfelt Hexagon to punch out the hole on the card front.  I stamped the outline from the Heartfelt Hexagon stamp set and the sentiment in Highland Heather ink from the Simply Said stamp set (which is a new set coming out on May 1st) and punched it out using the Heartfelt Hexagon punch.  I added adhesive to the right side of the punched piece, closed the card and centered it in punched hole.  This way it adhered to the inside piece but lined up perfectly with the outside.

After this, I die cut all the flowers and leaves from the Around The Bend die set in Gorgeous Grape, Highland Heather, Lemon Lolly and Shy Shamrock card stock and adhered them around the punched hole being careful not to get any adhesive on the punched piece.  I used a retired die set called Balloon Pop Up Dies for the balloon on the inside of the card.  The inside sentiment is from the stamp set called Layering Leaves.

The links below include everything but the new Simply Said stamp set because it is not available until May 1st.

Product List


Seaside Wishes Sneak Peek

Stampin Up Seaside Wishes

As I am sure you know, the new 2024-2025 Annual Stampin’ Up!®  catalog will be live on May 1st.  I am also sure you have heard that the new catalog has a bit different set up than previous catalogs.  It takes a while to get used to the new format.  In spite of this, it is filled with amazing products.  As a demonstrator I was able to purchase a limited selection of products from it.

One of them was a bundle called Seaside Wishes.  I knew I had to purchase this set because of the sand dollars that are included in it.  Here is why:

Every year Rob and I are able to go to the Florida west coast and every year I come home with lots and lots of sand dollars.  I love them and it is fun to collect them. Rob thinks I have more than I need but you always need more shells and more sand dollars, don’t you think?

The Seaside Wishes Bundle is in the new catalog.  It includes a stamp set, a hybrid embossing folder and dies.  A hybrid embossing folder can work like a normal embossing folder but it also comes with a large die where you can ink, emboss and cut at the same time.  To do this, I added some a new color called Basic Beige ink by tapping the ink pad directly onto the embossing folder.  You can also use a brayer if you have one.  Then you lay the die down on the folder.  It fits perfectly around the sand dollars.  Then you lay the card stock (I used Basic Beige) on top and run it through your Cut & Emboss machine.  As you can see by the photo, the sand dollars have ink on them, are embossed and cut into separate pieces.  So much fun!

I also used a new Designer Series Paper pack called Country Woods.  It is a great pattern for background.  I layered it onto a piece of Basic Gray card. stock and a Basic White card base.  I stamped the sentiment in Basic Gray ink.  Lastly, I added some Pebbles Enamel Shapes (retired).

I have a long list of products I will be ordering from this catalog and am looking forward to May 1st!  I am sorry I can not post links to the new products because they aren’ available yet.