Showing posts with label Copic. Show all posts

Sunday, January 4, 2015

Mom's Lilacs

Good morning everyone.  It's been a while since I've posted anything!  Today I'm playing along with the JustRite Papercraft January release.  Today's set holds a special meaning for me.  It's called Lilac Blossoms.  Lilacs were one of my mom's favorite flowers.  I have a lilac bush in my yard that comes from my great grandfather's old homestead.  I love lilacs and they smell amazing!!

I began my card by using Spellbinders 5 x 7 Reflective Moment die then I added lots and lots of purple pearls.

Next I stamped the larger Lilac Blossom stamp onto the matching Lilac Blossom SVG cut file (awesome!) and colored them using Copic markers.  This was placed onto a rectangle piece stamped using Script Background stamp.  To finish off my card I added a "Mom" tag in honor of my mom who passed away 1 year ago January 8th.  Every time I look at this card I will be reminded of her.

Here are the other JustRite designers also showing some beautiful projects today using Lilac Blossoms and Script Background.  Be sure to check them out!


ENABLER ALERT -   Notice the amazing sale going on at JustRite Papercraft this week - time to do some after-Christmas shopping!!


Thanks for stopping in for a visit today.  I'll be back tomorrow with another January release project.

Have a great day!

Supplies:

Stamps:  JustRite Papercraft - Lilac Blossoms, Script Background


SVG Cut Files - Lilac Blossoms

Misc - Copic markers

Wednesday, November 5, 2014

Get Well Soon


Good morning everyone.  Welcome to another great JustRite Papercraft release.  Today's release set is called Sentimental Flowers.  This set has some really gorgeous floral stamps!  And the best thing about this set is that it has a matching SVG cut file to help make some amazing cards/projects.


My card begins with a base using the Modern Lattice Background, stamped with Versamark and heat embossed with clear embossing powder.  Next I used the baby wipe technique and randomly applied Faber Castel Gelatos giving the beautiful shades of orange and yellow.

The sentiment was stamped onto the matching SVG cut file ( I love cut files!!)  The small flowers were stamped directly onto the strip of cardstock and colored with Copics.  The larger flower was stamped onto the matching SVG cut file and colored with Copics.  All of these are included in the Sentimental Flowers set.

Here are the other JustRite Papercraft designers also showing some amazing projects using Sentimental Flowers.


Thanks for stopping in for a visit today.  Be sure to check back tomorrow for another release set card.

Have a great day!

Supplies:

Stamps:  JustRite Papercraft - Sentimental Flowers, Modern Lattice Background

SVG files:  JustRite Papercraft Sentimental Flowers

Misc:  Faber Castel Gelatos

Friday, March 7, 2014

You Are Loved.....

Good morning everyone.  Today is the 3rd day of JustRite Papercraft's March releases.  Today's beautiful set is called Magnolia Vintage Labels Seven.

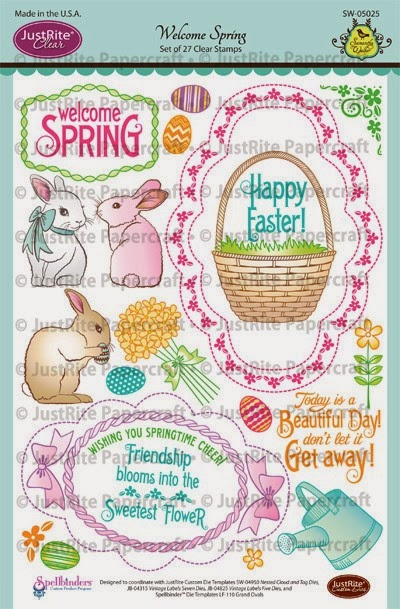
The image is included in Magnolia Vintage Labels Seven, colored with Copics and diecut with Spellbinders Classic Ovals.  Next I added a peach mat diecut using Spellbinders Lacey Ovals.  The corner embellishment is included in Welcome Spring Clear Stamp set and diecut using JustRite Papercraft Nested Cloud and Tag die.  The beautiful sentiment is included in Welcome Spring Clear Stamp set and diecut using JustRite Papercraft Vintage Sentiment Tag.


Here's a look at the stamps that I used to create this beautiful card.  As an added bonus, Magnolia Vintage Labels Seven also has a matching SVG file!!


Here is the list of JustRite designers also showing some beautiful projects using Magnolia Vintage Labels Seven clear stamps


Thanks for stopping in for a visit today.  Be sure to come back tomorrow for more great March release projects!

Supplies:

Stamps:  JustRite Papercraft - Magnolia Vintage Labels Seven, Welcome Spring

Dies:  JustRite Papercraft - Nested Cloud and Tag, Vintage Sentiment Tag, Spellbinders Classic Ovals, Lacey Ovals

Monday, November 4, 2013

Happy Birthday - Shoes Vintage Labels Six Cling Stamps


Good morning everyone.  Welcome to Day 1 of the JustRite Papercraft November release.  Today's release set is called "Shoes Vintage Labels Six Cling Stamps".  This set is perfect for the shoe lover out there but there are also parts of this set perfect for non-shoe lovers.  My card is an example of a non-shoe lover.

My card base is 5" x 5".  I chose the beautiful bouquet included in the Shoes Vintage Labels Six Cling set, colored with copics.  The silver frame is also included in Shoes Vintage Labels Six Cling set which I heat embossed with silver embossing powder.  Next I diecut it using JustRite Papercraft's Vintage Labels Six die and handcut the center oval.  I placed the bouquet image under the frame and adhered it using pop dots.


The sentiment is from "Birthday Wishes For You Clear set", stamped onto Vintage Labels Two diecut.  The beautiful corner piece was diecut using Spellbinders Filigree Corner die.  To finish my card I added a beautiful bow using some ivory seam binding from Sharon Johnson's Stamp Simply Ribbon Store.


Here are the other JustRite designers also showing some beautiful projects today using Shoes Vintage Labels Six Cling Stamps.  Be sure to check them out.

JustRite Inspiration
Debbie Olson
Darsie Bruno
Kristi Schurr
Michele Kovack
Marisa Job
Angela Barkhouse
Kazan Clark
Kathy Jones
Sheri Holt
Barb Schram
Eva Dobilas

I'll be back tomorrow for another November release project.

Have a great day!!

Supplies:

Stamps:  JustRite Papercraft - Shoes Vintage Labels Six Cling Stamps, Birthday Wishes For You Clear Stamps

Dies:  JustRite Papercraft - Vintage Labels Six, Vintage Labels Two, Spellbinders Filigree Corner

Ribbon:  Sharon Johnson's Stamp Simply Ribbon Store

Wednesday, May 12, 2010

Another Teacher Basket

Good Morning everyone.  Today I have another Teacher's Basket.  You can check out the others that I made last week here:
For this basket I chose a designer center and border from the Breath Of Spring set by JustRite, colored with Copics and diecut with Spellbinders Ovals and Scallop Ovals.
I still have a few more of these baskets to make before the end of the school year.  I like to show my appreciation for the great teachers that are at Emily's school.  They deserve recognition because there is NO WAY that I could do what they do.

Thanks for stopping in for a visit today.  Have a great day!

Supplies:

Stamps:  JustRite Stampers - Breath Of Spring Centers and Borders

Paper:  A2Z What's New Club, DCWV cardstock

Ink:  Memento Rich Cocoa, Copic Markers (E01, Y17, G24, YR16, Y13, Y0000, G00, G12, B21)

Accessories:  Spellbinders Classic Ovals & Scallop Ovals Nestabilities

Monday, January 11, 2010

Wild Roses

Good Monday morning everyone. I hope everyone had a wonderful weekend. This week over at the JustRite Stampers blog, they are having sneak peaks at their new releases coming out January 20. These new stamp sets are beautiful. The florals just make me wish for Spring even more!!!


I chose the Wild Roses center because I love wild roses as does my grandmother. She has a beautiful bush right next to her house. It smells sooo nice!!


My card base is 7" x 5" with 1/2 of it embossed using the Cuttlebug Swiss Dots embossing folder. The cardstock & Baby Lace paper is separated by pink/white striped ribbon.


My focal point are these beautiful wild roses. I stamped the center & border separately onto Neenah white cardstock using Memento Rich Cocoa for the center & Memento Bamboo Leaves for the border. These images are very easy to color using my Copic Markers. I am fairly new to coloring but I think they came out really nice. Of course, it is easy to color when you start out with a nice image
I diecut each layer using the Spellbinders Classic Circle Nestabilities and applied popdot between each layer to give it some lift. I also applied light pink chalk around the edges of my center image to help "frame" it.

Below are the beautiful images that come in this set. If you think these images are beautiful, be sure to check out the JustRite Stampers blog throughout this week for more sneak peaks of upcoming releases.


The JustRite design team will also be having different sneak peaks throughout this week so be sure to check out their blogs. The inspiration will totally amaze you.

Supplies:

Stamps: JustRite Stampers - Plant A Little Love Centers & Borders, 3 1/4" wood stamper

Paper: Creative Imaginations Baby Lace, DCWV

Ink: Memento Bamboo Leaves, Memento Rich Cocoa, Copic markers (YG07, YG09, Y19, Y17, RV3, RV34, R85, colorless blender)

Accessories: Spellbinders Classic Circle Nestabilities, Kaiser Rhinestones, ribbon, popdots, Pebbles Inc Pearlescent chalk, Cuttlebug Swiss Dots embossing folder

Thursday, August 20, 2009

Cheer Up


I am not ready for summer to be over. I enjoy the warm weather and watching my flowers grow. My daughter always grows a "fort" of sunflowers in our garden to hide in but this year the sunflowers did not grow well at all. It may be due to the fact that we had rain almost every day in July!! So my card today is of sunflowers since I could not enjoy them outside.

I tried my hand at the "wiper card" that was focused on Splitcoaststampers. The instructions were very easy to follow and the video that Beate made was outstanding. I didn't have any trouble at all doing my card.

My card base is Worldwin Desert Dune as well as my fence which was made using the Martha Stewart Picket Fence border punch. My green mat is Antique Green polished stone from Murdock Country Creations. I diecut the yellow & tan mats using the Spellbinders Long Classic Scallop Rectangles.

My sunflower image is stamped onto Neenah white cardstock using Memento Rich Cocoa ink. Then I colored them using my Copic Markers. This image is diecut using the Spellbinders Long Classic Rectangles. I added Lavender Stickles to my purple flowers for extra bling.

For my "wiper" portion of the card I used the Tiny Words Set from JustRite Stampers. The image was stamped onto ivory cardstock using Versamagic Pumpkin Spice ink. I also added Lavender Stickles around the outer edge of my border. The mats were cut using SU circle punches.
For the 2 side panels, I added more of the Antique Green polished stone and then added purple cardstock which had been put through my Big Shot using the Cuttlebug Bloom Dots embossing folder. I added a few Prima flowers and more Lavender Stickles to add some dimension to my side panels.

Thanks for stopping in for a visit today. I hope everyone is enjoying the last days of summer.

Supplies:

Stamps: Anita's sunflower stamp, JustRite Stampers Tiny Words set

Paper: Worldwin Desert Dune, Murdock Country Creations Antique Green polished stone

Ink: Versamagic Pumpkin Spice, Memento Rich Cocoa, Copic markers (E29, Y19, V15, G24, E17, Y17, V12, blender pen)

Accessories: Spellbinders Long Classic & Scallop Rectangles, SU circle punches, Stickles, Prima flowers, Pebbles Inc chalk, pop dots, Cuttlebug Bloom Dots embossing folder, MS Picket Fence border punch,

Monday, August 10, 2009

Friends & Happiness


I am back from a wonderful weekend with my family. Friends of ours have a camp on Moosehead Lake in Greenville, Maine. It is very peaceful there, no phones, no tv, no computer, no running water. It is nice but I was happy to come home after 3 days.
Here are a few photos from our weekend:


Now that I am back home, it is time to play. I am playing along with the "Try A New Technique" on Splitcoaststampers. It is to create a tri-fold Pocket Card. You can get all of the great instructions to make one yourself here.


After I assembled my card it was time to embellish (which happens to be the fun part). I decided to make a belly band for my card. To do this, I cut a piece of my pattered paper 1 1/2" wide by 7" and scored appropriately. Next I used the designer center from the JustRite Stampers new Friendship Set. I colored the image with my Copic markers. Then I diecut the center using the Spellbinders Classic Circles and used Scallop Circles for the mats. Each layer has pop dots between to give lots of dimension. Then I attached it to my belly band. I chalked around the edge and in the center of my stamped image to add more color.


To decorate the card, I randomly stamped a flower from the Autumn Leaves Flower stamp set using Versamagic Pumpkin Spice ink. I added Lavender Stickles to the centers for extra bling.


The puffy butterflies are leftovers from my stash. I added Tiara Stickles for stringers behind my butterflies.

The corner puffy stickers and puffy heart stickers are also from my stash.


The "Friendship and happiness" on my pockets are also from the Friendship Set by JustRite Stampers. It is a border that I diecut into half circles using my Spellbinders Classic Circle Nestabilities.


This was a fun project to assemble. I'm sure to make more of these in the future.


Thanks for stopping in for a visit today.


Supplies:

Stamps: JustRite Stampers - Friendship set, 3 1/4" wood stamper, Autumn Leaves

Paper: DCWV Posies Glitter Print, Plum cardstock, Worldwin cardstock

Ink: Versamagic Pumpkin Spice, Purple Hydrangea, Copic markers (B02, B14, G24, G07, V17, BV01, Y19)

Accessories: Spellbinders Classic Circles & Scallop Circles Nestabilities, Stickles (Tiara & Lavender), misc ribbon, misc puffy stickers, pop dots, SU Large oval punch, Pebbles, Inc Pearlescent chalk


Friday, July 31, 2009

Thinking Of You


Today I am playing along with Sharon Johnson's Stamp Simply Challenge which is to use lace in your project. These challenges are so much fun to play along with. Sharon really gets you thinking. Check it out here:


For this card I chose the center from the new Thinking of You set from JustRite Stampers. This set has lots of nice borders & centers that can be used for any occasion.


I stamped my image onto Neenah white cardstock using Memento Black Tuxedo. Then I colored the flowers with Copic Markers. I used the Spellbinders Labels Four to diecut the image as well as the blue mat. I think the Labels Four has become my favorite set. To add a bit of "pop" to my image, I chalked the edges with blue pearlescent chalk by Pepples, Inc. Each layer is adhered to the next using pop dots for extra dimension.
The bottom portion of my card has a layer of blue/brown polka dot paper from DCWV. Then I added my wide lace from Offray. To add a bit of color, I chose yellow polka dot ribbon to lay through the middle of my lace. The flowers are from Creative Impressions and I added some Kaiser pearls to the centers.
Now as I was looking at my "finished" card, the little voice in the back of my head (thanks Kellie) said to always do 1 more step. That is when I decided to add Kaiser rhinestones to the top and bottom edges of the lace.
Thanks for stopping in for a visit. Be sure to check back sometime over the weekend because I will be having blog candy to celebrate my first week as a blogger.
Supplies:


Stamps: JustRite Stampers - Thinking of You Borders & Centers, 2 1/4" x 3 1/16" wood stamper

Paper: DCWV Blossoms & Butterflies Stack, DCWV blue cardstock

Ink: Memento Black Tuxedo, copic markers (B02, B04, G09, Y08), Versamagic Ocean Depth

Accessories: Spellbinders Labels Four, Offray lace, Kaiser pearls & rhinestones, Pepples Inc chalk, Creative Impressions blossoms, pop dots, misc ribbon

Tuesday, July 28, 2009

Autumn Blessings Basket


I had the pleasure of being the guest blogger on JustRite Stampers yesterday. Kellie is at the CHA show in Orlando and I am stuck at home. So I have been busy creating projects to post on my new blog.
I made this Autumn Blessings Basket for Sharon Johnson's Stamp Simply Challenge . The challenge was to use fruit in your project. I am having so much fun playing along with Sharon's challenges. She really gets me thinking. Thanks Sharon!!


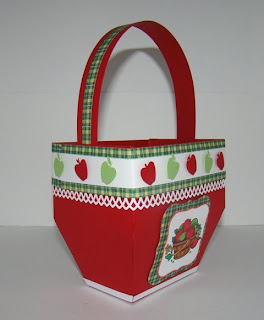
To make this basket, I started with a wonderful template by Lauren Meader called My Timeless Templates Pack a Picnic which can be purchased at Papertrey Ink. All you have to do is download the template and instructions, print them onto cardstock of your choice, cut them out and assemble. The instructions are very easy to follow. Lauren also has a great blog which is full of inspiration. You can find it here.


I made the top rim of the basket by using the Martha Stewart Arch Lattice border punch, Then I cut strips of Kelly Green/Yellow Plaid paper (Hot off the Press) and adhered them to the top and bottom edge of the rim. The green & red apples are cut using my Cricut Expression and the Makin' The Grade cartridge. Each apple is popdotted to give some dimension. I also cut a strip of the Kelly Green/yellow Plaid paper and adhered it to the basket handle.


Next, I chose the apple basket stamp from the new Autumn Blessings Borders & Centers set by JustRite Stampers. This set is full of great colorable images. I am fairly new to this coloring thing (I never was much of a colorer even when I was little). I am beginning to enjoy it though since I purchased some Copic markers. These markers don't leave start/stop lines when you are coloring. I stamped the image onto Neenah white cardstock using Memento Black Tuxedo ink. Then I colored the image with my Copics. I diecut the stamped image using Spellbinders Labels One and diecut a mat from the Kelly Green/Yellow Plaid paper. Each layer has popdots to give some dimension.


To finish off the basket, I cut narrow strips of white cardstock and adhered them to the bottom edges of the basket.


Thanks for stopping by today. Have a great day!!!!


Supplies:


Stamps: JustRite Stampers - Autumn Blessings Borders & Centers,
2 1/4" x 3 1/16" wood stamper

Paper: Hot Off The Press - Kelly Green/Yellow Plaid
Neenah White Cardstock
Worldwin Crimson Red cardstock

Ink: Memento Black Tuxedo
Copic Markers ( Copic Markers (E29,E99,E17,R29,E33,G09,YG17)
Versamagic Red Magic

Accessories: Spellbinders Labels One, Basket Template from My Timeless Templates, MS Arch Lattice border punch, Cricut Expression & Making The Grade cartridge, pop dots

Monday, July 27, 2009

2Sketches4You challenge


This week's challenge is sponsored by JustRite Stampers. Check out the sketch and give it a try. I like following sketches because it makes coming up with a card much easier.


For my card I used the new "Friendship Borders & Centers set" from JustRite Stampers. This set has lots of nice borders & centers which can be used on a variety of cards. I stamped the center image onto Neenah white cardstock using Memento Tuxedo Black ink. The border was stamped onto white cardstock using Versamagic Spanish Olive ink.


I colored my stamped image using Copic Markers. Then I diecut each using Spellbinders Classic Circles & Petite Scalloped Circle Nestabilities. Each layer is popdotted onto my designer paper.


The designer paper that I used is the Early Bird series from Cosmo Cricket. The card base is made with DCWV cardstock.


Make sure you play along with the sketch challenge. The prize is a $100.00 gift certificate from JustRite Stampers!!!! Who couldn't use $100 worth of JustRite Stamps.


Supplies:


Stamps: JustRite Stampers "Friendship Border & Centers" set

Paper: Cosmo Cricket Early Bird - Apron Strings, Ribbon Sandwich

DCWV green cardstock

Neenah white cardstock

Ink: Memento Tuxedo Black

Versamagic Spanish Olive

Copic Markers (YG17, G00, R17, YR02, Y19, B21)

Accessories: Spellbinders Classic Circles & Petite Scallop Circle Nestabilities, popdots