These, are car ramps. Big, heavy, old, metal car ramps. I never use them. My father never used them. It is extremely unlikely that I will ever need to use them. I'm not sure why we even have them. But for some reason, I can not bring myself to get rid of them. It's one of those, "have it and not need it" vs. "need it and not have it" kind of things. But they are taking up space, and even though my father's workshop is fairly large, I seem to be obsessed with making more room in it.

I was going to try to hang these ramps up on a wall near the ceiling, so they would be out of the way. I plan to do that with a lot of stuff that I want to keep, but expect to rarely/never use. But they are too heavy for that. It would be a serious effort getting them up and down, and if they fell, they would pose a serious safety hazard to anyone under them. So then a thought occurred to me, "If I can't get them off of the floor, what if I could get double duty out of the floor space that they are taking up?" Then I thought about a video I saw about how to make a metal hammer rack.
Actually, I've seen several videos of this type,
but this was one of them, and I happened to find this picture of it to illustrate the design. Now, I don't really
need a hammer rack. I already have my hammers organized in a way that I like (sort of). OK, not really. They are in several different places around the shop, and I would like to get them all in one place. But I did make a hammer rack about a year ago, that holds most of them, and I kind of like it. But it doesn't hold my wooden mallets, or my rubber mallets, or my sledge hammers. And it takes up wall space, which is kind of at a premium.


So then I started thinking, "what if I could build a hammer rack right on top of these ramps?" I could use the ramps themselves as the frame of the rack, and make some sort of cap to go on top and which will hold the hammers. The handles would just hang down in the empty space between the ramps. It would be big enough to fit all of my hammers and mallets and they would not take up any wall space, and the rack would not take up any additional space that the ramps were not already taking up. Even better, I could set the whole thing on casters and make it mobile, which is more than I can say for the ramps as they currently are. If I ever wanted to use the ramps, all I would have to do is remove the hammers and the cap, and the ramps would be accessible.
So, the first order of business is to build a little cart base with casters that the ramps can sit on. I made it very simply out of scrap 2x4s and some plywood. The casters I used are a little light duty for this, but they were already on hand. The 2x4s are glued and pegged through with oak dowels (I did't trust screws going into end grain), and I cut a rabbet on all four sides to recess a 3/8in. plywood bottom. The bottom is glued and pin nailed, and also screwed for extra strength.
The casters are the kind that have a post on top that goes up into the leg of the chair, or whatever, so all I had to do was drill out a hole in the 2x4 for the post to fit into. I added a little screw wax to the posts to lubricate them. For my original idea, they would have been plenty strong enough, but as I build, I keep coming up with other ideas of what I could hang on this make shift cart, so now, I kind of wish they were a little heavier duty.
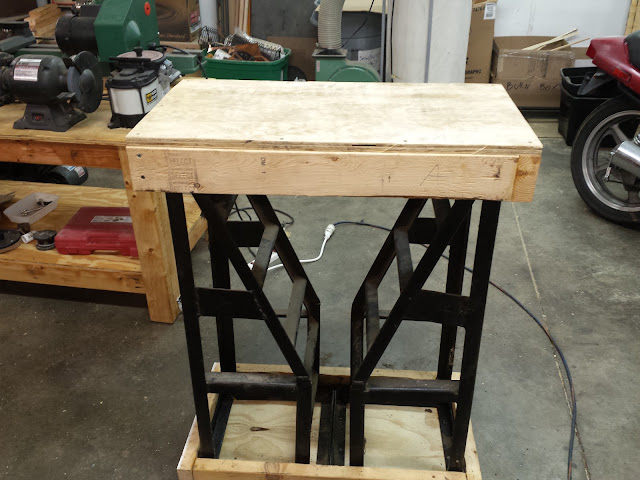
Here are the ramps positioned on the cart base. It took quite a bit of finessing with a chisel in order to get them to fit in there. I made it a tight fit, and the ramps are not very square. This was never meant to be a great piece of shop furniture. It was kind of a lark. I don't even know if I will like it or keep it. But it did seem like a good way to make some extra use out of the floor space the ramps take up.
I cut a little piece of plywood scrap to fit into one of the ramp's natural recesses, which made for a nifty little shelf. It is not fixed in place. I could easily remove it if it is in the way, or if I need to use the ramps. I might make a shelf on both sides, or I might try to fit my sledge hammers on the other side. They have long handles, so I would need the space. The ramps are also not fixed to the cart base
[they are now]. They just sit in there snugly. But I might decide to screw them down for more stability. Because they are not square, they wobble just a little. It would not be hard to remove a couple of screws if I needed to use the ramps.
Now that the base is pretty much done, I need to make the cap that will hold the hammers. Here I am roughing out the cap frame from more 2x4s. In order to prevent the issues with square that I ran into with the base, I decided to make the cap a custom fit, rather than just make it to particular dimensions. That's why the 2x4s are long on several sides in the picture below.This is a test fit, so I can find and mark the right length for each side. Those little strips of plywood along the top are just there to hold the cap at the right height. They rest on the tips of the ramps. They will not be part of the cap when it is done.

Once I am happy with the fit, I cut each side to its final length, and then I glue and screw each joint. Then, I sat and thought about how I wanted to build the hammer rack. The more I thought about it, the more I thought that I really don't like the kind of "load from the top" hammer rack in the video above. I like the one that I made, that loads from the side. I can grab each hammer by its handle and pull it straight out. Then I thought "can I just mount the one I already have to the side of the cap?" The answer was- not really. But I could build a new hammer rack, like my old one, that goes around the perimeter of the cap and that would let me put a flat top on the cap and use it to hold some other tool. The only issue that would bring up would be the robustness of the casters. Oh well, let's try it and see how it goes. If necessary, I can tear it all apart. This whole thing is made from scraps so far anyway.
I found a piece of 5/8" plywood scrap and cut it for the new cap top. It was just a hair too narrow to go from edge to edge, but this thing isn't going to win any beauty pageants, so I used it anyway. I also went ahead and drilled some holes in the bottom flange of the ramps so I could screw them down to the cart base.

I thought a little bit about what I could put on the top, and decided to mount the remaining bench grinders to it. I am a little concerned about all the vibration from the grinders, but, we'll see how it turns out. The one 8" grinder wasn't bolted down to anything (and walked all over the place) where it was sitting anyway, so it can hardly be worse than it was. In all, I mounted a very wide double ended 8" grinder with a buffing wheel on one end and a grinding wheel on the other; a regular 8" grinder with two grinding wheels; and I had enough room to squeeze one more small one on there, so I dug out a single sided one (just a motor with an arbor) that has a wire wheel attached to it. I may also change out the grinding wheel on the wide one for a brass wire wheel. These are all my dad's old grinders. The motor with the wire wheel did require me wiring a switch into the power cord, but otherwise, all they needed was bolted down.


In addition to not taking up any more room than the ramps already did (well, maybe a few more inches for the width of the caps), this configuration is also going to allow me to save some floor space. The wide grinder was mounted to a floor stand, which wobbled quite a bit because it is designed to be bolted to the floor, which it wasn't. Now I can get rid of that stand. The smaller grinder was sitting on top of the disused parts washer (where the drill press is sitting in the background), and also walked and wobbled because the parts washer has a metal top, so it couldn't be bolted down either. This gets me one step closer to eliminating the disused parts washer as well, which will free up even more floor space.
This was originally going to be a very quick and simple modification to the ramps, which could very easily and quickly be reversed if they were ever needed. Not so much any more. With the grinders on top, god help anyone who wants to lift the cap off. It probably weighs 75-80 pounds now, and that's without the hammers. And it's a tight fit. I am concerned that the casters are too light duty for all of this weight. ...Shit- I just remembered, I was going to add a washer to the posts of those casters while I had the ramps off to drill them. Damn it. Oh well, not going to tear it apart again now.
I drilled a hole in the cap top to thread down the three power cords from the mounted grinders. Then I zip tied the cables together somewhat neatly and plugged them all into a three way adapter, which I zip tied to one of the cross braces of one of the ramps. Then I selected a mid sized extension cord, of which I have an over abundance, that will remain with the cart (but can be easily unplugged and used elsewhere if need be). I made a very quick cord wrap/hanger out of a scrap of 2x4 and an old shelf bracket, which I hung from the underside of the cap. The cord coils up and hangs neatly between the two ramps. Once everything was wired up, I tested it out. The vibration is much less than I thought it would be.
Now, it's on to hanging the hammers. Just for a test, I stuck my three sledge hammers under one of the ramps. The largest one fits a little awkwardly, but it rarely gets used, so not really a problem. I'll probably just keep all three of these down here.
One thing that does concern me is that if I put hammer racks all the way around the cap, that will increase the footprint of the cart significantly. Right now it is roughly 15"x27". If I add a 4" deep hammer rack on each side, it will become 23"x35". That's quite a bit bigger of a footprint than the car ramps originally took up. Maybe I don't need to build the rack all the way around. Maybe I can get away with just one or two sides for now, and then expand it later, if I decide it is working out. I don't have enough hammers to go all the way around right now anyway.
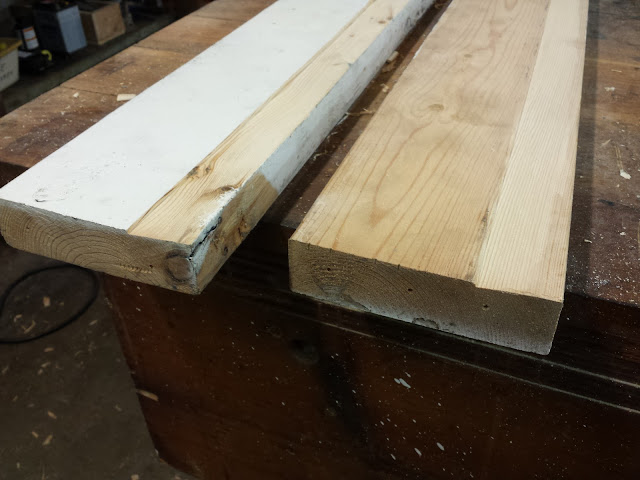
I decided to use 2x6 scraps that were left over from the wood I used to make the Roubo workbench. I will hang them horizontally under the bottom edge of the cap, which will leave 4" sticking out past the edge of the cap from which to hang the hammers. But I want a little bit of an angle to the horizontal flange, so I used the table saw, with the blade angled very slightly, to cut a slight back-bevel on the first one and a half inches of the board. This will make the leading edge of the board tilt up slightly, helping to keep the hammers seated and prevent them from walking out of their holders when the cart vibrates. I also made sure to use the natural cupping present in the boards to my advantage.

Next, I needed to cut slots into the boards to accept the hammer handles. Each slot is custom fit for a particular hammer. Each of the hammers has very different sized and shaped handles. If I just used one or two or even three universal sized slots, I would have some pretty sloppy fits. I used the slots in the old hammer rack as a template to get started, but then for most of the hammers, I just lined them up on the board and traced them with a pencil.
I made the initial cuts on the band saw, and knocked out the waste with a small chisel. I then used the chisel and a large file to refine the shape of the slot to custom fit each handle. Most just needed a slight taper or a chamfer on the top or bottom of the slot, but some of them required some odd geometry.
Because they are relatively thin pieces of cross grained soft wood, there is a risk that these fingers that stick out between the hammers could crack off if hit the wrong way. To combat this, I pre-drilled and sunk a 4" screw down the center of each one. That should give it more strength, and even if it cracks, it shouldn't fall off.
Once the board was ready, I used about a dozen 4" screws to attach it to the underside of the cap edge. I thought about gluing it also, but I may want or need to remove it at some point, so I just used a lot of screws.
I wanted to see how it was going to work out before I made the second side, so I loaded up the majority of the hammers along the front rack to get a good look at it. This was also helpful for seeing how I wanted the side rack to fit with the front rack. and how the hammers would flow around the corner.
I wanted the side rack to come out all the way to the front edge of the front rack, so I had to cut a notch in it so that it would fit. because of the tilt, they don't match up perfectly, but that's OK.
Then the process of tracing, cutting and filing the slots was repeated for the mallets that would go on the side rack. Then add the 4" screws to the fingers, and mount the board, just like the front rack.
And that's it! for now anyway. I don't have enough hammers at the moment to warrant putting up a third of fourth side right now. I have a few planishing hammers but they are in a case, and rarely if ever get used. At least until I start doing more metal work. So they can just stay in their case for now.
All told, there are
nineteen twenty-two hammers and mallets on this rack, and it could be expanded to double that.
And here it is, right back in the same corner where the car ramps were originally stored. But now it is about eight inches wider and deeper. It can be used in place, or it can be rolled out easily on casters when it needs to move, or to get to the grinder on the back side. Time will tell how the light duty casters will hold up. I may need to upgrade them at some point.
Anyone want to buy a parts washer?
.


