Meal in under 30 mins: Chicken with potatoes and peas

For my daily solo cooking and eating, I always like to cook meals in under 30 minutes, which is the practical way to do things. I only spend a longer time (approx. 1 hour) preparing and cooking when I have to cook three dishes for a family meal when my parents and brother are visiting.

Today, I cooked chicken cubes with potatoes and peas for lunch. It is a simple homely meal, but satisfying and filling.

The chicken can be cleaned, prepared and marinated after buying it and before storing it in the freezer. In this way, the flavour of the marinade has time to seep into the meat for a better outcome and a tastier meal. Also, the sauces and spices will also help to preserve your meats better, in case you are keeping the meats in the freezer for a few weeks.

Hope you try it and like it! 🙂

Chic, peas, potatoes

Chicken with potatoes and peas, served with organic ten-grain rice

Chicken with potatoes and peas
Serves 2

Ingredients:
1 chicken breast (cubed and marinated)
1 small onion (cubed)
1 large potato or 2 medium potatoes (cubed)
1 small bowl of frozen green peas
1/2 tbsp. Light soya sauce
1/2 tsp. Dark soya sauce
1 tsp. Honey
1 tsp. Cornflour
White pepper
Coarse ground black pepper (optional)
Coriander powder (optional)
Salt
Cooking oil
2 tbsp. Water

Method:

  1. Marinade the chicken breast cubes with light soya sauce, dark soya sauce, honey and cornflour. You can adjust the amounts of the sauces and cornflour to your liking. You can marinade the meat and store in the freezer for weeks, waiting for the right time to cook it, or marinade the meat half an hour before cooking.
  2. Heat up cooking oil in a non-stick frying pan and fry the potato cubes on medium heat till just cooked. You know they are cooked when you can stick a fork into them easily, or slice them with your spatula easily.
  3. Transfer potato cubes to a plate lined with a paper kitchen towel to absorb the excess oil.
  4. In the same pan (there should be some oil left), on medium heat, fry the onion cubes till they are fragrant and starting to turn translucent. Add the chicken cubes and fry them till just cooked (opaque).
  5. Add the peas and also the cooked potatoes into the pan. Add 2 tbsp. water. Stir to combine. Let the mixture simmer till peas turn a brighter green, which indicates that they are cooked. This takes a very short time.
  6. Turn the heat to low. Add a dash of coriander powder, a dash of white pepper, a pinch of coarse black pepper. Add light soya sauce, dark soya sauce and salt to taste.  You can adjust the amount of sauces and spices to your taste. If you want more sauce, you can add 1-3 tbsp. more water.
  7. Let it simmer till the sauce thickens a bit and you are satisfied that you have achieved the right flavour with the sauces.
  8. Serve hot with rice.

Some people might wonder what is the function of cornflour in the chicken marinade. Adding a starch to the marinade before stir-frying is a common practice in Chinese cuisine. The starch binds together the sauces and spices in the marinade and seals them to the meat, poultry or seafood being marinated. Adding a starch to the marinade will also help you thicken the liquid while the dish simmers, so you do not need to cook a sauce separately later.

On another note, I love spices and enjoy experimenting with them in my cooking. Different spices add different flavours to make food more appetising. Besides that, they also have their own unique nutritional and medicinal benefits as well.
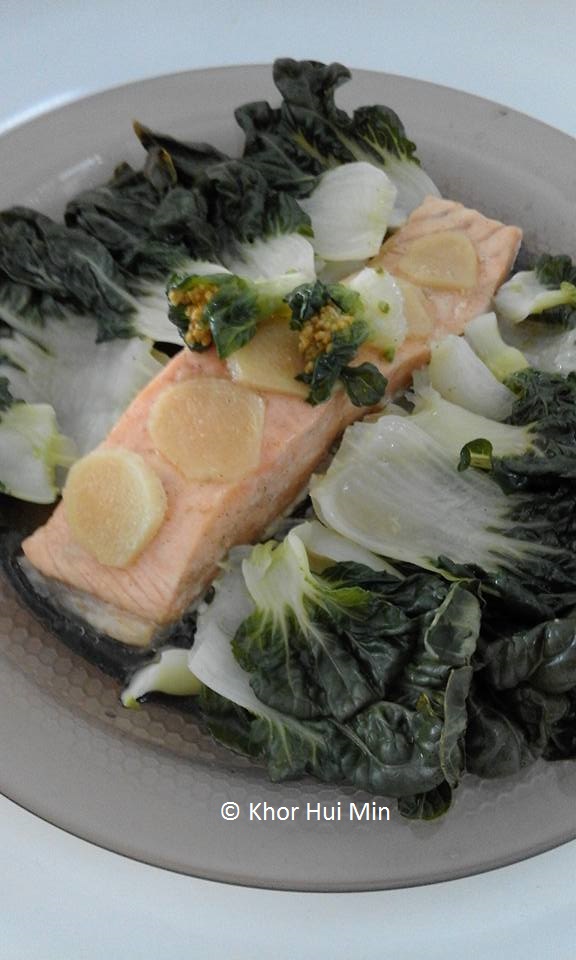
 

10 ways to cook salmon #2: Salmon Steamed in Abalone Sauce with Mini Bok Choy

Sorry, I have been very busy in the past few weeks, so I have not uploaded my salmon recipes, although I have been cooking the fillets.

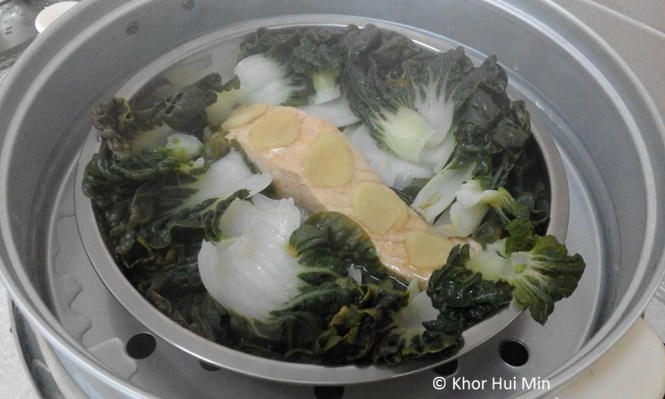
The second piece of salmon was cooked in a very different way – steaming. Steaming is a very easy and healthy way to cook food, and no cooking oil is required. All you have to do is put water in the steamer, if it is an electric one, turn it on and put the raw food in. Then, let the steamer do all the work for you. If the steamer is the non-electric traditional type, then some monitoring of the fire and water level is required.

Here is the recipe for Salmon Steamed in Abalone Sauce with Mini Bok Choy. It is a complete meal by itself. If you require something more filling, then some rice will go really well with it.

14732189_10154321375304930_4655740436891057868_n1

Salmon steamed in abalone sauce with mini bok choy

Salmon Steamed in Abalone Sauce with Mini Bok Choy

Serves 1

Preparation time: 15 mins
Cooking time: 15 mins

Ingredients:

1 piece salmon fillet (washed and marinated with pinch of salt and white pepper)
1 small bag of mini bok choy (washed, leaves separated)
1-2 inch piece of ginger (peeled and sliced thinly)
2 tbsp. abalone sauce
1 tsp. sesame seed oil
Salt or soya sauce to taste

Method:

  1. The night before, before going to sleep, take the salmon fillet out from the freezer. Season with a pinch of salt and white pepper . Give it a rub. Store in an airtight container. Put in the fridge to thaw slowly overnight. Pack bok choy and ginger slices in individual airtight containers and pack in the fridge too.
  2. In the morning, take all the ingredients out from the fridge. Arrange a row of sliced ginger on the plate. Then put the salmon fillet on top of this row. This will prevent the skin of the fish from sticking to the plate.
  3. Arrange the bok choy leaves on the left and right of the fillet, filling up the plate.
  4. Pour the tsp. of sesame seed oil on top of the fillet. Next, pour the abalone sauce on top of the fish. Arrange remaining slices of ginger on top of the fish.
  5. Turn on the steamer and put the plate in it. Once the water starts to boil and steam fogs up the transparent cover, the cooking time begins. Check your clock to make sure you know when it is time to turn off the steamer and serve the food. Do not overcook.
  6. After 15 mins, turn off the steamer and serve hot.
14717139_10154321361849930_4163568545617114842_n1

Steaming food in the steamer is very easy & very healthy


Not everyone likes sesame seed oil. If you are not a fan, you can omit it altogether, or only put a few drops.

After the dish is cooked, taste the liquid @ sauce in the plate. If you feel it is bland, you can add a pinch of salt or a few drops of light soya sauce for added flavour.

10 ways to cook salmon #1: Pan-fried salmon & potatoes with garlic & chives

I went with Nancy a week ago to NSK. With interest, I observed that she selected a frozen boneless salmon fillet, and proceeded to ask the supermarket worker to cut it for her into slices. She said it was good. Not ‘fishy’ at all (as in the fish is fresh) . I followed suit. Never try, never know. 😉

I went home and counted that I had 10 slices of salmon fillet. Hence, I hatched a plan to cook my 10 slices of salmon in 10 different ways. 😀

So, I actually endeavoured to wake up half an hour earlier in the morning a few times a week to cook my salmon lunch, so that I could bring it to the office to eat. So far, so good.

Here is my first salmon recipe, which I enjoyed very much. 😉

14502704_10154305043579930_745262104186833116_n1

Pan-fried salmon & potatoes with garlic & chives


Pan-fried salmon & potatoes with garlic & chives

Serves 1

Preparation time: 15 mins
Cooking time: 15 mins

Ingredients:

1 piece salmon fillet (washed and marinated with pinch of salt and black pepper)
1 large potato (washed, peeled, cut into thin slices)
A handful of chives (chopped)
5 pips garlic (chopped)
Salt
Black pepper
Vegetable oil
2 tbsp. butter

Method:

  1. The night before, before going to sleep, take the salmon fillet out from the freezer. Season with a pinch of salt and black pepper . Give it a rub. Store in an airtight container. Put in the fridge to thaw slowly overnight. Pack potatoes, chives and garlic in individual airtight containers and pack in the fridge too.
  2. In the morning, take all the ingredients out from the fridge. Heat up vegetable oil in a non-stick pan and turn heat down to medium. Fry potatoes till golden on both sides and cooked. The potatoes are cooked when the spatula cuts them easily. Scoop up onto a plate lined with paper kitchen towel(s).
  3. Heat up oil in the same non-stick pan on high. Pat dry the salmon fillet with a paper kitchen towel. Place salmon skin-side down in the pan. Turn heat down to medium. Cook until golden brown and crisp, which will take around 4 minutes.
  4. Pan-fry the salmon on each of the other sides till lightly browned. Remove from heat. Arrange potatoes and salmon on a plate or in your choice of lunchbox.
  5. Heat up softened butter in non-stick pan. Turn down the heat to medium. Fry garlic till golden and fragrant. Add chives and fry till they change colour to a brighter green. Season with salt and black pepper. Scoop onto the salmon and potatoes.


If you are wondering about the best ways to pan-fry salmon, you can read a very comprehensive and interesting post by Serious Eats on the subject by clicking here: The Food Lab: How to Pan-Fry Salmon Fillets

Bon appetit!

Lotus Root Soup

Last Sunday, I cooked one of my favourite Chinese soups, which is Lotus Root Soup. Normally, I like to cook it with chicken, but it can be meatless as well. The sweetness of the lotus root as well as the red dates give the soup its signature flavour.


13775527_10154095326519930_480694350260000822_n1.jpg


Lotus Root Soup

Serves: 4-6
Cooking time: 1 hour

Ingredients:

3-5 sections of Lotus root (washed and cleaned)
1 Chicken carcass and/or pieces of Chicken
10 pitted Red dates (washed and halved)
A few slender strips of Dried cuttlefish
Salt (to taste)
White pepper (to taste)
Filtered Water
Light soya sauce (optional)


Method:

  1. Scrape or peel the lotus root. Cut into thin slices.
  2. Marinade the pieces of chicken (and carcass, if you like) with the soya sauce and pepper. Set aside.
  3. Fill a pot half full of water and put on the stove. Turn on the heat on high.
  4. When the water boils, put in the carcass, red dates and dried cuttlefish. Then, lower the heat to a simmer.
  5. Check on the water level once in a while to make sure that there is still water in the pot!
  6. After half an hour, add the lotus root and chicken pieces. Let the soup simmer.
  7. After another half an hour, add salt to taste.
  8. Then, switch off the heat and scoop the soup into bowls.
  9. Serve hot with rice and your choice of dishes.

A faster version of this recipe is… do away with the carcass. No chicken carcass. You will cut the cooking time by half.

Revised method:

Cooking time: 30 mins

  1. Scrape or peel lotus root. Cut into thin slices.
  2. Marinade the pieces of chicken with the soya sauce and pepper. Set aside.
  3. Fill a pot half full of water and put on the stove. Turn on the heat on high.
  4. When the water boils, put in the chicken pieces, red dates and dried cuttlefish. Then, lower the heat to a simmer.
  5. After 15 mins, add the lotus root. Let the soup simmer.
  6. After another 15 mins, add salt to taste.
  7. Then, switch off the heat and scoop the soup into bowls.
  8. Serve hot with rice and your choice of dishes.


Pumpkin with Dried Shrimp

I love pumpkin. It is nutritious, sweet and flavourful. It is very versatile – we can stir-fry it, braise it, steam it, roast it, or boil it in a savoury soup or sweet dessert. We can also boil grated pumpkin with barley as a cooling drink, great with ice cubes on a hot day! Pumpkin can also be baked in pumpkin bread and pumpkin pie. Both are wonderfully delicious.

I cooked Pumpkin with Dried Shrimp last Sunday . Here’s the simple recipe. Hope you will like it. 🙂

13731472_10154095326499930_4766102328013484102_n1.jpg


Pumpkin with Dried Shrimp

(Serves 4-6)

Ingredients:

Half a small to medium-sized Pumpkin
A large handful of Dried shrimp
5 pips Garlic (chopped)
Salt (to taste)
Macadamia nuts (optional)
2-4 tbsp. vegetable oil


Method:

  1. Wash dried shrimp to get rid of sand and dirt. Soak them in 1 cup of water.
  2. Remove seeds from pumpkin. Cut it into wedges. Then, slice the skin off the pumpkin carefully. Cut the pumpkin into thin slices.
  3. Heat up oil in wok or non-stick pan.
  4. Remove dried shrimp from water. Reserve the water. Turn heat to medium.
  5. Fry dried shrimp until fragrant and slightly browned.
  6. Add garlic. Fry garlic until starting to turn golden around the edges.
  7. Add pumpkin. Stir, and using a spatula, bring pumpkin from bottom of wok to top, so that everything is mixed evenly. Add a pinch of salt and repeat.
  8. When pumpkin has started to turn colour, add the reserved water (used to soak shrimp). Give it a good stir. Cover wok. Turn the heat to low.
  9. Stir every 2-3 minutes. Cover again.
  10. Repeat until pumpkin has soften – a spoon can cut a slice of pumpkin relatively easily, without much resistance. Stir in macadamia nuts, if you have some.
  11. Taste to see if you need to add more salt (this is subjective). Normally, I don’t need to add any more.
  12. Scoop onto plate and serve with rice and other dishes.


Stir-fried Sweet Pea Sprouts (tao miew)

I like sweet pea sprouts a lot. They are short and cute, crunchy and sweet. In Chinese, they are called ‘tao miew’. Sweet pea sprouts are best eaten stir-fried with garlic, so that the sweetness of the vegetables shines through. I cooked this dish last Sunday, at a newly set up home for old folks, single mothers and underprivileged/abandoned/orphaned children. Besides this dish, I also cooked black pepper & honey chicken, as well as mini bok choy with ginger and garlic.

If you haven’t tried sweet pea sprouts before, you should try this simple recipe. 🙂

13716105_10154080900819930_4911468599014209532_n1.jpg


Stir-fried Sweet Pea Sprouts

Ingredients:

Sweet pea sprouts
2-4 pips of garlic (chopped)
Salt (to taste)
2 tbsp. Vegetable stock (optional)
2 tbsp. Vegetable oil
1 inch piece of red chilli (chopped) (optional)
Method:

  1. Heat up the wok or pan. Fry garlic till fragrant.
  2. Sprinkle 1 pinch of salt over the garlic. Stir.
  3. Lower the heat to medium. Add the sweet pea sprouts. With spatula, constantly scoop the sprouts from below to the top, so that they cook evenly.
  4. When the leaves of the sprouts become a darker shade of green, add vegetable stock, and salt to taste. When the stock is bubbling and the stalks are a little wilted, the dish is ready.
  5. Scoop onto dish and serve hot with rice and other dishes. Sprinkle the chopped chilli on top as a garnish if you like a bit of zing.


#atozchallenge: Growing mushrooms

Today, I would like to share with you my edible garden project – growing mushrooms. No, I did not grow mushrooms on logs or wooden stumps. I grew them from a mushroom kit a friend gave me. It is fun, safe and hygienic.

G for Growing Mushrooms

Firstly, we have to make a cross on the cylindrical bag from the kit with a sharp knife. The lines of the cross should be 5 cm long, roughly the length of your index finger, but use a ruler just to be sure.

Then, we place the bag in a cool and shady (or dark) place. Fill up a spray bottle with water. Spray some water on the opened cross twice a day. If the conditions are right, mushrooms will start to sprout after a week.

Mine was an oyster mushroom kit. You can see how I grew my mushrooms by looking at the following slideshow. However, the photos were taken with my old mobile phone, so they are not the greatest photos. Sorry about that. 😉

This slideshow requires JavaScript.


Pan-fried herb & butter dory fillet

You might be wondering why I have been cooking dory a lot lately. Well, since I bought a bag of frozen dory fillets, and there are four to six fillets in a bag depending on their size and collective weight, I still have a few more to cook. 🙂

For yesterday’s dinner, I prepared herb and butter fillet, with a two-ingredient tomato and cottage cheese salad on the side. It is fuss-free, and best of all, ready in under 30 minutes. Here are the recipes. 😀

Pan-fried herb & butter dory fillet

Front: Pan-fried herb and dory fillet. Back: Tomato and cottage cheese salad.

Pan-fried herb and butter dory fillet
Serves 2

Ingredients:

2 dory fillets
2 tbsp. of butter
Assorted dried herbs (basil, oregano, thyme, marjoram, sage & rosemary)
Salt
Black pepper

Method:

  1. Melt the butter in a non-stick pan. Use medium-low heat and be careful not to burn it.
  2. Pat the dory fillets dry with kitchen towels. For each side, sprinkle salt, black pepper and the assorted herbs. Then, give the fillets a light rub to coat them evenly.
  3. When the butter has (mostly) melted, place the fillets carefully in the pan. Cook the fish on medium-low heat, with the pan covered. Cook for five minutes or until the fish has turned from translucent to white.
  4. Carefully turn the fish over, and try to coat it with the melted butter. Cover the pan again. Cook for about 5 minutes more. Fish is done when it has turned white, and flakes with a fork.
  5. Serve hot with your choice of side dish.
  6. Do not discard the melted butter that is still in the pan. Now comes the fun part… (please continue to the side dish recipe below)


Tomato and cottage cheese salad

Ingredients:

2 medium ripe tomatoes (cut into cubes or chunks)
Cottage cheese (crumbled)

Method:

  1. Leave the remaining melted butter in the pan, from the fish dish above. It has been infused with herbs and liquid from the fillets.
  2. Turn off the fire and take the pan off the stove.
  3. Put all the cut tomatoes into the pan and coat evenly with the liquid. The tomatoes will be infused with the herbs and sauce.
  4. Scoop out onto the serving dish and sprinkle the crumbled cottage cheese on top.

Cottage cheese might be a bit hard to find, depending on where you are, so you can substitute it with any other soft crumbly cheese, such as ricotta. In Kuala Lumpur, you can buy paneer (Indian cottage cheese) from selected shops in Brickfields and cut them into cubes for this recipe.

The cottage cheese I used in this recipe was freshly made the night before. I made it myself in my own kitchen. 🙂

If you are making the tomato and cottage cheese salad on its own, you can season it with olive oil and basil. Either dried basil or fresh is fine, but fresh basil will give the dish a nice green colour – red, white and green is a nice colour combination and will brighten up any dinner party or picnic lunch.


Pan-fried dory with balsamic vinegar & thyme

I decided to experiment with dory yesterday, and was delighted with the result. Along with the dory fillet, I also prepared a two-ingredient potato side dish and a two-ingredient broccoli side dish. All in all, my dinner took approximately only 30 minutes to prepare.

I wanted to try cooking fish with balsamic vinegar, but at the same time, incorporating another dimension of flavour by adding brown sugar. I was satisfied with the sweet-tart outcome. 🙂

The ingredients can be adjusted to your preferences. You can use fresh thyme to replace the dried variety, if available. If you want a less acidic taste, go easy on the balsamic vinegar. If you want to cut down on sugar, put less brown sugar. You just need a hint of the unique fragrant taste of molasses in the dish. The result is a pan-fried fillet with an attractive brown glaze.

fish2

Pan-fried dory with balsamic vinegar and thyme. Served with potato slices with yogurt and buttered broccoli.

Pan-fried dory with balsamic vinegar & thyme
Serves 2

Ingredients:
2 dory fillets (thawed)
A dash or two of balsamic vinegar
2 tsp. brown sugar
2 tsp. of dried thyme
Black pepper
Salt
2 tbsp. vegetable oil

Method:

  1. Heat up some vegetable oil in a non-stick pan.
  2. Pat the dory fillets dry with kitchen towels. For each side, sprinkle salt, black pepper and thyme. Then sprinkle the brown sugar on the fish. Give the fillets a rub to coat them evenly. Then splash some balsamic vinegar and rub lightly on both sides.
  3. When the oil is hot, place the fillets carefully in the pan. Turn the heat down to medium and cover the pan. Cook for five minutes or until the underside is brown and a crust begins to form. Be careful not to burn the fillets.
  4. Carefully turn the fish over. Lower the heat to medium-low and cover the pan again. Cook for about 5 minutes more. Fish is done when it flakes with a fork.
  5. Serve hot with steaming hot rice or any side dish of your choice.

Potato slices with yogurt

Ingredients:
2 medium potatoes (peeled and sliced thinly)
4 tbsp. natural unsweetened yogurt
4 tbsp. vegetable oil

Method:

  1. Heat up the vegetable oil in a non-stick pan.
  2. When the oil is hot, fry the potato slices on medium heat. Spread them in a single layer to ensure even cooking. Then flip them over when the underside is browned. The potatoes are cooked when a spatula or fork breaks them up easily. Scoop onto a plate lined with a kitchen towel to cool. The kitchen towel will absorb the excess oil.
  3. Alternatively, a healthier cooking style is to steam the potato slices.
  4. Once the cooked potato slices have cooled down completely, mix them with the natural unsweetened yogurt. You can add salt and black pepper to taste.
  5. Chill in the fridge till it is time to serve.
  6. Sour cream can also be used to replace the yogurt for a creamier finish.
  7. For an added zing, you can add a pinch of paprika or cayenne pepper.


Buttered broccoli 

Ingredients:
A small head of broccoli (cut into florets)
A tbsp. of butter

Method:

  1. Heat up the butter in a non-stick pan on medium-low  heat. Be careful not to burn the butter. Add the broccoli to the pan and coat evenly with the butter. Turn the heat to low. Cover the pan for a minute.
  2. Once the broccoli is cooked, it turns into a brighter green.
  3. Serve hot with a main dish of your choice.
fish3

Succulent and flavourful dory fillet

These recipes are easy to prepare and cook, even after a full work day, and they are healthy too. I hope you will enjoy them as much I did. 🙂

Bon appetit!

Chicken Breasts with Cherry Tomatoes

Today, my dinner consisted of a chicken breast cooked with tomatoes, with a side dish of string beans. Many people do not like chicken breast meat because they say it is hard and dry, but I think if it is prepared well, it will not turn out that way.

Chicken breast meat is high in protein, low in fat and full of nutrients such as B vitamins, amino acids, potassium, selenium, niacin and magnesium (source: MDhealth.com). These nutrients are important to help us build and maintain our bodies. Depending on the way it is cooked, chicken breast meat can be low in calories as well (about 150 to 260 calories).

Of all of the parts of the chicken, the chicken breast is the piece that is lowest in fat, making it an ideal meat for people who observe healthy eating and anyone monitoring their fat intake. Because it contains no carbohydrates, chicken breast meat is also a good food for anyone on a no- or low-carb diet. Furthermore, boneless and skinless chicken breasts contain only small amounts of fat and the least amount of calories of any of the chicken breasts.

Here’s my recipe of the day. Try it and let me know how it goes. 🙂

Chicken Breasts with Cherry Tomatoes


Chicken Breasts with Cherry Tomatoes
Serves: 2
Time: 20 mins

Ingredients:
2 boneless, skinless chicken breasts
Salt, white pepper and black pepper to taste
2 tablespoons olive oil
1 medium onion (finely chopped)
3 pips garlic (finely chopped)
2 tsp. fresh tarragon or 1 tsp. dried
6 tbsp. tomato puree
1 tsp. Worcester sauce (also known as Worcestershire sauce)
2 tsp. balsamic vinegar
2 tsp. sugar *
10 cherry tomatoes (cut into half, lengthwise)
½ cup water

Method:

  1. Defrost and wash chicken breasts. Dry on kitchen towels. Put into a plastic bag, one at a time, then pound with a meat tenderizer mallet (Google it to see what it looks like 🙂 ).
  2. Sprinkle the chicken with salt, white pepper and black pepper. Give it a rub.
  3. Heat the olive oil in a non-stick pan. Add the chicken and sauté over medium-high heat, turning them over with thongs until lightly browned. This will take about 5 mins.
  4. Add the onion and garlic around the chicken. Stir-fry briefly. Then add the tarragon, tomato puree, Worcester sauce, balsamic vinegar, sugar and water. Stir to mix well, then cover the lid to simmer at medium heat for 9 to 10 mins. Open the lid every 3 to 5 mins to stir the mixture and turn the chicken breasts.
  5. When the chicken pieces have been cooked through, add the cherry tomatoes, stir, then cover to cook for 1 min. If you like more sauce, add a bit more water when you add the cherry tomatoes and bring the sauce to a boil before serving. Season with salt and pepper to taste.
  6. Serve warm with a salad, rice or pasta.

* Note: Sugar makes the sauce less sour. But if you like it sour, you can omit the sugar.


Garlic String Beans
Side dish

Ingredients:
String beans (washed and ends removed)
Garlic (finely chopped)
Salt to taste
1 tbsp. of water
1 tbsp. olive oil

Method:

  1. Heat the olive oil in a non-stick pan. Add the garlic and sauté over medium-high heat till it starts to turn golden.
  2. Add in string beans and a pinch of salt. Sauté till the beans are cooked through, which is when they have changed to a brighter shade of green. If you want the beans to cook faster, you can add 1 tbsp. of water and cover the lid of the pan, but check frequently to make sure they are not overcooked.


After the meal, I made myself a cup of hot aromatic passionfruit and orange tea. I added a tsp. of sugar, because that’s how I like to prepare fruit teas. However, I would like to try adding stevia (a natural sweetener) to my fruit teas one day to see how it turns out. I’m always looking for healthier options. 🙂


Passionfruit and orange tea