Quickstart
This guide takes you from an empty account to your first reviewed drawing set. It should take under ten minutes, most of which is the platform doing the work.
Sign in, create a project, upload a set, add context, start a Structured review and watch the first issues arrive.
Reading this inside the app? You're already signed in, so start at step 1. Otherwise, sign in at app.getstructured.ai with your work Microsoft or Google account or your work email (see Sign-in and SSO setup). If your firm is already on Structured, you join its organization.
Open Help (top right) and choose Platform tour. It walks you through the sidebar, a project and the review tools on screen, one step at a time.
1. Find your way around
You land on All projects, your home screen.
Down the left-hand side is the sidebar:
- My Dashboard - your own page: your projects, runs and documents, your memory, labels and settings. See My Dashboard.
- Organization - your company's page: its members, teams and settings. Only organization owners see this row. See Organization page.
- All projects - this home screen.
- Requests - requests to join a team or share something, waiting on you or asked by you. See Requests & My issues.
- My issues - the issues assigned to you, across every project.
- Resources - your organization's shared library, with an Upload button. Its folders are Codes, Standards, Checklists, Workflows, Toolbar tools and Shared documents; an admin can rename them or add more. See Resources.
- Teams - each team and sub-team you belong to, with Browse teams to find others.
Files only you can see are not in the sidebar: they are on the Documents tab of My Dashboard.
Your account menu (your name) sits at the bottom of the sidebar, with the notifications bell beside it. It holds Profile, Settings (which opens My Dashboard's Settings tab) and the User Guide video clips. Top right, on every screen, are Tasks, Updates and Help.
The one thing you need right now is the Create project button. Your projects sit below it, in the All Projects, My Projects, Shared with me and Favorites tabs.
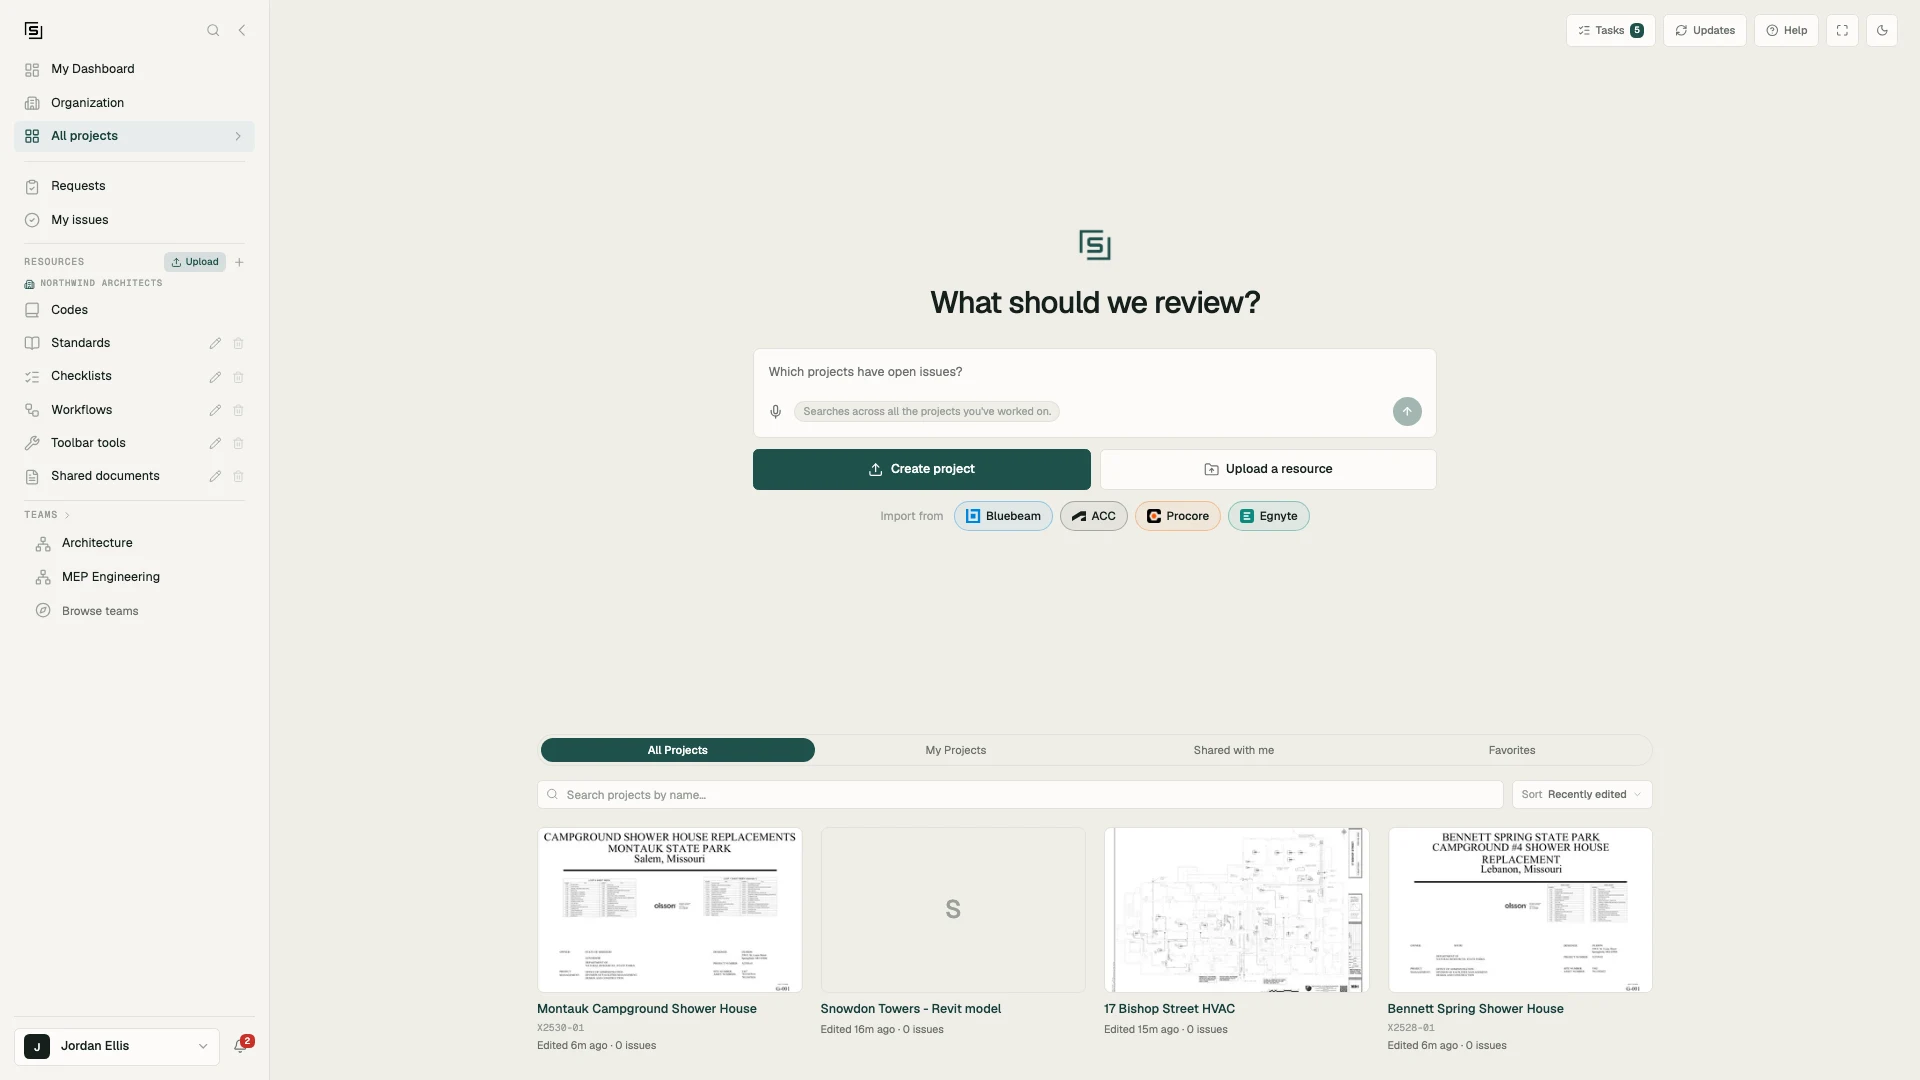
If your screen doesn't look like this, you may be on the legacy layout. See The legacy layout.
2. Upload a drawing set
Click Create project, or drop your files onto the main card (the one that asks "What should we review?"). You can also bring a project in from another tool with the Import from row under it: Bluebeam, ACC, or Procore where your organization has it turned on.
The upload opens a short wizard: Upload, Details, Ask, Open.
-
Upload - your files, with Add more files if you missed some. The platform starts reading them as soon as they land.
-
Details - what the platform read from your drawings: Project name, Disciplines, Project no., Client, Architect, Project type, Stage, Issue date, Revision, Drawing set, Location, Codes, Jurisdiction, Occupancy, Construction type, Building area and Stories. Click any value to edit it.
-
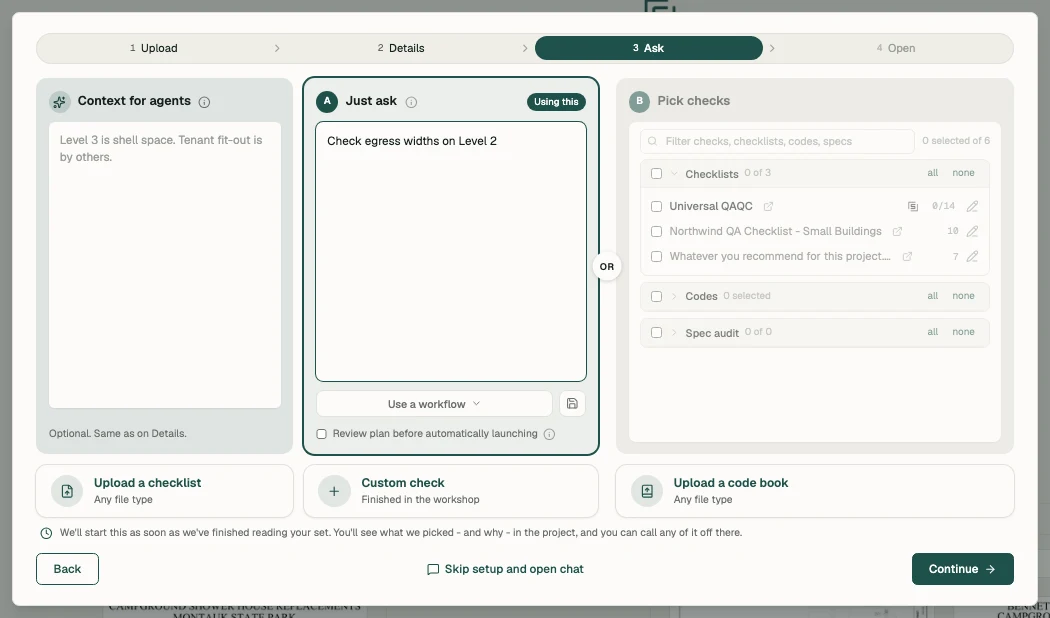
Ask - what you want done, in three columns:
- Context for agents (optional) - facts every check should take as given, such as "Level 3 is shell space. Tenant fit-out is by others."
- Just ask - write what you want checked in your own words, and the platform works out which checks and codes fit. Tick Review plan before automatically launching if you want to talk the plan through in chat before anything starts.
- Pick checks - tick the checklists, codes and spec audits yourself.
The wizard runs whichever of the two you used last; it's marked Using this. It starts as soon as the project is created. You can also skip this step and start a review from the project later.
-
Open - the project is created and opens.
New revision of an existing job? On the Details step, choose Add to an existing project and pick the project ("Add to which project?"; the likeliest match is marked Suggested). The set is added to the project you already have, so it sits alongside the previous version and you can compare them later. See Projects & uploads.
The platform processes the set page by page: it reads title blocks, detects disciplines, extracts schedules and tables, and indexes everything for search and chat. Larger sets keep processing in the background while you look around.
3. Start a review
If you didn't start a review in the wizard, open your project and select Project QAQC in the Tools panel. At the top of the panel are two ways in:
- Start Structured review - our recommended checks for this project. Press it and a small box opens under the button with an Effort slider: Standard (the default), Extra or Limitless. The line under the slider says what each level does and roughly what it costs compared with a usual review. Press Start review to run it.
- Start custom review - opens the list of checks, checklists, codes and spec audits so you can tick exactly what you want, then press Run (the button counts the items you ticked: each checklist, code book or spec audit is one item, however many of its checks you picked). The same Effort slider sits above the button when what you ticked includes Structured's own checks; your custom checklists always run as written.
Above them, Add context opens the project context box (the same facts the wizard's Context for agents column holds) and Add a resource adds a code, standard or checklist to use.
Depending on your organization, the Start Structured review box can also show an estimate and a Review plan before automatically launching tick box. A review that runs 10 minutes or more emails you when it finishes; you can turn that off on My Dashboard → Settings → Preferences ("Email me when my long-running tasks finish").
If the documents are still processing when you start, the review waits and starts on its own as soon as processing finishes. You can watch it under Tasks, top right.

4. Review the findings
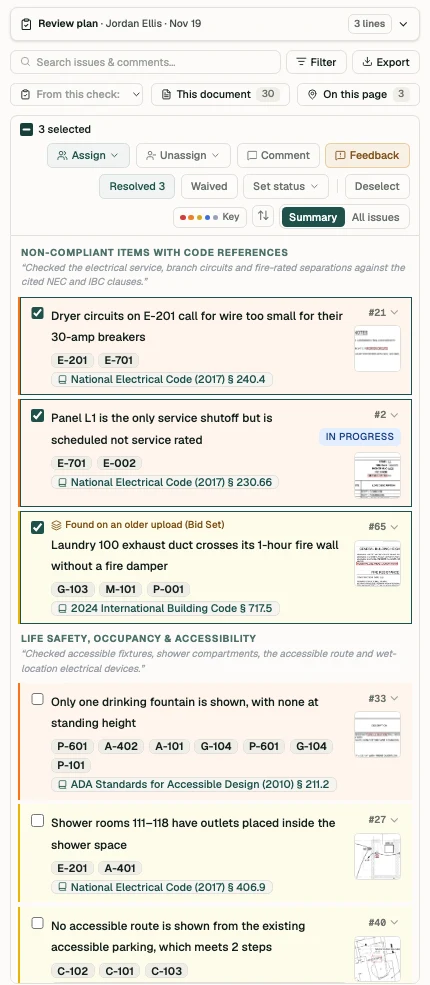
Findings land in Issues, the pinned row at the top of the Tools panel. Work through them there:
- Click any finding to jump to the exact location on the drawing.
- Resolve it, Waive it with a reason, Comment on it, or send Feedback that it wasn't a real issue.
- Assign issues to teammates; they get an email with a link straight to each one.
5. Turn it into a deliverable
When you're done triaging, export the issue list as an annotated plan set with every finding boxed and numbered, plus a formal plan-review letter. Or ask the chat to generate a written report.
Every change you and the platform make to the project, from a resolved issue to a moved file, is recorded in the project's History, where most of it can be undone. See History.
Where to next?
- Take the project workspace tour to learn the Files panel, viewer, Tools panel and chat.
- Ask the chat anything about your drawings, in plain language.
- Connect Revit or Bluebeam to work where your team already works.
Everything above is also covered by short video clips in the app: Help → User Guide, or User Guide in your account menu.